How to Grow Morning Glories

Morning glories are a very popular flower for landscaping because of their intense color and fragrance. The morning glory vines give body to trellises, add rich heavenly blue color to flower beds, and add size and scope when allowed to grow over an arbor.

These beautiful flowers are a favorite among landscapers, but you may also want to consider growing them in your own garden. They’ll add another dimension to your flower beds, and neighbors will be intrigued when they see the flowers blooming on your fence or trellis.

In this article, we’ll discuss how to grow morning glories in your garden. Let’s get started!

What You Need to Know About Morning Glories

There are several things that you should know about morning glory before planting them in your garden:

Morning glory can grow up to 40 feet long.They need direct sunlight for at least six hours a day to grow properly.You should not allow morning glory to over-saturate the soil with water, as it can kill your plants due to root rot.Morning glory flowers that require pollination to produce the next round of flowers.If you are planting morning glories in an area where morning glory vines are unwelcome, consider using a trellis or arbor for support.The morning glory can be invasive, so make sure it will not overwhelm other plants in your garden bed before planting them.

Image caption: https://www.gardendesign.com/

When to Plant Morning Glories

Morning glories are warm-weather flowers. It is best to plant them in early spring when the soil can be worked, and temperatures have climbed into the seventies Fahrenheit.

When you plant the heavenly blue morning glory flowers, choose an area that gets full sun during most of the day. Morning glories need at least six hours of full sun each day for best results. Ensure they get the morning sun with a very light shade to protect them from the intense afternoon sun.

Preparing Morning Glory Planting Soil

Before you plant morning glories, prepare the soil. These plants do well almost anywhere, will really appreciate neutral soil pH. If you’re a gardener, you must learn how to test the soil pH

Use a spade or tiller to loosen up the soil, which will help the roots spread out over the ground. If your garden has poor drainage because of clay or compacted dirt, consider adding organic matter like pine bark mulch to improve conditions for your flowers (pine bark is an excellent choice because it is both effective and affordable).

Germinating Morning Glory Seeds

If you are planting morning glories from seeds, the next step is to germinate them. To do this, place the seeds in a pot of moist and well drained soil and cover them with plastic wrap. Secure the plastic wrap around the pot with a rubber band or twine.

The next step is crucial to get your morning glory seeds to germinate. Place the pot in a warm area with indirect sunlight, like near a window or under a grow light. The plastic wrap will trap heat and moisture inside the pot, which will activate germination.

Germinating seeds should take about 7-14 days to sprout. Keep checking on your seeds every day or two until you see some sprouts coming out of the soil.

Once your morning glory seeds have sprouted, remove the plastic wrap and move the pot to an area that gets full sunlight every day. The hardiest plants will survive in this location, while weaker plants may die due to lack of moisture or not getting enough light.

How to Plant Morning Glories

Morning glories are planted in the spring when it is no longer frosting outside. If possible, buy bare-root plants for optimal growing conditions. Bare root plants are typically cheaper than potted ones and will give you a better yield. 

To plant morning glory, simply dig a hole about six to eight inches deep and place the plant inside. Remember to leave twice as much stem above the soil surface than below it.

Then, fill the hole with dirt and gently pat it down on top of it with your hands. Don’t pack too hard so that there are no air pockets left in the dirt. This will allow oxygen to get to the roots.

Morning Glory Planting Depth

When you’re planting morning glories, the right planting depth can make all the difference. Morning glories need to be planted at a depth of around six inches but no deeper than eight inches. If they are too deep, their growth will be stunted.

If your morning glories are too high above the ground, they will not get enough sunlight and nutrients to survive. Thinner stems and less vibrant foliage indicate that your morning glory plants aren’t receiving enough light.

Why Bigger Isn’t Always Better

It’s important to note here that bigger isn’t always better when it comes to gardening. You don’t want to plant too deep; if the stem is buried more than eight inches, it will rot, and you won’t get many flowers.

How to Care for Morning Glories

For your morning glories to thrive, you need to take really good care of them. Caring for morning glories involves watering, sunlight, fertilizer, etc.

Watering Morning Glories

Morning glories don’t like their soil to get too soggy, but that doesn’t mean you should let the ground dry out completely. Morning glories need an even supply of water throughout the growing season.

It’s easy to tell whether morning glories need more water: pick up your flowers and see if they weigh about the same. If they feel lighter, water them.

Sunlight Requirements for Morning Glories

If you are growing morning glories in an area that doesn’t get a lot of direct sunlight, consider using stakes or string to make a teepee over your plants. This will provide the extra light they need to grow.

Planting Morning Glories Near a Fence or a Wall

Planting morning glories near a fence or trellis is a great idea because it ensures that your flowers will get the support they need to grow. However, make sure you plant them far enough away from whatever will be supporting them so that their roots can spread out without being restricted.

Planting Morning Glories Near a Fence or a Wall
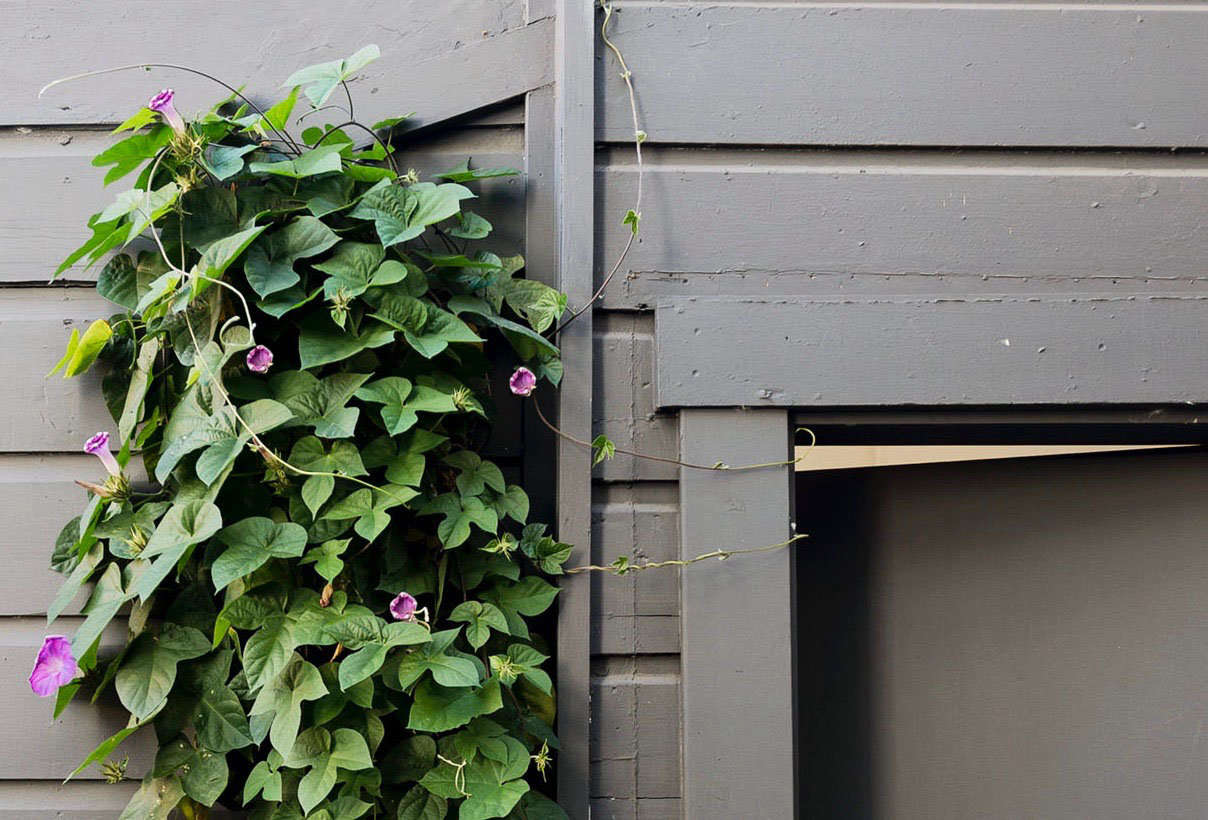
Image caption: https://cmsmedia.remodelista.com/

Morning glories climb by twining their stems around pretty much anything they can grasp. If you’re planting morning glories near a fence, make sure the fence is tall enough so that your flowers won’t be able to reach it and grow up vertically rather than along it.

How to Feed Morning Glories

Feeding your morning glories is important, but be careful not to overfeed them. Use a balanced fertilizer according to the instructions on the label and add it in early spring when you plant your morning glory flowers. This will give them enough time to absorb nutrients throughout their growing season without damaging the roots.

Pruning Morning Glories

Once your morning glories begin to flower, you can use pruning shears to cut off dead flowers and stem tips that look withered and yellow. Doing this will allow more energy in the plant to produce new blossoms rather than dying ones.

The exact timing of your pruning session depends on where you live and what type of morning glory you’re growing. If you live in a colder area, for example, wait until mid-June to prune your flowers.

Morning Glory Propagation

Many morning glory seeds are produced in seed capsules that split open to reveal the seed inside. The morning glory flower propagates extremely easily by simply growing new plants from the fallen seeds on the ground below.

However, this method can be time-consuming, and you might not want to spend your entire summer collecting morning glory seeds on the ground. If this is the case, there are other ways to ensure that you have many flowers for the summer. These ways include cuttings, layering, and division.

Morning Glory Pests and Diseases

Like other plants, morning glory is prone to pest and disease attacks. 

Pests

The most common morning glory pests are aphids, cutworms, sunflower beetles, spider mites, and thrips.

Aphids: Aphids look like tiny green bugs that come out in long lines or groups on your flowers. You can remove them by hand or spray the affected area with a strong jet of water from a hose.Cutworms: Cutworms are fat, gray caterpillars that feed on plants at the soil line. To get rid of them, simply dig a circle around your plant’s stem about an inch deep and remove any cutworms you find there.Sunflower Beetles: Sunflower beetles look like yellow ladybugs but have black spots instead of spots. They are most active during the day, so you will most likely see them on your flowers.Spider Mite: Spider mites are tiny, spider-like bugs that their fine webbing can identify on your plant’s leaves. If left untreated, they steal away nutrients from the leaves and cause them to turn yellow or brown with spots.Thrips: Thrips are tiny, black bugs that suck the juice out of your morning glories’ leaves and cause them to turn brown and crispy. They thrive in cool weather, so they usually appear during the spring and early fall.

To get rid of these pests from your morning glory vines, use an insecticide like Bon-Neem or Safer Soap or dust with diatomaceous earth.

Morning Glory Diseases

As mentioned above, morning glory vines are susceptible to the same diseases that other garden plants are. These include mildew, black spot, and rust.

Mildew: Mildew is caused by fungi that infect your flowers at damp times of the year. It appears as white powdery patches on the leaves and stems of your morning glories.Black Spot: Black spot looks like black dots all over the surfaces of your morning glory flower and leaves. It is caused by fungus gnats that create tiny holes in leaves where they lay their eggs for new fungus to grow.Rust: Rust is another fungal disease that appears as rusty, orange spores on your morning glory leaves.

To get rid of these diseases, switch to a fungicide or pesticide labelled for use against each specific disease you have in your garden. For example, Daconil will treat rust and powdery mildew, while Bon-Neem can be used against black spots and rust.

Bonide and Garden Safe brands both offer fungicides and pesticides that are labelled for use against morning glories.

FAQs on Growing Morning Glories

Why are my morning glories only blooming in tiny flowers?

If your morning glories only produce tiny flowers and blooms, the most likely reason is that they aren’t getting enough sunlight. Morning glories need at least 6 hours of direct sunlight each day, so if you’re not providing them with this amount of light, they will continue to produce bloomless stems.

Why won’t the buds morning glory flowers open?

If your morning glory buds are all green with no signs of opening, it means that they aren’t receiving enough water. Morning glories need an even supply of water throughout the day to open their buds completely. You can check if they are getting enough or adjust accordingly.

Why won’t my healthy morning glories bloom?

You may have healthy morning glories that aren’t blooming because they are not getting enough sunlight or nutrients. Morning glories need at least 6 hours of direct sunlight a day, and if you fertilized them with a poor fertilizer, this would affect their growth, health, and flowering ability. Use a good quality fertilizer to provide your plants with plenty of nutrients. Without these, the flowers won’t start blooming or will just produce few flowers.

Final Verdict on How to Grow Morning Glory

Morning glories add vibrancy and beautiful shine to your home with their heavenly blue colors. They have brilliant flowers that bloom throughout the day. Morning glories grow easily and require little maintenance after planting, making them a popular choice among gardeners who don’t have time to take care of their plants or want an instant touch to their backyard or patio.

If you follow the steps outlined above, you should be able to grow morning glories in your own garden, and they will be a beautiful addition to your home.

The post How to Grow Morning Glories appeared first on Kitchen Infinity.

Did you miss our previous article…
https://chefbuano.com/?p=148

How To Clean Household Leaves

Household leaves are an essential part of home décor, but they tend to accumulate dust and dirt. These beautiful leaves are also good for purifying the air. However, to get their full benefits, you must clean them regularly. 

Cleaning leaves is not an easy task because they are moist and easily tear when used. It’s important to clean your household leaves from time to time so that you can enjoy the sight of them for longer.

Remove Dust and Grime

Leaves that are covered in dust or grime can cause illnesses like asthma and bronchitis. Wipe them with a damp cloth before placing them in the dishwasher if dishwasher safe. This is the best method to clean large plant leaves that are difficult to move. Make sure you don’t let your leaves wet as this can trap more dust.

Dunk your cloth in water and squeeze out excess liquid, then gently wipe the leaves. Be gentle with your plants; rubbing too hard can damage them. This will remove all the dust and grime. Also, use microfiber cloths and cheesecloths as they’re good in cleaning both indoor and outdoor plants. Occasional cleaning and dusting can help keep your plant leaves stay clean all the time.

Remove Dust from Plants with Fuzzy Leaves

Plants with sticky or fuzzy leaves, such as African violets, are very delicate and damaged with water. Instead of wetting them, use a damp microfiber or terry cloth to wipe down the furry leaves. If you have dust on your violets’ long fuzzy leaves, spray them lightly with plain water, which can help remove dust without damaging the plant.

Also, use a clean, soft paintbrush to gently brush off plant leaves. A soft paintbrush can also be used to remove cobwebs on indoor plants. If you don’t have a soft paintbrush, try to wipe off the dust using a pipe cleaner or a  mushroom brush. A soft brush can gently coax the dirt and dust between the hairs without damaging them

Rinse Indoor Plants with Warm Water

Place your indoor plant in a kitchen sink or shower stall. Fill the sink with water up to its rim, or wet the shower floor to submerge the leaves in about an inch of water. Shower mist will also help to hydrate the plant’s leaves. 

Allow the plants to drip-dry, then take them outside to get some sunshine. Avoid using cold water as it can leave spots in your plant. Instead, always use warm water. Also, avoid washing plant leaves that are sensitive to water.

Dunk Small Plants into Water

Dunking small houseplants into water will help you get rid of dust quickly. All you have to do is keep them in place by placing your hand over the soil, then dunk them in water for some minutes. This is an excellent option for both houseplants and outdoor plants.

Giving those small plants with leaves, a quick dunk in a bath of tepid water can help them. After swirling the plant around tepid water, flip it back, then allow it to drip dry. If there’s still a lot of water in the leaves, use a paper towel or soft cloth to gently blot and allow it to dry.

Clean Cactus and Succulents Using Compressed Air

Regularly dusting the leaves of houseplants with a thin layer of water-free pesticide can be hard. The solution to this is using compressed air for plants that are easy to see in garden shops or plant stores. When cleaning household leaves, cactus and succulents require a different approach than simple houseplant care. 


Image caption: https://tobebright.com/

They have a waxy coating that helps them to survive in arid environments. This protective coating helps them to collect water and save it for dry days. When you want to make them look attractive, use compressed air for plants or spray a soft cloth with water, then gently wipe the dust. 

You can also try other household leaves cleaning tools like feather duster or vacuum cleaner hose attachment that sucks up dirt without damaging delicate plant parts. Spraying water on the plant to get rid of dust and grime is not good as it makes the coating soggy and plants die. If you plan to clean a potted plant, remove the pot from the stand before washing it. Do not forget to check if drainage holes are clean as it leads to rotting of roots.

When leaves have yellow color due to salts or fertilizer build-up, spray water with a very low concentration of all-purpose cleaner solution and dry. Cleaning cactus and succulents should be done outside and not inside your home. Be sure to wear gloves while cleaning the plants. Do not spray for too long as the air gets too cold and can damage your plant tissue.

Wash with Water and Soap Solution

If your indoor plants are considerably dirty, they may not only need a dunk but soap spray to make them clean and smell fresh. When your indoor leaves are abnormally dirty, it is best to mix a gentle soap solution before you spray the leaves. Spray a lightweight mixture of soap solution and water on the surface of your indoor leaves, particularly if they’ve been exposed to smoke or pollution.

Wash with Water and Soap Solution
Image caption: https://www.gardeningknowhow.com/

This will effectively wash away dust, dirt, salts from cigarette smoking, fireplace smoke, or even air pollutants. Create a solution containing one tablespoon of dish soap and one quart of lukewarm water in a bottle. Shake the bottle well to mix completely. 

Distribute the soap solution on your indoor plant’s leaves with a sprayer or if you are cleaning large areas of leaves, use a garden pump-up sprayer. Alternatively, use a gentle stream from your faucet. Spray the current foliage clean since it consists of soil particles and other debris.

Let the leaves air dry completely without wiping, brushing, or agitating the foliage to avoid injury. This might take several days. Doing this procedure frequently can cause yellowing of leaves and loss of plant vigor, so clean only when needed. You can also pat with a cloth if it is infrequent cleaning.

Rinse Indoor Plants Off the Shower

If your indoor plants are too large that you can’t dunk them in the kitchen or bathtub, don’t worry. Give them a quick wash in the shower. Move your plant to the bathtub and gently spray them down. This can be done weekly if needed, but make sure to allow the plant to air dry before placing it back in your home or office. If there is salt build-up in your household leaves, this is the best method to clean them.

This method is good for rinsing down plant food or salts built up in your plant’s leaves. This is not good for general cleaning but rather for giving it a quick rinse down so you can continue to take care of your plant without much fuss. Mineral salts are great nutrients for plants, so don’t rid them completely. Just be sure you are providing proper nutrients.

Clean Your Plants with White Vinegar and Water

The best thing to clean leaves in a household with nutrient build-up is white vinegar and water. Mix this in a 1:1 ratio and fill your sink with the solution. Place your plant leaves in the solution and allow them to soak for about 5-10 minutes or longer if needed. Remove from the solution, rinse well with water, and allow to dry.

This solution can also be used on any hard surfaces with grime build-up on them. It is a good idea to wipe down the leaves with this solution, along with the stems, before placing your plants back in the room or area where they are being displayed.

The best thing about vinegar is that it is safe for your plants and won’t harm them in any way. You can find white vinegar at most grocery stores, and it does not cost much money either.

Trim Dead Leaves from Plants

When doing some gardening work or cleaning your plants, you might notice dead leaves and the best signs for this are wilting and discoloration. However, trimming off these leaves doesn’t improve the look of your plant. Instead, it can stop nutrients from reaching your survival leaves. Alternatively, you can get rid of these dying leaves by hand if they are loose. And if they’re not loose; use a pair of scissors for pruning shears.

Trim Dead Leaves from Plants
Image caption: https://www.charlestoncrafted.com/

Then you can gently tug at the leaf until it comes loose from your plant. This is a great way to remove dead leaves from your plants if they’re easy to get out of the ground. Instead of pulling these dying leaves, you should try using a cloth or sponge with some warm water. Gently wipe the leaves to remove dust and dirt, but do not harm your survival leaves.

Rub a Thin Coat of Mayonnaise to Keep Your Leaves Shiny

Squeeze little mayonnaise into your paper towel and wipe it over your leaves. Use a light enough coat to cover your entire leaf without making it feel slippery. Mayonnaise is full of fats and oils that will keep your leaves healthy and shiny by protecting them from the elements.

You can also use olive oil or grape-seed oil to shine and protect your plant’s leaves, but mayo works just as well for a fraction of the price. Use a clean paper towel to remove excess mayo. The shiny coat will last for two weeks, so reapply the mayonnaise to restore your leaf shine. Cover your leaves in thin mineral oil, available at almost every grocery store across the country.

Mineral oil won’t damage your leaves or make them slippery but will protect them from drying out. Rub a small amount of mineral oil onto the leaves with your fingertips for best results.

Leaf shine products like mineral oil and grape seed oil will protect your leaves while giving them a shiny look throughout the time. You can also spray commercial plant leaves shiners on your leaves to create a leaf shine.

Dust Your Leaves with Feather Dusters

The simple way to remove dust and grime from your leaves is by dusting them with a feather duster. And ostrich feathers are the best option as they are soft and gentle on your leaves. Moreover, they won’t cause any damage to your leaves like other options like wire brush or rough cloth. 

After dusting with ostrich feathers, you can either use a feather duster or wipe it off using a cotton strip to remove the remaining dust particles.

FAQs on Cleaning Household Leaves

What is the best way to clean indoor plant leaves?

The best way to clean indoor leaves is using a cotton strip dipped in warm water. Wipe it off with the cotton strip, and you are done.

What can I use to clean household leaves?

You can make your eco-friendly cleaner at home that will work wonders on all kinds of surfaces, including household leaves. You need baking soda, water, and some essential oil. Combine the baking soda with water to form a paste and add some drops of essential oil for fragrance. You can also use vinegar instead if you don’t have any essential oil.

Final Thought on How to Clean Household Leaves

As you can see, plants leaves are more than just for show. They have more important functions than acting as home decor or air purifiers. They also aid in plant growth, and leaving them dirty can impede plant growth as well. So, apart from ensuring your plants get proper nutrients and testing soil PH, keep them clean. Consider the above methods to remove dust and dust and also maintain plant health.


The post How To Clean Household Leaves appeared first on Kitchen Infinity.

Did you miss our previous article…
https://chefbuano.com/?p=145

How To Build Your Own House

When it comes to building houses, many people are afraid of making mistakes or getting scammed. This makes them fall into the hands of a real estate agent when they’re looking for an existing home. You should know that the home building process varies slightly from country to country and depending on the area where you’re planning to build.

You need to do your research. You can search for information on the web or consult with a construction company specializing in building homes. Get as much advice as possible, but make sure it’s reliable and accurate.

If you’re just about to start the process of building your own home, then this article will help you understand what’s involved and how much money you’ll need for the project. Let’s get started on how to build your own house.

ct as Your Contractor

When you decide to build your own home, you become the general contractor. A general contractor is a person who organizes everything necessary for building a house, but he doesn’t do any manual labor. This way, you become an owner-builder and can save money on each project.

To be your own contractor, you must be in charge of all building plans. You get to design it the way you want, picking everything from colors and appliances to materials such as wood or concrete. On the downside, you won’t receive any wholesale prices. On the upside, you’ll be ready for anything and won’t have to wait on anyone else to start building your house.

Prepare a Detailed Budget and Plan

Before starting to build your new house, make sure you determine all the expenses that may occur during the process. Estimate everything, including building materials, equipment rental, license fees, and salary for construction workers. If you have some experience with the construction of buildings, it will be easier to calculate the estimated costs of building your dream home.

If you have never built a house before, it is better to contact a construction company and ask them for help with cost estimation. Once you know what you can spend or borrow, plan your budget as accurately as possible.

Locate the Spot for Your House

When choosing a place for your house, you should consider many factors, such as availability of utilities, proximity to schools and shops, etc.  When you have already found a suitable building site, make sure it is not occupied or reserved by somebody else before you proceed to build. Make sure you check with your local real estate for desirable locations.

After that, clear the building site of brush and other debris. Make sure the ground is level at least 25 feet around your planned home perimeter. Call in a surveyor to draw for you the property boundaries.

Prepare the Home Site and Pour Foundation

Before your builder puts a shovel on the ground, make sure the local government approves the design of your house and provides you with the permit.  The land surveyor, engineer, and builder can assist you in designing a home.


Image caption: https://cdn.vox-cdn.com/

Then hire an excavator to dig the foundation of your house, choosing from T-shaped, square, or L-shaped foundations depending on the design of your home. After that, make sure that any area of ground is mounded and leveled to the surrounding area with a soil test.

After pouring concrete, give it time to cure, then apply a waterproofing membrane to your foundation walls. If you’re pouring concrete in cold weather, know the process involve so you don’t have a problem with the curing process.

After that, install the drain, sewer, water taps, and any plumbing that should be on the basement floor. Ensure backfills excavated dirt into the hole around your foundation wall. When the curing process is done, make sure your foundation components are inspected and tested before you proceed with your home construction.

Move to Rough Framing

Once you’re done with excavation, foundation, and concrete work, move to the second phase of your DIY home construction project, which is rough framing. At this point, you should have already installed the concrete foundation and roof deck using screws instead of nails. Your contractor will check for any dips or sags in nearby areas where your footings are located so that they can be leveled evenly.

Here, floor plans, walls, and roof systems are completed. Proceed to apply sheathing to your exterior walls, windows, and roof, then install exterior doors. Cover your sheathing with a house wrap and shingles. Remember to use a vapor barrier between sheathing and roof sheathing, as instructed by your contractor.

This is the next step in building your own house: interior finishing work. Your priority at this point is insulation, drywall, and electrical work. You should have finished framing all doors and window openings, making sure that no liquid infiltrates your structure. Also, make sure water vapor is kept out.

Cover your insulation with drywall to keep potential moisture out of your house, and install wiring systems for lighting, receptacles, and appliances. Use only fireproof materials in every aspect of your electrical installation; this will prevent short circuits, fires, or injury.

Install Electrical, Rough Plumbing, and Insulation

After you’re done with the interior work of your house, it is time to get the electrical system done. You will need an electrician for this part of the construction process since you have already started framing your house to keep moisture out. You’ll also need plumbers and HVAC specialists.

Once the shell is complete, install siding and roofing. Electrical and plumbing contractors can also start running pipes and wires through the interior walls, ceilings, and floors. Proceed to install sewer lines, vents, and water supply lines. Install ductwork for heating and air conditioning.

Install Electrical, Rough Plumbing, and Insulation
Image caption: https://plumbingconcepts.com/

Install landscaping, walkways, patios, decks, garages, porches, handrails, handrails around staircases and sidewalks. Install retaining walls to keep the land in place once it is sloped toward an excavation site. This process usually starts after all plumbing and HVAC. Install HVAC vent pipes in ceilings and floors. Sockets and light fixtures in walls and ceilings, garage doors, exterior lights, and doorbells in the exterior.

Before moving to the next step, make sure plumbing, electrical, rough framing, and mechanical systems are installed in compliance with building codes. Remember that these require three different inspections on the same structure.

Install the Insulation

Common types of insulation in new homes include:

FiberglassFoam mineral woolCelluloseInsulation concrete formsSpray formConcrete blocksFoam board or rigid foamStructural insulated panels

Insulation is very important as it is helpful in making a new home more energy-efficient. This makes your home feel more comfortable year-round. Insulation is also very important in helping to keep your heating and cooling costs down. The insulation materials can help protect against heat flow, noise levels will be reduced, and protection against moisture penetration which can cause permanent damage to the walls of the house.

The most common types of insulation used are fiberglass, foam board, and rigid insulation boards. But your builder may use mineral wool insulation which is better for your home. Both fiberglass and mineral wool are installed in between the studs. Then, insulation can be used under the house floor to stop heat loss and noise reduction.

Complete Drywall and Interior Fixtures

Start by hanging the drywall, then tape, sand, and paint the surface. Install the interior fixtures, such as your light fixtures, plumbing access panels, heating vents, and electrical outlets. Complete texturing, then apply a primary coat of paint. Add the trim and baseboard. Finalize by installing exterior finishes.

Drywall is hung and taped for the seams between the boards to make it invisible. Drywall texturing is then applied to complete the process. You then apply the primer coat of paint and the primary and final coats of paint. 

Install the Trim

Interior doors, door casings, moldings, baseboards, and decorative trim will all go up after you paint the textured areas. These materials come ready to install with their caulk and nails, so you cut them to fit and apply caulking where needed.

Your driveways, walkways, and patios are also formed and poured. Your roofs are shingled, and your siding is applied to the exterior of the house.

Paint the Walls and Perform Finish Work

After installing your drywall and priming the wall surfaces, you should be ready to apply the final paint coat. This is something you can do yourself instead of hiring someone to save money.

Paint the Walls and Perform Finish Work
Image caption: https://cdn.ceoworld.biz/wp-content

When painting over a textured surface, you should use a roller fitted with a brush. You first roll on an even coat of primer and then go back and go over it with a full-brush width of paint. Walls and ceilings are either painted or wallpapered, depending on which you choose. Make sure you learn how to choose paint color because this will have a great impact on many other home decors.

The final step in any house is to install light fixtures and faucets. Kitchen and bathroom countertops are then installed with the help of countertop specialists. After countertops, move to kitchen and bathroom cabinets and ensure they’re correctly installed. After that, finish the flooring of your entire house. Floor covering to consider include laminate flooring, wood flooring, carpeting, ceramic tile, and luxury vinyl plank.

Finish with Mechanical Trims

After finishing house painting, you’re not done yet. You need to install electrical points and switches for light fixtures in the walls. It’s also time to install heating units like water heaters, gas or electric furnaces, air conditioning units, or heat pump systems. Get your hot and cold water plumbing installed right, too, since they are an important part of your new home.

Install Mirrors and Shower Doors

Install mirrors, shower doors, and carpet. A deep clean with a professional cleaner will give your home that extra sparkle you’ll love. Complete your exterior landscaping by planting grass, plants, and shrubs. You can also install a garden or add some potted plants to give your home that extra zing.

Inspection

Make sure an official from building codes completes a final inspection and then issues you with a certificate of occupancy. If there are any defects during the inspection, handle them right away. Schedule for a re-inspection to make sure the corrections were made.

Legalize all your home documents and discuss with the lender to fix a reasonable interest rate for you. The faster you can close on your new home, the sooner you can start enjoying it!

Final Touches

Complete your exterior landscaping and finalize your interior design. Include items to make your house feel like a home. These include things such as family photos, fresh flowers, and comfy furniture. Call the disposal company to clean up the debris and rubbish from your old house. Make sure permitted agencies do the inspection. If you’re using a general contractor, schedule a final walk-through to ensure that any repairs are done to your satisfaction.

Before you can move into your new house, make sure it’s completely clean, inside and out. The last thing you want is for all of your furniture to get dirty during the final stages of construction. If you financed the building of your home through a construction loan, make sure your lender also makes the final inspection before you move in.

FAQS on Building Your Own Home

Is it cheaper to build your own house?

It is cheaper to build your own house if you have the necessary skills and experience needed to do so. However, it is important that you get quotes from several contractors before choosing one to work with.

Can I build my own house?

You can only build your own house if you have the necessary skills and experience for this task. Make sure you do your research well before you get started.

What is the most expensive part of building a house?

The most expensive part of building a house is the land. Building a home on land that cannot be developed for some reason, such as wetlands or floodplains, will also add up your expenses.

Final Thought on Building Your Own House

As you can see, building your own home is not as easy as it may look. It requires a lot of planning, time, and money to see your house become a reality. If you are determined to do this, then start saving up now? If you have all that it takes to build a house, start immediately and enjoy the undeniable allure that comes with a new home.


The post How To Build Your Own House appeared first on Kitchen Infinity.

Did you miss our previous article…
https://chefbuano.com/?p=142

How To Grow Cosmos

Cosmos are annual plants that grow beautiful flowers in the garden. They come in many different colors and will flower profusely until frost. Growing cosmos from seeds is super easy because they can survive even in poor soil conditions.

Cosmos are grown as annuals or biennials throughout most of North America. However, they are considered perennials in USDA Plant Hardiness Zones 9 and warmer.

Cosmos grown as perennials usually live about 3-4 years, but annual cosmos may only live a year or two before they need to be replanted.

Cosmos flowers are one of the easiest to grow in your garden. They require little sunlight, water, and pruning to thrive. They are a colorful addition to any garden and make great cut flowers for indoor arrangements for those looking for some green home décor

So you need to learn how to grow cosmos in your garden? Read this article.

How to Grow Cosmos

To grow cosmos,  start by selecting the plants you want to grow. Cosmos plants are often available as seedlings at your local garden center or they can also be purchased online.


Image caption: https://www.gardeningknowhow.com/ 

Growing cosmos involves a lot of work, including planting, caring for them, and storing your plants after harvesting. These plants also come in different varieties, so you can choose between different heights, colors, and blooming times.

When Is the Right Time for Planting Cosmos?

The best time to plant cosmos is typically in early spring after the risk of the last frost has passed. However, you can also plant them in late summer and expect to have flowers from September until the first frost.

The right time to plant cosmo seeds is in early spring when the soil temperature has reached at least 65 degrees Fahrenheit. The warm temperatures will help your plants grow quickly.

If you are planting late in the season, wait until mid-August to make sure there is enough time for your cosmos plants to grow.

Cosmos require full sun exposure and average soil conditions with proper drainage for optimal growth and to bloom more flowers. Since these plants are native to Central America they will do best if planted in soil with a pH level between 6.5 and 7.

How to Grow Cosmos from Seeds

To plant cosmos, start by selecting an area in the garden where you want to plant cosmos. Then prepare the soil by tilling it lightly so that it can be leveled out for planting. Mix some organic compost into the soil to make it more nutrient-rich. You can learnhow to make a compost bin at home to help grow your plants easily.

How to Grow Cosmos from Seeds
Image caption: https://images.ctfassets.net/ 

Cosmos grow in warm temperatures, especially when the seeds are first planted, so you should wait until after the last frost has passed or spring frost has passed before planting your cosmos seeds. If you live in an area with hot summers, the best time to plant these flowers will be early fall.

How to Prepare the Garden to Grow Cosmos

Choose a planting location in full sun exposure and add 3 inches of compost to the soil. Remove all weeds from the garden bed. Dispose of them by adding them into your compost or discard them in the trash instead of leaving them on your soil.

Till the ingredients into the topsoil with a garden rake, smooth out the surface, and water the area to create a moist environment.

Remember, don’t overwork yourself too much because the cosmos doesn’t really need too much preparation. Poor soil that’s not too rich will still encourage foliage. As for the soil PH, can still tolerate most Ph. But it would still help if you test the soil Ph and ensure it’s alkaline, which is perfect for cosmos.

Preparing and Planting the Seeds

Once you have selected your cosmos plants, it is time to actually prepare your seeds for planting cosmos. Before planting your new seeds, soak them overnight in warm water to help speed up germination. Fill a pot or flat with seed starter mix or potting soil. Sprinkle the seeds evenly over the surface, about an inch apart from each other. Cover them with a small amount of additional seed starter mix or potting soil and pat it down with your hand so that all of the seeds are in firm contact with the soil.

You should put the seeds into a pot that is filled with moist compost or potting soil. If using dry compost, simply add water until it becomes moist. The next step will be to sprinkle some seed starting fertilizer over the top of the soil and mix it in lightly.

Once you have added the seed starting fertilizer, you will want to water the soil again until it is moist. Make sure that your seeds are covered with soil and place your pot in an area where it can receive sunlight.

Don’t worry, cosmos don’t require a lot of warmth when they are first planted. They germinate at about 60 degrees Fahrenheit, which is cool for most plants. However, they can tolerate extreme heat and cold weather.

How to Care for Cosmos

Sunlight

Cosmos prefer a good five hours of direct sunlight every day.  If you are concerned that your plant is not getting enough sunlight, either move them to a sunnier location or supplement by using grow lights.

Watering Cosmos Plants

In the spring and summer, they’ll need a lot of water to stay healthy and strong. Water your seeds daily to keep the soil moist, but not too wet or dry. You also want to be sure that you are providing adequate drainage by adding some sand into the potting soil before planting your seeds.

You should water your cosmos plants about once a week because overwatering can cause the roots to rot and die. If you choose to use tap water, let it sit overnight or use a de-chlorinator to remove any chlorine from the water before watering your flowers with it.

Once your cosmos start coming up, you should stop watering them daily. Instead, water your cosmos seeds 1-2 times per week to give the seedlings time to establish themselves.

Fertilizer

Don’t start fertilizing your young plants until they are about 6 inches tall. Then, you should only apply a small amount of fertilizer each month during the spring and early summer seasons when your plants are growing.

You can use a water-soluble fertilizer that is mixed at the ratio of 1/2 teaspoon per gallon to supply all of your cosmos flowers with nutrients. Don’t fertilize during the fall and winter months or you will encourage new growth right before the cold weather returns, which would leave your flower exposed to potential damage.

Pruning Cosmos Flowers

Cosmos are relatively easy to care for, so most people won’t have to prune their cosmos unless they are trying to encourage new growth. If you would like to speed up the blooming process, you can cut about an inch off of the main stem of your flower just after it is in full bloom.

Once the blooms have dropped off, you can then cut the plant down to just a few inches above the soil surface. This will hopefully encourage new side shoots and blooms to shoot up from your cosmos plant.

Harvesting and Storing Cosmos Seeds

After you’ve harvested your cosmos plants, let them fully dry out before you remove them from the plant. The stems should be brown and brittle. Shake the seeds off of the dried cosmos flowers into a paper bag or envelope.

Label your envelope with the name of the flower, the year it was harvested, garden zone, type of seed (i.e.: hybrid, open-pollinated), and any other special notes. Store the envelope in a cool, dry place until next spring.

Cosmos Problem Solving

Cosmos Flower Issues

If your cosmos flowers do not produce any blooms or only give you fewer flowers, then they may be getting too much water. Like other plants, Cosmos don’t like too much water. This can prevent the growth of the flower buds and instead promote rot and disease in the plant. Your cosmos can develop root rot if you are watering them daily, especially if their roots do not have enough air circulation.

You can also create a water diversion system to prevent overwatering and buildup of fungus and mildew. This will help eliminate these problems and make it easier for you to care for your cosmos flowers.

Cosmos Diseases – Fungal and Bacterial Problems

Your cosmos may be suffering from root rot or fungal disease if their leaves turn yellow and fall off early in the season. This can often be caused by water-logged soil that prevents the plant from receiving the oxygen it needs to absorb nutrients and develop healthy roots.

Cosmos flowers can also get powdery mildew if they are not getting enough sunlight or airflow around their leaves, which will cause them to become moist. This moist environment is perfect for fungus to develop, so be sure your plant has plenty of sunlight and airflow.

FAQs on How to Grow Cosmos

Do cosmos come back every year?

Yes, most cosmos flowers will come back and flower each spring as long as their conditions remain favorable. The plants must have enough time to complete their entire life cycle before it freezes in the winter.

How do I save cosmos seeds?

You can store your cosmos seeds indoors over the winter, or you can plant them right away and let nature take its course. If you choose to store your seeds indoors, be sure they are completely dry and label your envelope before placing it in a cool, dry storage area.

What do you do with an old cosmos?

If your old cosmos have stopped flowering, you can cut the plant down to about 8 inches from the ground and new shoots should emerge from the plant’s crown in a few weeks. Once the new shoots have reached about 8 inches, you can cut flower them back to encourage more branching.

How do you prevent small flowers?

Keep your cosmos plants moist and fertilize 1-2 times a month during the summer months with a balanced fertilizer to encourage healthy growth. Don’t fertilize in the fall or winter when their growth cycle is slowing down for winter. Also, consider giving your cosmos a “haircut” in late spring after blooming to encourage fresh new growth.

Final Thoughts on How to Grow Cosmos

Growing cosmos flowers can be a very rewarding and enjoyable experience. It is one flower that will never fail to impress you with its vibrant colors and bold, unique blooms that light up your garden or patio area.

Once you’ve mastered how to grow cosmos flowers, then you may want to consider growing some of their other cosmos varieties such as Cosmos sulphureus, Cosmos bipinnatus,  Cosmos “Kimigayo”, and Cosmos atrosanguineus.


The post How To Grow Cosmos appeared first on Kitchen Infinity.

Did you miss our previous article…
https://chefbuano.com/?p=139