A bathtub is one of the most important fixtures in your bathroom. It’s where you relax and unwind at the end of a long day, so it’s natural that you want to keep your tub looking its best. Unfortunately, a bathtub can become chipped and scratched or even corroded by hard water stains over time. This can make it look old and unattractive.
Refinishing your tub is an easy way to restore it to its original condition without having to spend thousands on replacing it with a new one. The process can be done relatively quickly depending on how large your tub is and won’t cost too much either. Most importantly, when you’re finished refinishing, your tub will look new again.
There are several ways to refinish an old or damaged tub, including painting the surface with acrylic paint or applying the vinyl film directly over the existing surface. Here we go!
Tools and Materials
Painter’s tapePutty knifeRoller traySpongeTack clothDrop clothBreathing protectionAbrasive padRubber glovesBleachChemical caulk removerTub and tile caulkPaint rollersPaintbrushesEpoxy puttyPaper towelsAbrasive cleanersBathtub refinishing kitSafety goggles
Remove Old Caulk and Tub’s Hardware
Use a putty knife to remove old caulk and tub hardware. Remove anything that may block your work. Cover the faucets with paper towels and mask them off using painter’s tape. Scrape off soap scum with a razor blade and make sure you clean any dirt from your bathtub openings.
Clean Your Tub Thoroughly with Diluted Bleach and Water
Pour a pail of diluted bleach and warm water into your bathtub and let it sit for 10 minutes. Then, scrub the inner and outer surfaces with a sponge or an old rag to remove dirt and stains. Rinse the tub thoroughly afterward using clean water. Allow it to dry completely before you continue with your work.
Sanding
Use a coarse 36-grit paper to sand the bathtub—sand in the direction of the grain to avoid gouging or scratching your bathtub surface. Use a vacuum cleaner to remove dust particles as you sand. After that, fill any marks in the dried fiberglass with putty and sand it.

Image caption: https://www.topkote.com/
Mask off the areas around your bathtub with paper or plastic before you proceed to the next step. You can rough up sanding by brushing the tub’s surface with a stainless steel brush. Make sure you neutralize the acid before applying the paint.
Wipe and Prime
Wipe the surface with a tack cloth and prime it with an acrylic urethane enamel primer. Give it enough time to dry before you apply your top coat. Follow the instructions on the can as to how much drying time is needed after priming. After wiping with a tack cloth, clean it with a rag to enable your acrylic urethane enamel to adhere to the surface of the porcelain.
Depending on room temperature and humidity conditions, you can apply several coats per day. Make sure you apply a bonding agent over the tub’s surface to ensure your new finish won’t peel off the old porcelain.
Mask off the Tub and any Remaining Fixtures
You’ll want to mask off the remaining fixtures, including the drain stopper and any faucets. Mask off floors and walls using drop cloths and painter’s tape. Remember that epoxy paint will be hard to remove, so make sure to guard your tub against drops and spills. Protect the tile at tub level and any fixture or faucet hardware with painter’s tape or paper.
Ventilate Your Working Space
The whole project of etching, sanding, and coating will create dust and fumes. In addition to the epoxy paint fumes, sanding can create fiberglass dust that can irritate your lungs and sinuses. Always work in a well-ventilated space, preferably outside or near an open window. Also, wear breathing protection or any respiratory equipment as recommended by the manufacturer.
Then, prep your paint included in the refinishing kit according to the manufacturer’s instructions. Many DIY refinishing kits use a two-part epoxy paint that needs to be mixed before use, so read the label carefully.
Mixing faces is very important, so don’t play fast and loose with the directions. Then, transfer half of that mixture to a second container to save the second coat and cover it to keep it from drying out.
Etch the Tub Surfaces
If the refinishing kit includes etching powder, apply it to your tub’s surface with water and scrub the surface with an abrasive pad. The etching will help the refinishing sealer adhere to the surface, which will prolong the life of your newly refinished tub. Then, rinse the tub thoroughly with clear water.

Image caption: https://bathrenovationhq.com/
Sand and Wipe Down the Bathtub
Skip this step if you’re refinishing an acrylic or fiberglass tub with no substantial grout lines. But you can learn how to clean fiberglass showers here and keep the material in good shape. An older bathtub with built-up gunk is likely to have crevices and ridges that need to be sanded down to provide a smooth surface for the sealer. Use a power sander if it’s available. Ensure you roughen up the corners and edges of your tub.
Sanding is very important because it ensures the epoxy coating adheres to the surface area properly without showing any crack or peel. After that, wipe the tub with paper towels to ensure it’s completely dry. Then, remove any excess dust or paper residue using a tack cloth.
Mix the Epoxy Coating
The key to success is in how you mix your epoxy coating. Make sure it’s well blended before applying it to your tub. You’ll have 30 minutes to work with the product, so following the manufacturer’s instructions is important.
Paint the Tub
If you know how to paint bathrooms and other surfaces like tile and drywall, then you’ll have no problem with this step. The epoxy forms an ultra-thick, high gloss finish that’s completely waterproof. Finish the edges as required with the sponge brush, then apply a second coat of coatings as directed by the manufacturer. Before applying the second coating, you may recoat immediately or wait for one to two hours of drying time.
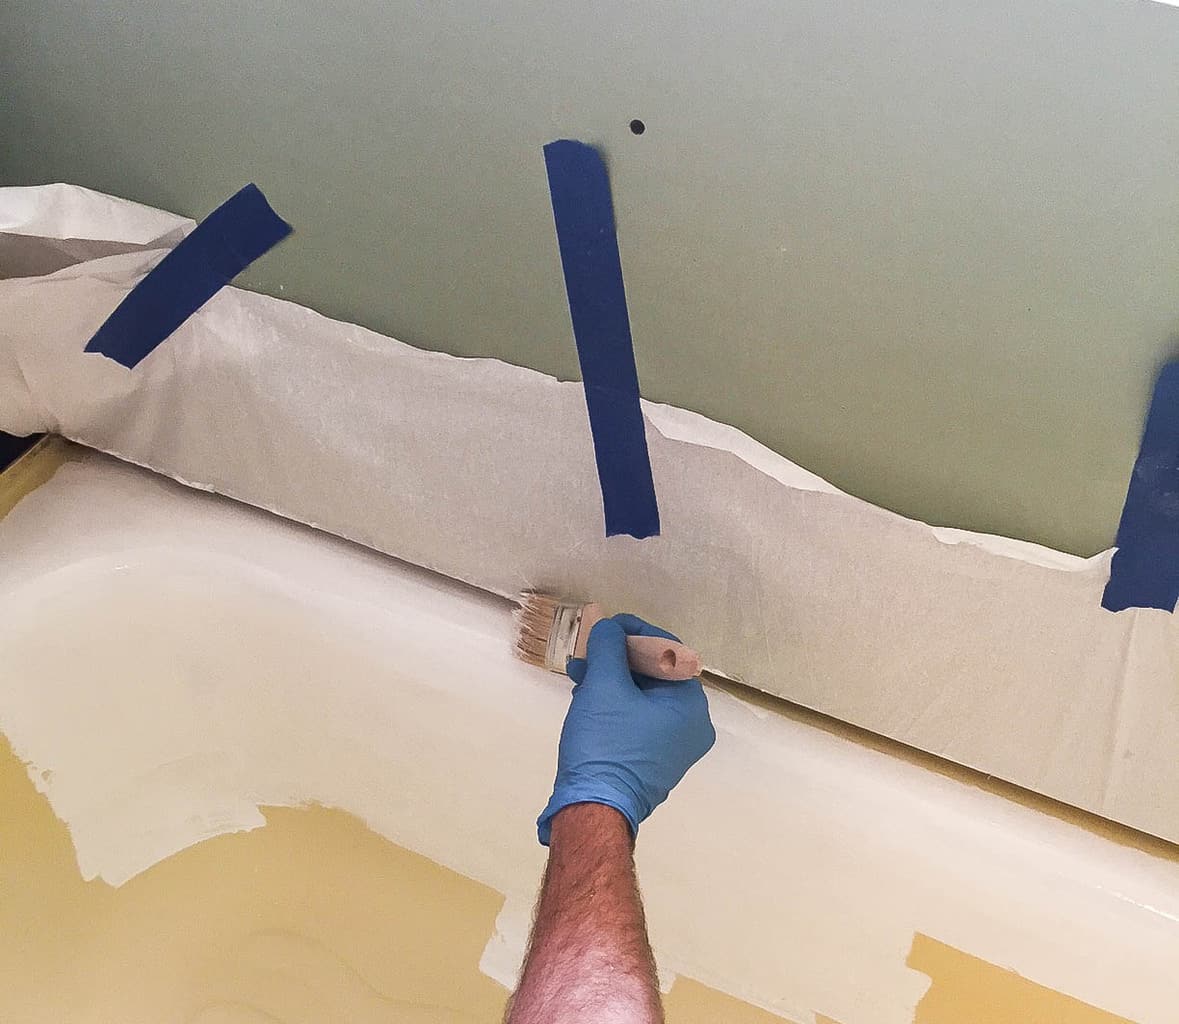
Image caption: https://www.sunrisespecialty.com/
Let the Coating Dry Completely
This could take 3 to 6 hours depending on climate conditions – warmer climates mean shorter drying times. You can speed up the process by using an exhaust fan. Let the tub dry and cure as indicated on the label. Make sure your working site is well ventilated to prevent inhalation of vapors.
pply the Second Coat
Sponge on another coat as required by the manufacturer’s instructions. You can do this after 3 to 6 hours, depending on climate conditions. If you wait too long, it could affect adhesion, so consider the drying time before applying your second coating. Let this dry completely and apply a third coating if required by the label.
Caulk and Reinstall the Hardware
Seal your tub’s joints with fresh silicone caulk and let it cure overnight. Then, reinstall your faucet hardware. Your refinished tub is now ready to use, so run yourself a nice, warm bath.
After bathtub refinishing, it’s best to avoid abrasive cleaners to protect your surface. Instead, go for non-abrasive and bleach-free cleaners such as cast iron and porcelain cleaners.
Call Professional Bathtub Refinishing Company
If you want to avoid the trouble of doing this job yourself, consider professional refinishing since their years of experience in bathtub reglazing can help get your old tub looking new. Professional tub refinishers market their process as reglazing. Their standard will look similar to DIY refinishing kits, but they’ll spend more time and money repairing chips and cracks.
FAQs on How to Refinish the Tub
How long does bathtub reglazing take?
Professional refinishers will complete the job within a day and can seal your tub before you head to bed.
When is the best time to reglaze your bathtub?
You can reglaze your bathtub anytime, but if you’re looking for the least messy option, do it on or before the winter months because it’s usually cold outside, and tile grout dries quickly.
Final Thought on How to Refinish the Tub
As you can see, refinishing the tub is a great option for anyone looking to update their bathroom’s refurbishing. Just ensure that you are aware of the steps involved, so you have enough time to prepare for it.
The post How To Refinish The Tub appeared first on Kitchen Infinity.