Birds are probably one of nature’s most beautiful creatures. These creatures have so much to offer when it comes to beauty. From their vibrant colors, soft melodies, comical actions, and straight-out impressive features, birds are pure eye candy.
In this article, we have gathered pictures of nests and eggs from various bird species worldwide. Read on to enjoy every bit of the beauty that these nests and eggs hold within them.
House Finch Nest
House Finches build open cups nests of grass, twigs, and mud. The male builds the nest while the female oversees its construction. They often make their homes close to humans, which makes them popular around cities and suburbs alike.
House finch eggs are 0.75 to 0.8 inches long with a very long pale blue color and small. There are also infrequent spots that are typically concentrated on the larger end of the egg.
merican Robin Nest
American robins build large nests in the crotch of a tree, under the overhang of roofs, or in man-made structures. Their nests are built with mud and lined inside with grasses, roots, and hair. American Robin eggs are 0.6 to 0.7 inches long and very pointed at the smaller end of the egg.

Image credit: https://nestwatch.org/
The color can vary from white to pink, but they usually have brown speckles all over the entire egg. Each female American Robin lays between 3 to 7 eggs, but typically 4 or 5. When two females nest close together, they will oftentimes lay their eggs in one nest and then switch once all of the first female’s eggs have been laid. This is referred to as a dump nesting strategy.
Vermilion Flycatcher Nest and Eggs
The Vermilion Flycatcher will usually make their nests in the cavities of trees, and each female lays between 3 to 8 eggs that are white or cream-colored. They do not have any spots on them at all. With its eye-catching feature, the vermilion flycatcher is a favorite among birders, thanks to its brilliant plumage, and its nests and eggs are just lovely.
Their cup is very sturdy; plus, it is often decorated with moss and lichen bits that serve as camouflage. The 0.75 inches long eggs are creamy-white with bold, thick blotches of lavender, brown, and grey.
nna’s Hummingbird Nest and Eggs
Anna’s Hummingbirds can be found in the United States, and they like to build their nests in small shrubs or trees. Each female lays between 2 to 4 white eggs with a glossy texture. Look for shiny egg spots on these pale eggs. Females tend to lay one egg per day until all of them are laid.
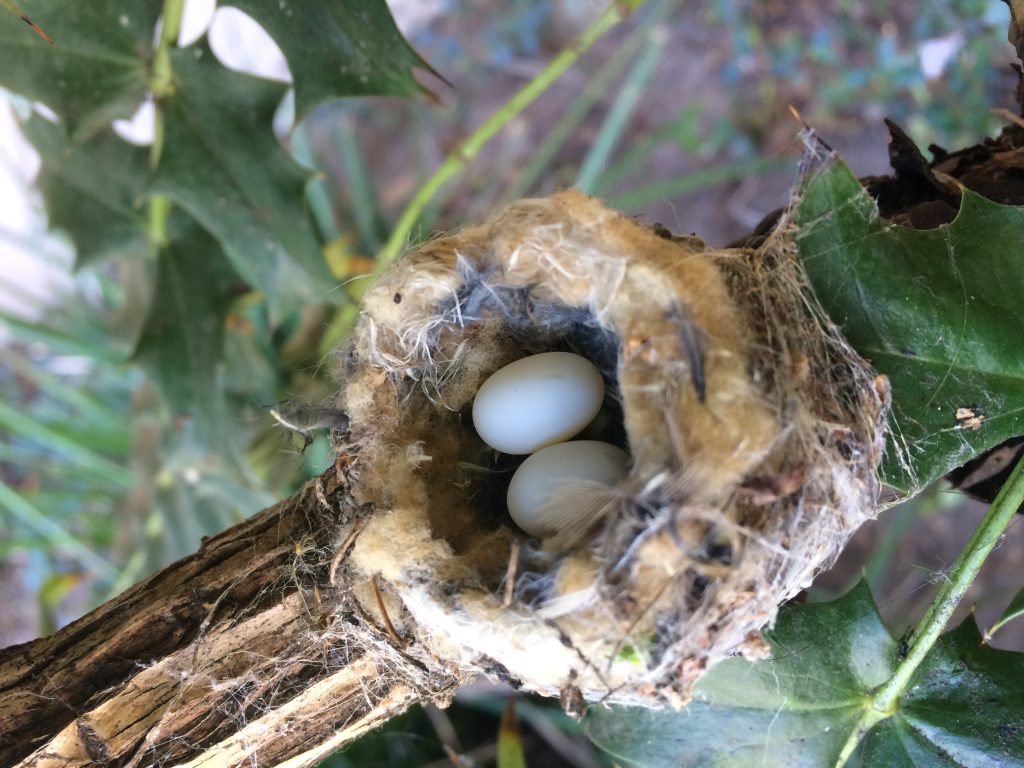
Image credit: https://nestwatch.org/
These nests are often found in precarious locations on thin branches, twigs, on cliff ledges, and even astride wire. The nest is lined with feathers to gently cradle the white, symmetrical oval eggs.
Killdeer Nest
At first, you might think that this isn’t a nest at all. This simple nest is lined with pebbles and twigs and even without lining. Killdeers lay their eggs on open ground, which makes their nests highly vulnerable to predators.
Its light-colored eggs have black and brown splotches, plus, the eggs are somewhat pointed, so they don’t roll easily on flat ground. However, parent birds will often feign injuries to distract predators away from their nest.
Black-Capped Chickadee Nest in a Tree Hole
The Black-Capped Chickadee nests in natural tree cavities and boxes. The female will line the cavity with grass, mosses, and hairs from mammals then she will lay her eggs on these lining materials. She’ll have anywhere from 4 to 7 eggs that are white or greenish.
These are cavity-nesting birds and will use birdhouses, snags, and other natural nesting holes such as reusing woodpecker nesting sites. The nests are lined with feathers, moss, and animal fur. Their eggs are oval, 0.6 inches and are marked with brownish speckling.
Mallard Nests and Eggs
Mallard duck eggs are large, smooth with a matte or eggshell rather than glossy feel. They’re typically pale blue-green. Their nests are surrounded by tall grass, and while sitting in the nest, the female may line it with vegetation and twigs that she can pluck from around her and her feathers.
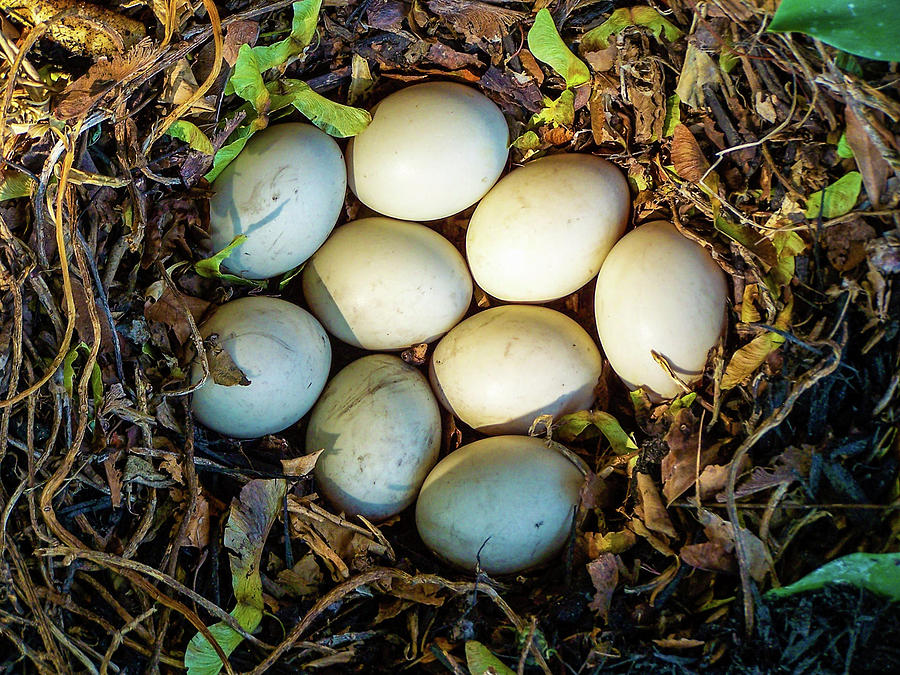
Image credit: https://images.fineartamerica.com/
It takes a lot of energy for females to lay eggs; it heavily depends on their mate for protection and food. After mating, males will remain potent for an extended period if the first brood fails and females need to mate again. Eggs are incubated for about a month, but hatchlings can leave the nest in about half a day.
Song Thrush Nests and Eggs Images
Song Thrush eggs are pale blue with a few dark spots and a slight gloss. While females lay 2-4 eggs, males do not contribute to parental care or incubation of the eggs. The nests are usually constructed of mud with no grass lining.
If you come across eggs in the nest, this can be an easy distinguishing factor of the song thrush versus other birds with similar eggs. They lay their eggs in early spring, and after they fledge, the parents feed their chicks until they reach maturity.
House Martin Eggs and Nests
The house martins lay plain white eggs. You can identify the nests of the house martin from a distance by their hanging upside-down shape. The birds build these cup-shaped nests out of mud pellets and grasses they find on the ground while using saliva as a building material to stick the pieces together.
These summer nesters depend on flying insects for their diet and to feed their brood. The eggs are incubated for two weeks by both parents, and the chicks can take three weeks to leave the nest, though they remain in the colony for several more weeks.
In case there’s no food, the hatchlings can go into a state of torpor, where some of their metabolic processes are shut off to enable them to survive. The first hatchlings often help their parents to feed successive broods.
Pheasant Eggs and Nests
Pheasant eggs are the size of a small hen’s egg. They’re usually olive-brown eggs but can be brownish and have some bluish tones. Their nests are constructed on the ground by digging out a pit concealed among the tall grass. Like chickens and hatching, Pheasant chicks are already covered with feathers and ready to leave the nest.
Mute Swan Nest and Eggs
Mute Swans live in many parts of the world but prefer cold climates. Their nests are large heaps of reed or bulrush stems, usually built in a sheltered location on the water. They can lay from 3-7 eggs, and they only breed once a year. Their eggs are light grey or blue, though they can have brown and grey stains from marsh material.
Rock Pigeon Nests and Eggs
The cliff or rock nesting blue-grey pied color of a pigeon creates the perfect camouflage for their nests. They are also very protective against predators and will even attack creatures as big as humans to protect their babies. Rock pigeons usually breed twice a year, laying two eggs at a time in flimsy twig nests on cliff ledges or buildings.
The pale blue-grey eggs can have brown and black spots from the mud used to make the nests. Unlike other birds, rock pigeons can breed at any time of the year as long as there are sufficient resources to raise their young ones.
Herring Gull Nest and Eggs
They are large white birds with a pale-yellow bill and long reddish-orange legs. If you come across an abandoned herring gull nest, you will find that there is no lining in it at all. The eggs are usually laid on a bare spot on the ground, and there may be scrape marks where the parent birds have tried to scratch loose material together.
Image credit: https://cdn.download.ams.birds.cornell.edu/
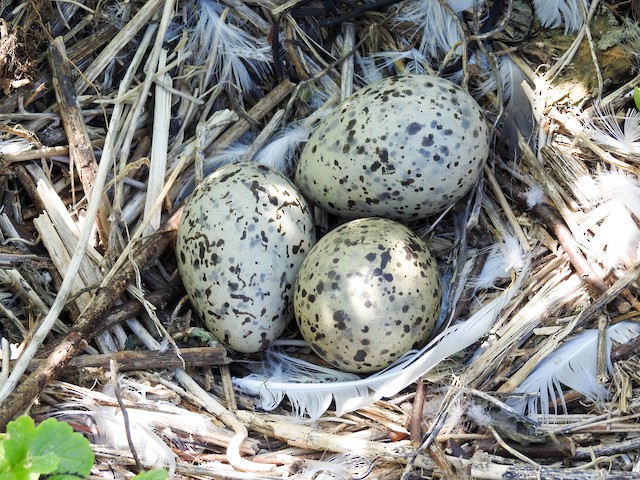
They prefer to lay eggs on sheltered ground or roof locations with minimal nest construction. However, the parent birds will line the nest site with weeds, grass, and seaweed. Their eggs vary from grey to brown hue to a faint blue or green. They are also marked with brown, lavender, and black streaks or spots. And because they are not in a deep nest, they’re slightly pointed to minimize rolling.
House Sparrow Nests and Eggs
The House Sparrow, a non-native bird, lays its eggs in an untidy nest of straws and twigs on the ground, often mixed with paper litter. The nests are frequently seen in garden sheds or around human habitation. Their eggs are white with variable, often heavy speckling in browns and blue-greys.
The chicks only take two weeks to fledge, and their parents take further two weeks to care for them as they cannot feed for themselves for the first week out of the nest. The male sparrow is in charge of the chicks while the female prepares the next clutch of eggs.
FAQs on Photo Gallery of Wild Bird Nests and Eggs
How long does it take for a bird egg to hatch?
It can take 10 to 30 days, but the incubation period varies, depending on the bird species. Occasionally, it can take ten to thirty days. You should know how to identify baby birds once they hatch to know which nests they come from.
How do you identify a wild bird egg?
One way is to use the table as a reference. It also helps to have a bird book with you or to enlarge the photo for better detail. The egg’s color, size, and shape should also guide you to identify if it’s a wild bird egg.
Final Thought on Photo Gallery of Wild Bird Nests and Eggs
As you can see, there’re so many types of wild bird nests and eggs, and it’s a privilege to get a glimpse of their lifestyle. With the photo gallery provided, you can easily enjoy the fruits of Mother Nature. Just make sure you learn how to take care of baby birds and don’t harm them in any way.
The post Photo Gallery of Wild Bird Nests and Eggs appeared first on Kitchen Infinity.
Did you miss our previous article…
https://chefbuano.com/?p=756


/godetia-plant-profile-4800077_03-0851a9a0fa004a18a5328540b257a908.jpg)