20 DIY Couch Cover Ideas

20 DIY Couch Cover Ideas

You have a couch that’s past its prime time, and you’re on a tight budget. There are plenty of ways to update your couch, but most of them require spending money or taking up too much time. When you turn to these DIY couch cover ideas, then you won’t have to buy new furniture for your house.

Whether you want a new couch and chair or you want to redo your bedroom, there’s always a slipcover for your headboard. These slipcovers are easy to do and will instantly transform your home. Plus, you can give your old couch and chair a new look by spending only a fraction of what it would cost to replace them. 

Here are DIY couch cover ideas for making your custom slipcovers in no time at all.

DIY Sofa Slipcover

This sofa slipcover is perfect for those who want to update their furniture on a budget. You’ll need some basic supplies, including a sewing machine and fabric. You’ll also have individual covers for the frame and cushions. This way, you won’t have to worry about constantly adjusting your cover every time someone sits on it.

DIY Drop Cloth Slipcovers

Repurpose old drop cloths to make your slipcovers. Depending on the look you want to achieve, you can make them patchwork-style or one solid piece. If you plan on painting your walls, this style is great because you can remove it at any time without damaging the underlying fabric.


Image credit: https://i.pinimg.com/

You can find drop cloths at almost any departmental or home improvement store at a relatively low cost. The covers will extend the life of your couch by a number of years and give your home a look you’ve always wanted.

Easy Sectional Cover

Do you have a sectional sofa but no cover for it? This easy DIY project is perfect for you. All you need is a piece of fabric that’s at least two feet wider and four feet longer than your sectionals. 

Easy Sectional Cover
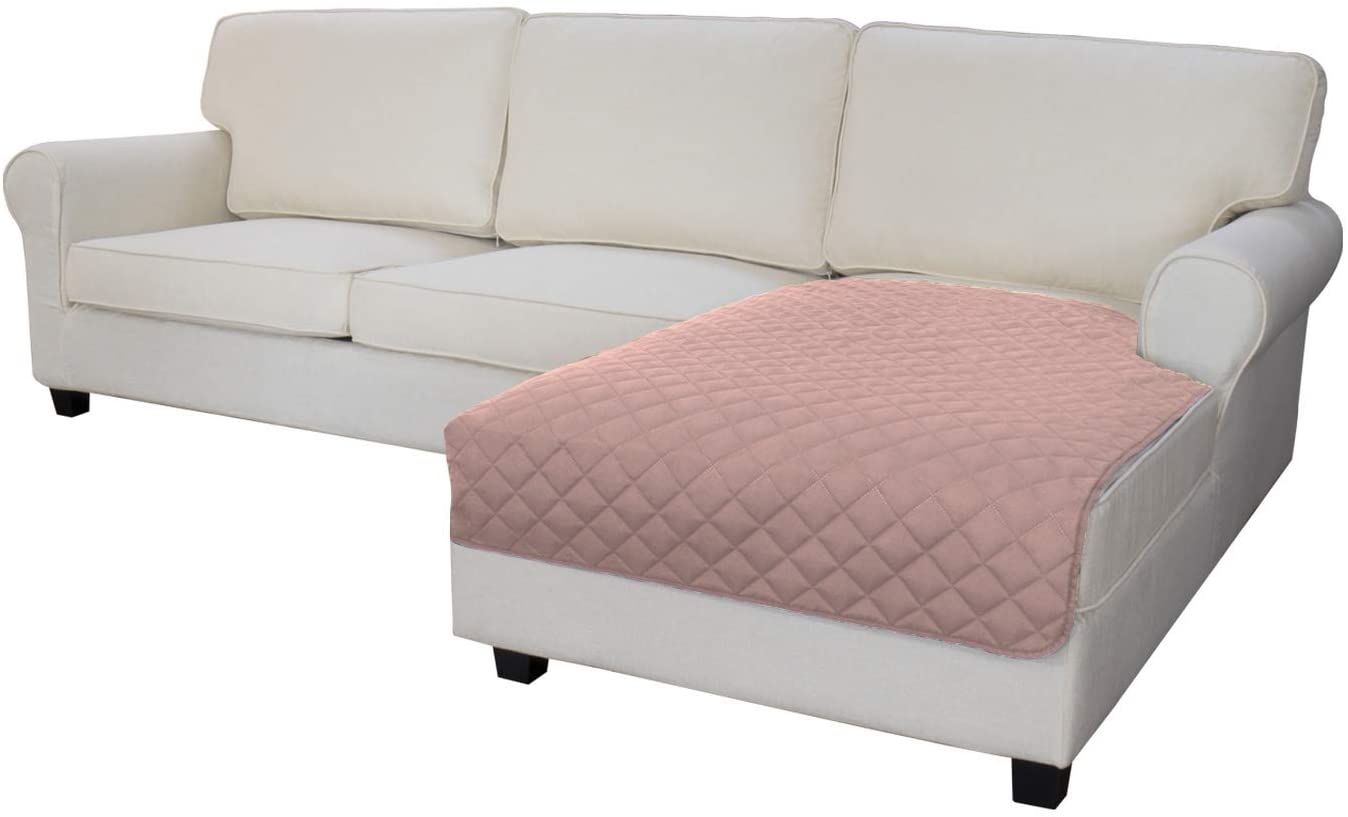
Image credit: https://m.media-amazon.com/

This is a great way of covering your sectionals and ensuring you get the slipcover that fits perfectly. You can get a brand new look and create any pattern and design you like. These DIY slipcovers are very important.

Patio Furniture Covers

If you have patio furniture, it’s important to keep it covered when not in use. Not only will this protect the furniture from the elements, but it will also help to keep it looking new for years to come. 

Patio Furniture Covers
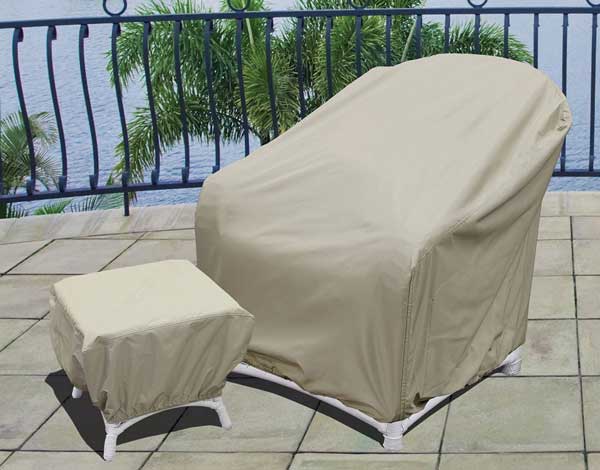
Image credit: https://www.patioproductions.com/

A simple patio furniture cover can be made out of a fabric that’s at least six feet wide and ten feet long. These DIY outdoor cushion covers can help transform your outdoor space.

No Sew Bench Cushion

If you have an old bench that could use a little bit of TLC, why not try this no-sew bench cushion? This project is easy and only takes a few supplies. You’ll need some batting, fabric, scissors, and a needle and thread but no sewing machine. Bench seats always make any area feel cozy and relaxing. So, you can DIY your bench cushion and customize it to your liking. 

Easy Sofa Slipcover

If your sofa looks a little worse for wear, don’t worry. With this easy DIY slipcover, you can easily give it a new lease on life. This project will take you just a few hours to complete and only requires a few supplies.

All you need is some fabric, scissors, and a sewing machine if you have sewing skills. This simple and quick fix is a great-looking temporary fix that will transform your couch from a drab to fab.

IKEA Couch Makeover

Don’t worry if you have an old IKEA couch that you’re not quite sure what to do with. With this easy DIY makeover, you can easily give it a new lease on life. This project will take you just a few hours to complete and only requires a few supplies.

All you need is some fabric, scissors, and a sewing machine. You’ll sew through the buttons and add extra stuffing to your couch cushions. This DIY slipcover is budget-friendly, and the results will look amazing.

Dyed Sofa Slipcover

This is a great way to renew your old furniture in your living room. All you’ll need for this project is fabric dye and rubber gloves. You can also use a stencil if you prefer the look of that instead. The results will not only look fantastic but will cost you next to nothing.

If you’re looking to give your living room a bold new look, you’re going to want to take a look at this project. Plus, dying your couch cover can help cover up any old stains and signs of wear.

DIY Outdoor Cushion Covers

If you’re like most people, you probably spend a lot of time on your deck or patio during the summer. One way to make these spaces even more comfortable is to add some new cushions. But, buying new cushions can be expensive. Instead, why not try making your own? 

This project is easy and can be completed in a few hours. Plus, the results will be fantastic. You’ll need cushion covers, Paint or fabric dye, Paintbrush or sponge, Masking tape, and Scissors.

DIY Tufted Cushions

Tufted cushions are chic, but they’re also very expensive. Luckily, you can make them yourself without spending too much money or time. For this project, you’ll need cushion covers, Scissors, Measuring tape or ruler, a Pencil or pen, and Thread. 

This easy-to-follow tutorial will allow you to transform a budget-friendly sofa into a stylish anchor piece for your living room. In just 20 minutes, you can transform this couch’s entire look.

DIY Slipcovers with Piping

Piping can add a nice touch to any home décor project, and these slipcovers are no exception. For this lovely design, you’ll need cushion covers (fabric or foam), Scissors, Pencil/Pen, Measuring tape or ruler, and a Piping foot if your sewing machine doesn’t come with one already.

Whether you make your piping or purchase it at the store, this DIY couch cover keeps costs low without compromising on looks.

DIY Armchair Slipcover

Why not include your favorite armchair for fun as you’re making over your living room or sitting area? Here, learn how to make a DIY slipcover for an armchair.

This project is a little more complicated than others, but it’s still doable for almost anyone with basic sewing skills. To make it even cheaper, use drop cloths because they’re cheap, but that doesn’t mean they’re uncomfortable.

Couch Pet Protector DIY

Simplicity is key when working with slipcovers, and this DIY couch cover follows that rule. Use an old blanket or even a foam cushion to create a removable accent for your sofa that looks great but provides the perfect place for pets to snuggle up too. 

These pets can cause havoc on couches, especially if they have sharp nails. They love to climb all over sofas, causing some serious damage. Thankfully, this DIY tutorial can provide you with a durable couch cover that will run along the back and arm of your sofa to protect it from pets.

Easy DIY Ruffled Sofa Slipcover

This easy DIY sofa slipcover doesn’t require much sewing, and it’s the perfect way to refresh your room without spending a lot of time or money. Plus, this is a great option for those who don’t have the necessary sewing skills to pull off something more complicated. 

This idea couldn’t be simpler: measure your couch and head to the fabric store to pick up some coordinating fabric. You’ll also need a few basic supplies, like a sewing machine, needle, thread, pins, and scissors. The ruffles give your sofa and chair a comfortable and welcoming look.

This makes it go along with your DIY farmhouse furniture. These are much easier to make than they look, and you can cover your entire living with ruffles in just a couple of days.

DIY Ottoman Slipcover

You can cover those ottomans and make them look new again. If you’re making slipcovers from your couch and chairs, why not make one for your ottomans, so your entire living room set looks new? This DIY slipcover is easy to make, and you don’t even have to sew it. 

You can also opt for one with pom-poms that can be easily removed so you can wash the DIY slipcover. If you don’t like poms, you can add a pleated skirt to your ottoman slipcover instead.

DIY Sheet Sofa Slipcover

You don’t have to buy expensive slipcovers from department stores to get that new furniture look. Instead, try to repurpose old sheets and make your DIY slipcover. 

DIY Sheet Sofa Slipcover
Image credit: https://photos.demandstudios.com/

You can buy inexpensive sheets if you don’t have a set that you can use, and they’ll look like a real thing. You can use them to cover the entire sofa, even the cushions. You can also remove and wash them regularly.

DIY Reclining Couch Slipcovers

Are you looking to give your old couch a new look? You can always use a slipcover to cover it. You have to buy the slipcovers that fit your reclining couches, and they should perfectly match your sofas’ size and shape.

After that, make modifications to your regular couch slipcover to make it fit over the reclining sections and cover those sections so that they stay put when the couch is reclined.

Striped Slipcover for Kid’s Sofa

If you have kids, they might want to have a couch of their own. You can surely buy them one, but it’s also possible to upcycle an old sofa into something that both adults and kids can use. Just remove the back cushions and cut out pockets for toy storage.

Striped Slipcover for Kid’s Sofa
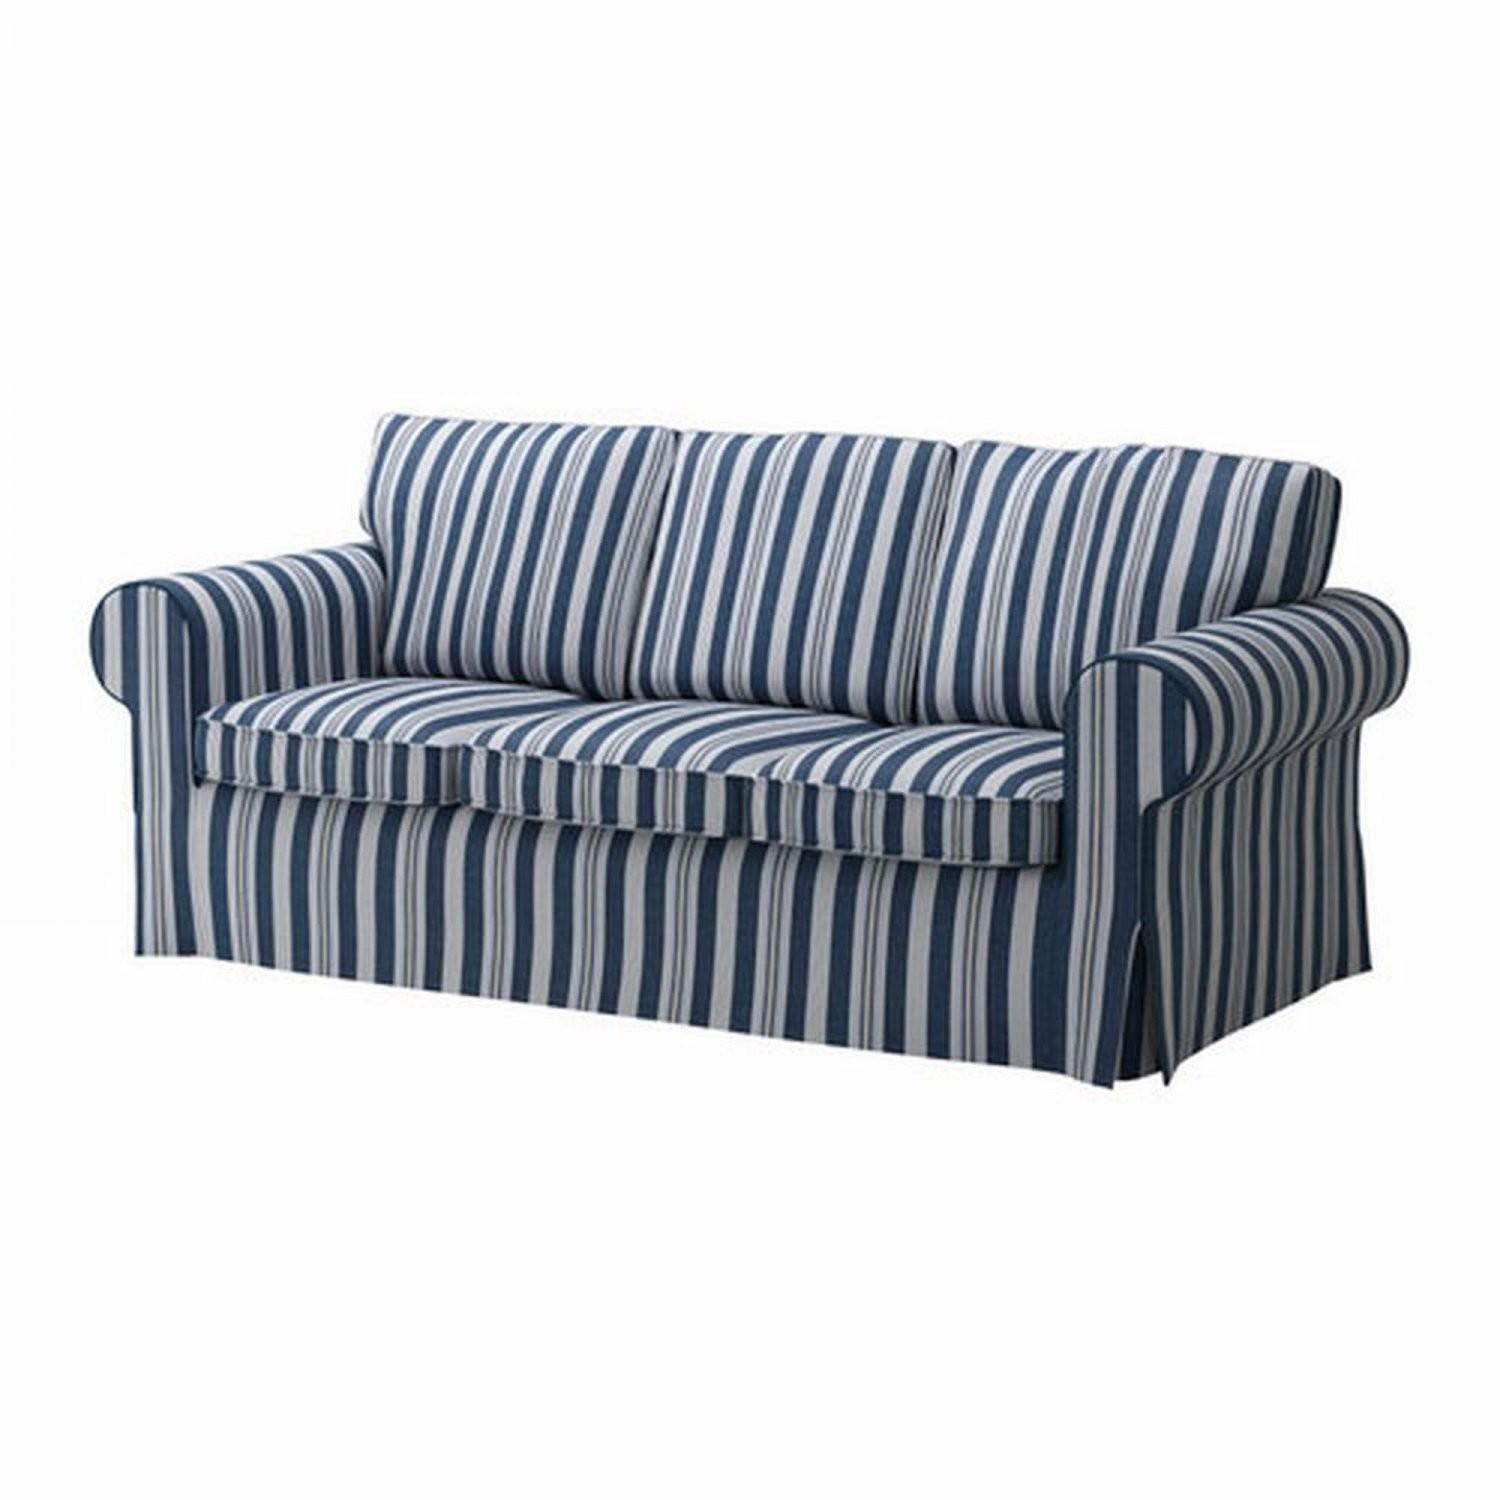
Image credit: https://cdn.decoratorist.com/

Then you can remove the seat cushions and sew some thick fabric or batting onto the bottom to make it a bit more comfortable. Finally, add a striped slipcover for an extra touch of fun.

Slipcover for Sofas with Attached Cushions

If your couch has attached cushions, you can still add a slipcover by measuring the width of the couch and adding an inch or two for seam allowances. Cut out a piece of fabric that’s at least two inches longer than the width of the couch, and sew the edges together. 

Whether your cushions are attached to the back or the arms, you can customize a slipcover pattern to fit perfectly. Make sure your measurements are accurate and leave enough room to tuck the slipcover around your cushions when you put it on.

DIY Settee Slipcover

Measure the width and depth of your settee. Draw these measurements on paper, adding about two inches at each end for seam allowances. Cut out the pattern you’ve drawn and use it to cut a piece of fabric that’s wider than the settee but not so wide that it will hang over onto the floor. The settee tutorial will instantly brighten up any room, and it’s so simple to make.

FAQs about DIY Couch Cover Ideas

re slipcovers worth it?

Yes, they’re worth it because they can change up the look of your house in minutes. Plus, they’re easy to wash and can protect your furniture from spills and dirt.

Do I need a pattern?

No, you don’t need a pattern. You can measure the width and depth of your couch and then cut out a piece of fabric that’s the right size.

Final Thought about DIY Couch Cover Ideas

As you can see, these couch cover ideas are super easy to make. Just pick the one that you like best and get started. These DIY couch cover ideas can instantly change the look of your home.


The post 20 DIY Couch Cover Ideas appeared first on Kitchen Infinity.

Did you miss our previous article…
https://chefbuano.com/?p=1248

How to Design a Nursery

How to Design a Nursery

Are you looking for ways to design a nursery for your newborn baby? Well, there are so many beautiful baby items out there you can use to create a lovely place for your little one. You want to create a beautiful nursery for your newborn baby, but you don’t know where to start. 

We’ve created this guide with all the tips and tricks you need in order to design a lovely place for your little one. Let’s get started!

Plant a Seed

Naomi Alon Coe who is an interior designer of Little Con Interiors, specializing in nursery and child design, says that many clients come to her with a single item that inspires the overall design. It can be a wallpaper pattern or just a crib or another piece of furniture they fall in love with.

Decorate the Walls with Decals

Your baby’s nursery is one of the most important rooms you will design. It contains everything your child needs for napping, feeding, and playing. Take some time to think carefully about how you want it to look.

Wall decals are inexpensive, easy to install yourself, and can be removed without causing damage if you change your mind about the decoration you want. You can find a wide range of shapes and colors in the local shops near you or online.

dd Relevant Furniture to Your Baby Nursery

When it comes time to start furnishing your nursery, you’ll likely spend lots of time looking at different cribs, dressers, and changing tables. It can be difficult to know what to buy when your child is still very small, and their needs may change rapidly. One piece of furniture that will come in handy is a rocking chair.


Image credit: https://momlovesbest.com/

Not only does it provide a comfortable place for you to rock your baby to sleep, but it can also be used as a feeding chair. If you’re looking for a dresser to match your nursery decor, make sure you select one that has storage for diapers and other baby items. Every nursery also needs a glider to get the baby back to sleep and for late-night feedings.

Doing so will allow you to keep everything neatly organized in one place. Storkcraft Portofino 4 in 1 convertible crib or changing table will convert from a crib to a toddler bed then a full-sized bed. It also features plenty of shelving and drawer space. The changing table also detaches to act as a nightstand when your baby is past the diaper stage.

Maximize Your Small Space

According to interior designers and decorators, if your baby’s nursery is small, you’ll want to consider the feature wall color. You can easily and inexpensively paint the room a light color to make it look bigger.

Maximize Your Small Space
Image credit: https://www.thespruce.com/

Also, add a mirror to open up the appearance of the room. In addition, consider buying a baby a rounded crib as opposed to a traditional one. The round crib isn’t always cheap, but it’s a gorgeous family heirloom that you can pass down from generation to generation.

Round cribs can go into different areas of the room more than rectangular ones. You can also put a round crib center of the room if needed.

Consider Upholstered Nailhead Double Chaise

If you have a little more space, consider adding an accent chair to the room. The chair can be used as a place for your child to sit or nap, or it can simply serve as decoration. You could even put this beautiful West Elm upholstered chaise in the room.

From there, furnish the rest of the room with a mix of storage and display pieces. Look for pieces that will grow with your child. A changing table that can later be used as a desk or a low dresser that can function as a bookshelf are great options.

Don’t Go Overboard with a Theme

It can be tempting to settle on a theme for the nursery right away, but it’s best to wait until your baby’s arrival. Some babies are born with dark hair and olive complexions, while others are born blonde and fair-skinned. Babies also come out looking like either their mom or dad, meaning that they might already look like they fit into a certain theme.

If you’re not sure what theme to choose, it’s best to go with a gender-neutral design that can grow with your child. For example, interior designer Cathie Hong of Cathie Hong interiors cautions against overdoing the modern trend of having a nursery theme.

Even if your nursery has a specific theme, try to keep the color palette soft and minimal to create a calm and non-stimulating environment for both the mom and the baby.

Design a Room the Will Grow with Your Baby

While you might want to create a beautiful room for your baby’s arrival, it’s important to keep in mind that the room will have to grow with your baby.

An interior designer called Bean recommends choosing elements in draperies, wall coverings, and lighting so that with a few changes in furnishings, art, and accessories, the room can still work for tweens and teens.

Consider the Lighting

When lighting your nursery, use dimmer switches because they create a calming atmosphere. You’ll also want to have plenty of task lighting so that you can see what you’re doing when you’re caring for your baby at night.

Also, consider a ceiling fan or overhead light combo because they’re an excellent accessory in a nursery to keep it cool, comfortable, and ventilated. After some diaper changes, you’ll be thankful for having a well-ventilated room. 

Test your bulbs for overheating and ensure you’re using the appropriate bulb wattage for your lamp, especially table lamps. Avoid floor lamps; even if they look nice next to a reading chair or a dim corner, they’re not the best choice ever for a nursery.

Make a Nursing Nest

A nursing nest is a great addition to your nursery if you’re planning to breastfeed. It’s a comfortable place for you and your baby to relax together and can be helpful in getting your newborn to latch on correctly. You can make your own nursing nest out of a soft blanket or buy one that’s already made. You can also keep a small end table with drawers or shelving for cubbies next to your cozy nursing chair for your stuff.

You can stock a few things, including baby food, nursing pads, burp cloths, extra blankets for spit-up incidents, and wipes. You can also store a water bottle, maybe a good book or magazine, and a feeding log if you’re early in the game.

Changing Area

You’re going to want a changing area in your nursery. This can be as simple as a changing pad on top of your vintage dresser, a changing tray, or an actual changing table. If you have the space, go for the changing table – it’ll make diaper changes easier. You’ll want to have plenty of stores nearby for diapers, wipes, ointments, powder, and other essentials. 

Keep a good stock of diapers in the nursery to make late-night changes easier on you and your baby. If you have a big enough budget, it might be worth getting a pack n’ play bassinet to keep in the room for speedy diaper changes during the first few months.

Install Black Out Shades or Drapes

Your baby will likely sleep best in a dark room. Install blackout shades or drapes to ensure the room is as dark as possible when your little one is trying to get some shut-eye. This will not only help your baby sleep better but will also keep the room cooler in the summertime. It’s great for comfort but, most importantly, for safety.

Get Organized

No one likes a messy room. Learn how to declutter your room to clear off surfaces. Make sure to put away any loose or potentially dangerous items before your baby arrives. If you store everything in the closet, you’ll have easy access to all clothes for middle-of-the-night changes. You can use cubbies, baskets and toy boxes to throw stuff in and locate it easily later on.

Get Organized
Image credit: https://media.front.xoedge.com/

At least one wall should be reserved for changing diapers, dressing, bathing, and so on. You’ll want to have easy access to a sink, toilet, and storage for diapers, wipes, and other necessities. When choosing nursery furniture, it’s important to think about both form and function. 

You’ll need a place for your little one to sleep, play, and store all of their necessities. Few of us can afford to buy a changing table, so you’ll want to look for items that can double as both a play area and diaper station. A dresser with ample storage space and a mirror provides room for clothes, toys, diapers, and other baby essentials.

Keep Colors in Nursery Simple and Practical

When it comes to color, it’s best to keep things simple in the nursery. Bright colors can be stimulating and overstimulating for a newborn baby. Stick to neutrals like grays, greens, and blues, or go with soft pastels. Knowing your child’s gender ahead of time is also essential as it can help you determine the color palette.

For example, if your kid is a baby girl, you can paint walls in lavender and white, with a carpet in the same colors. For your son’s nursery, consider other neutral colors that are colors of boys. Make sure you redesign and tweak the room to reflect your child’s personal tastes.

These colors will be soothing for your little one and won’t clash with their eventual room décor. If you’re looking for more helpful tips on nursery design, check out the Pinterest board.

FAQs on How to Design a Nursery

What are the most important factors to consider when designing a nursery?

The most important factors to consider when designing a nursery include the qualification of the staff, getting ready for school, and health and safety.

When should you prepare a nursery?

It’s best to put together a nursery before your baby is on the way so you won’t feel rushed when the time comes.

What color should I paint my baby’s room?

While it’s tempting to go bold, painting your little one’s bedroom in bright colors could restrict their vision and sense of security. Stick to neutrals like yellow, blue, and white.

What should I put on the walls?

Artwork can be a great decoration for your little angel’s room. It helps them express their personality while teaching them about shapes, patterns, and color recognition. Don’t forget to include pictures of your family members too.

Final Thought on How to Design a Nursery

As you can see, answering how to design a nursery is not as difficult as it seems. Just keep in mind your child’s needs and wants, and make sure to have a lot of fun with the process. 


The post How to Design a Nursery appeared first on Kitchen Infinity.

Did you miss our previous article…
https://chefbuano.com/?p=1244

Ceramic Tile Flooring Review: Pros and Cons

Ceramic Tile Flooring Review: Pros and Cons

Are you looking for flooring material that can be used in the living room, kitchen, and bathroom? Ceramic tile is a great flooring material, but it comes with some advantages and disadvantages that you should consider before installing them in your home. 

Also, deciding whether ceramic tiles are best for your new floors depends on your style preference and budget. Let’s have a comprehensive review of ceramic tiles to see if they can be a great option for your home.

What is Ceramic Tile Flooring?

Ceramic tile flooring is a type of hard tile made from clay. It is then kiln fired, making it a durable and long-lasting material. Ceramic tiles are available in a variety of colors, sizes, and shapes. They can be used in both residential and commercial spaces. 


Image credit: https://www.westsidetile.com/

Ceramic tile is also known as porcelain tile or non-porcelain tile. Porcelain tiles are more durable and dense than non-porcelain tiles. Ceramic tiles come in many varieties depending on the production process. Natural stone tiles are a well-known type of tile flooring, while other types of quarried stone include granite, marble, and slate.

Each of these tile flooring types has its specific characteristics and appearance. Natural stone tiles are more expensive than ceramic tiles.

Pros of Ceramic Tile Floors

Ceramic tiles are known for their versatility, low maintenance requirements, and moisture resistance. They have a hard surface that doesn’t hold onto or attract dust, dirt, or pollen. Learn some of the pros of ceramic tiles below:

Easy to Maintain

Ceramic tiles are relatively easy to maintain, requiring only a basic mopping every so often. If any stains, dirt, or liquids get on it, they will all rest on top and won’t get absorbed. You can also keep them clean frequently by using a vacuum with a soft brush attachment or a broom to get any loose debris and dirt off the floor. 

If any stains happen, you can use any cleaner, just like how to clean tile floors of different kinds. In addition to being easy to clean, germs won’t harbor on the floor, making it a great advantage when running a business that serves the public, such as a restaurant.

They’re Affordable on Any Budget

One of the biggest pros of ceramic tile flooring is that it is one of the most affordable types of flooring that you can buy. It ranges in price, so no matter what your budget is, you will be able to find a style and color that fits your needs. Most tiles will cost around $5 to $10 per square foot.

Tile is also more cost-effective than hardwood flooring but expensive than carpet. You can also find low-end ceramic tiles for as little as $0.50 per square foot and high-end tiles for as much as $15 per square foot. 

When finalizing your budget, ensure you account for additional installation costs such as labor, tools, and supplies. This is because as you look into the better-looking tile and professional installation, tile flooring can cost more than quality hardwood flooring.

They Can Withstand High Traffic Areas

One of the benefits that ceramic tiles offer is that they can support heavy foot traffic. This means you can walk on them every day without wearing them down or having to worry about creaking noises while you walk over them. However, keep in mind the quality will yield more wear and tear than higher-end tile.

The intense firing process makes ceramic harder to crack than porcelain or stone tiles. A quality tile flooring installation should last 20 years, which could add long-term value to your property if properly maintained.

Water Resistance

Another benefit of ceramic tiles is that they are extremely water resistant. This will be perfect for areas with high humidity or the possibility of spilling liquids, giving you peace of mind knowing your floors will remain safe. There is a protective layer on top of the material, making it stain and water resistant. 

This is very important in bathrooms and kitchens as the ceramic tile will last longer than other materials. If you buy unglazed tile such as traditional Saltillo tile, you’ll need to seal it to protect the surface from any liquids it might encounter. It must be properly sealed because the grout lines between the tiles can be susceptible to moisture. 

Otherwise, water can get down deep into the lines, weakening their installation and putting them at risk for mold growth. This can lead to costly problems down the road.

Ceramic Tiles are Durable

Another element to consider is the durability of ceramic tiles. These floors are extremely sturdy and can stand up to heavy foot traffic very well. They won’t crack or break like other materials would, so you don’t have to worry about any unnecessary replacements that might affect the aesthetic value of your home. 

And when one tile ends up breaking due to severe impact, you can easily replace the tile without redoing the entire floor. This allows you to keep your overall costs down because you don’t need to replace your tiles regularly.

They’re Allergen Resistant

Due to their hard, solid surface, ceramic tiles have a lot less porous area than other materials. This, in turn, makes them resistant to allergens and bacteria that might affect the overall health of the people living inside a house.

Allergen particles are easy to spot and remove, making them a great choice for family members who suffer from allergies and asthma. Ceramic tiles are a great option for people looking to keep the environment of their house free from harmful allergens or irritating materials floating in the air.

Ceramic Tiles Come in a Variety of Designs

The ceramic tiles currently on the market come in various colors, patterns, finishes, and designs, from subtle neutrals to bold mosaics. This makes it easy for homeowners to find the perfect tiles to match their home’s interior design scheme.

Ceramic Tiles Come in a Variety of Designs
Image credit: https://www.homestratosphere.com/

Modern printing technology has also led to styles that mimic concrete, wood, and marble. This means that you can create a truly custom look by cutting your tile into planks or larger squares to make your space feel more open. You can also learn how to paint ceramic tiles and give them a perfect look.

Cons of Ceramic Tiles

The durability and moisture resistant feature of ceramic tile comes at a cost. So, it’s important to understand the drawbacks of this flooring option before heading to the home improvement center to make the purchase:

They’re Not Very Comfortable to Walk On

One of the biggest complaints about ceramic tile is that it’s not very comfortable to walk on. This is because it’s a hard surface, leading to joint pain and leg fatigue over time. Tile’s hardness can also be uncomfortable in areas where people stand for long periods, like in front of the kitchen sink or stovetop.

However, a few strategically placed area rugs and cushioned mats can help absorb some of that discomfort. As an advantage, the tile floor will feel great to step on the cold floor during the hot summer months.

It’s Slippery When Wet

Another drawback is that ceramic floor tile, like other hard surfaces, can be very slippery when it gets wet. This can pose a safety hazard if you have young children or older adults in your home. It’s especially dangerous to walk on tiles with water or ice because it can cause people to slip and fall. 

It's Slippery When Wet
Image credit: https://www.covertecproducts.com/

This floor option is quite slippery, and if you’re installing them in highly trafficked areas, you want to prevent accidents as much as possible. In that case, avoid installing them in spots where liquid or water is spilled often on the floor, leading to injuries. For example, avoid using them in public bathrooms as you don’t want a lawsuit on your hands from a customer slipping on the wet tile flooring.

They Require Maintenance to Prevent Moisture Damage

Another thing to consider before picking ceramic tile flooring is that it requires a lot of maintenance. If you’re not careful, the tiles could get damaged from water and moisture, making them a breeding ground for bacteria and germs. With the grout lines acting as a pathway for liquid, this can be especially dangerous if anyone slips or trips.

A grout sealer is highly recommended on ceramic tile flooring to keep the moisture out and prevent damage like tiles’ watermarks. This also ensures that moisture doesn’t damage the underlying subfloor causing it to warp or crack. On top of this, having perfect subfloor conditions will ensure your tiles stay in place for years to come.

They’re Heavy

Tile flooring is heavy, making it a bad choice for upper-story installations. If it’s necessary to put tile flooring on the top level of a business establishment, then a professional should first check out the framing and building structure to ensure it can support the weight of tiles.

Ceramic Tile is Hard

Tile flooring is made out of ceramic, which is naturally hard. If you’ve ever stepped barefoot on a tile floor and felt the pain or heard your mother telling you not to run around on it, then you know how tough ceramic tiles are. Resilient floors can be softened with padded underlayment, but tile cannot.

Therefore, it doesn’t make for the best material for those who need to stand for hours at a time. You can use area rugs or throw rugs in the places where people stand most, like in front of the kitchen sink or behind the counter at the cash register.

High Installation Cost

Ceramic tile installation is not a do-it-yourself project. It’s also a time-consuming job that needs professionals. And, because of all the labor involved in the process, it is one of the most expensive flooring options you can choose.

Homeowners who want to install their tile should be careful of products that are easy to install and avoid tricky tiles such as large rectified tile, polished stone tile, and natural clay or Saltillo tile, which should be left for professionals.

FAQs on Ceramic Tile Flooring Review

Is ceramic tile good for flooring?

Ceramic tile is a good choice for flooring because it is durable, easy to clean, and can be installed in many different patterns and different rooms at home.

How can you tell porcelain tile from ceramic tile?

Ceramic tile is usually made in pottery or kiln, while porcelain tile comes from the same conditions but undergoes further refinement. The clay used in porcelain tiles tends to be purer and refined than ceramic tiles. Ceramic is designed for indoor use, while porcelain can be used indoors and outdoors.

Final Thought on Ceramic Tile Flooring Review

There you have it. The pros and cons of using ceramic tile on your floors. So, before you make the final decision on what to put down, make sure you weigh all your options.


The post Ceramic Tile Flooring Review: Pros and Cons appeared first on Kitchen Infinity.