Window Air Conditioning Tricks

Window Air Conditioning Tricks

Window AC units are a great way to stay cool during the hot summer months. But at the same time, they can be tricky to install and maintain. The wrong installation can lead to the AC unit falling out of the window, or not cooling your room as well as it should.

In this article, I will give you some tips for installing and maintaining your window air conditioner so that it works well all summer long. Let’s get right into it.

Installing and maintaining your ACs correctly

Understanding howdifferent types of air conditioners work is the first step in learning how to maintain them.

For example, most window ACs are cooled with simple, CFC-free R410A refrigerant gas. For these types of air conditioners, water is the cooling agent that absorbs heat from inside the room and passes it through the AC’s compressor. 


Image Credit: http://popularmechanics.com

The compressor increases the pressure of the water vapour until it becomes a hot gas (steam). The gases are then released through a set coil outside your home which cools it down before pumping it back into your room. The AC fan blows cool air into your house or office space to lower its overall internal temperature window air conditioning tips

With that said, installing a window AC unit is very similar to installing a normal window. The first and most important step is measuring your window. Make sure you have the right size AC unit for your window otherwise it will not cool your room properly or may even fall out of the opening.

Once you have the correct sized air conditioner, carefully read over the installation instructions before taking any steps. A lot of units can be flipped horizontally or vertically depending on what suits your window best, so make sure you’re doing that correctly as well.

After you’ve got everything set up, it’s time to plug in your AC and enjoy some cold air. Because most units are installed inside a window, keeping them dust-free is important for keeping them running smoothly and reducing wear and tear.

Make sure to keep an eye on your filters and have them replaced when needed. Also, because you are dealing with water vapour, do not place anything that can melt or catch fire near your unit.

The last step is making sure the AC itself stays secure in the window so it does not fall out. Some ACs come equipped with locks but if yours does not have one, installing a few screws at the top of the unit will usually suffice to make sure it doesn’t accidentally slip out of its casing window air conditioning tricks

The importance of having air conditioners installed securely

As we mentioned before, one of the dangers of installing a window AC unit is that it can fall out of the window.

This happens most often when the window opening is too narrow for the AC unit, or if there is no installation support on the inside of the window frame.

To help prevent your air conditioner from falling out, make sure you are using the correct size unit for your window and that it is properly installed. You can also use a locking mechanism to keep the AC in place.

If you are still worried about your AC unit falling out, it’s best to contact a professional to install it for you. They will know how to properly secure your air conditioner so that it doesn’t move an inch over the long term.

Other factors to consider

In addition to proper installation and maintenance, there are a few other things you can do to keep your window AC unit running smoothly all summer long.

One of the most important things to do is to keep the area around your AC unit clear. This means not placing any furniture or other objects near the unit that could obstruct the airflow.

How to Install Window Air Conditioner Units | Clera Windows + Doors

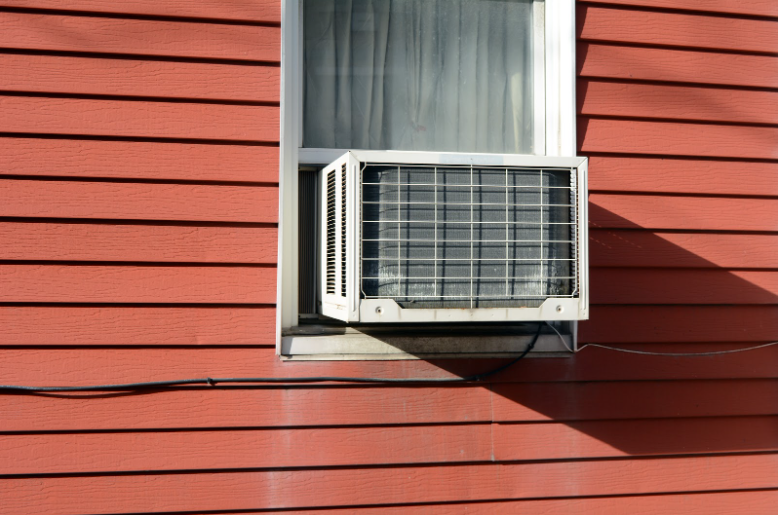
Image Credit: http://clerawindows.com

Finally, set a schedule for using your AC so that you’re not turning it on and off constantly. This will help reduce wear and tear on the unit and save you some money on your energy bill.

Window air conditioning freeze-ups

Window air conditioner freeze-ups do happen, but there are steps you can take to lessen the frequency at which they occur.

The first is keeping water out of the unit. A window AC unit pulls in air from outside and then pumps it back into your room. If that air has any moisture in it, it will lead to ice forming on the coils which prevent it from cooling down your space again.

Just like for all other units, avoiding places where frost can form is important for keeping your unit running smoothly throughout the year.

Finally, be sure not to cover your AC with blankets or furniture when it’s turned on as this can trigger ice build-up very quickly.

Window Air Conditioning Tricks – FAQ

What is the best way to clean the filters on my window air conditioner?

The most effective way to clean filters on a window air conditioner is by vacuuming them with the brush attachment. You can also use a damp cloth to wipe them down, but be sure to let them dry completely before putting them back in the unit.

How can I improve the airflow through my window air conditioner?

If you are having trouble getting enough airflow through your window air conditioner, try cleaning or replacing the filter. You can also make sure the unit is in an open area with plenty of room for air to circulate.

What should I do if water starts leaking from my window air conditioner?

If water starts leaking from your window air conditioner, the first thing you should do is turn it off and unplug it. Next, try to determine where the leak is coming from and take appropriate action to fix it. If you are unable to fix the leak yourself, contact a professional for assistance.

Can I use a space heater with my window air conditioner?

Yes, you can use a space heater with your window air conditioner as long as it is placed at least three feet away from the unit. Be sure to keep a close eye on the space heater while it is in use to avoid any potential fires or other hazards.

Final thoughts on window air conditioning tricks

In this article, we’ve gone through a few window air conditioning tricks that you can use to keep your home cool and comfortable. By following these tips, you can save money on your energy bills and make the most of your air conditioning unit.

Always take care of your window air conditioning unit by keeping it free from dirt, debris, and other materials. This will help to keep the unit running efficiently for as long as possible. If you have any trouble with your unit or you notice something is wrong with it, be sure to contact an expert who can give you specific advice for your situation.

Finally, check out this article on the best air conditioners to buy if you’d like to get your hands on the best ACs in the market right now.

The post Window Air Conditioning Tricks appeared first on Kitchen Infinity.

Did you miss our previous article…
https://chefbuano.com/?p=1108

How to Repair Orange Peel Texture

How to Repair Orange Peel Texture

Orange peel texture is a common issue in the home improvement industry. This problem can happen for many reasons, but most commonly it happens because of improper installation or removal of roofing materials. The good news is that there are some things you can do to fix it.

This article will outline how to repair orange peel texture and prevent future occurrences. Let’s get started.

What is orange peel texture?

Orange peel texture is a term used to describe the appearance of a surface that has been covered in a thin layer of paint or another coating. The surface appears bumpy and textured, similar to the skin of an orange. This can be caused by many factors, including improper installation or removal of roofing materials, using the wrong type of paint or sealant, or excessive weathering. 

Image Credit: http://eegrestore.com

Alternatively, it may be caused by using paint or sealant that is too thick. In this case, the paint or sealant may have been applied with a sprayer instead of a roller and not properly brushed out to smooth the surface. When this happens, it can be difficult to tell which part of the roof has been painted and which parts haven’t; therefore it appears as though the entire roof is orange peel textured.

Main causes of orange peel texture

If shingles are not installed correctly, they can pull away from the roof over time, causing the underlying roofing material to appear bumpy and textured. Also, if the shingles are removed too quickly, they can tear away from the roofing underlayment, causing them to appear bumpy and textured as well.

Alternatively, orange peel texture may be caused by using paint or sealant that is too thick. In this case, the paint or sealant may have been applied with a sprayer instead of a roller and not properly brushed out to smooth the surface. When this happens, it can be difficult to tell which part of the roof has been painted and which parts haven’t; therefore it appears as though the entire roof is orange peel textured.

Finally, if your home is in a sunny or hot location, the sun may cause the paint to blister and peel, also resulting in an orange peel texture.

How to fix orange peel texture

There are several ways that you can fix orange peel texture.

In this first place choosing thebest ceiling materials to buy should be done before getting started.

If the problem is caused by using paint or sealant that is too thick, then the solution is to use a roller instead of a sprayer to apply the paint or sealant. Use a medium nap and go over it about three times with the roller, brushing out any visible lines left behind by the roller.

If your home is in a hot location and has been exposed to too much sun, you can install reflective roof shingles to reduce heat absorption and lower your cooling bills. If you applied a primer that was too thick, apply a professional grade primer at half strength so that it doesn’t dry orange peel texture.

Finally, if the problem is caused by improper installation or removal of roofing materials, then the best solution is to hire a professional to come and fix it. They will be able to properly install or remove the roofing materials so that it doesn’t pull away from the roof over time.

Tips for avoiding orange peel texture in the future

There are several things you can do to prevent orange peel texture from cropping up on your roof again.

First, if you are going to be roofing your home yourself, make sure that you do a good job. Read the instructions thoroughly before getting started and use quality materials. You’ll also want to make sure that if you’re getting someone to do the job for you, they aren’t making any mistakes as they work. This could be anything such as not adding enough shingle adhesive or tearing off shingles too quickly.

Once the roof is finished, don’t walk on it for at least 48 hours so that it can be properly dry up. This will help prevent orange peel texture from forming by giving the coating time to dry completely before it has any chance of peeling away.        

If you are having any other problems with your roof, be sure to contact a professional right away. They will be able to assess the situation and recommend the best course of action. Remember, it’s always better to be safe than sorry, especially when it comes to your home.

Roof texture is not always an easy thing to fix yourself. If you are not sure how to go about repairing the texture on your roof, or if you think the problem may be more serious, it is always best to call in a professional. They will be able to take a look at the situation and let you know what steps need to be taken to fix it. By taking care of the problem as soon as possible, you can avoid further damage and keep your home looking its best.

How to Repair a Wall with an Orange Peel Texture - See Jane Drill

Image Credit: http://seejanedrill.com

How To Repair Orange Peel Texture – FAQ

What is orange peel texture?

Orange peel texture is a type of finish that is often seen on walls and ceilings. It is characterised by its bumpy, uneven surface.

What causes orange peel texture?

In addition to the types ofroof material chosen, there are several factors that can contribute to the development of orange peel texture:

Porous materials: If the surface material is porous, such as drywall or plaster, it will absorb the paint or primer unevenly. This will create a bumpy surface when the material dries.Poor surface preparation: If the surface isn’t properly prepared before painting, it will also be more likely to develop orange peel texture. The surface should be clean and free of dust, dirt, and grime.Incorrect application: If the wrong type of paint or primer is used, it can affect how well it adheres to the surface and may create an uneven texture when dried. It may also be hard for the finish coat to adhere to a rough surface produced by a poor-quality primer or paint.Drying time: Generally speaking, finishes with long drying times are more likely to develop orange peel texture than those with short drying times. This is because in some cases, the paint will begin to dry in certain areas before you have finished applying it. While this isn’t always avoidable, proper ventilation and working in small sections at a time can help minimize this risk.Environmental factors: Sometimes exterior painting jobs produce orange peel texture because of environmental factors such as humidity, temperature, and wind. Exterior painting jobs are especially affected by these factors as they can affect the drying time and how well the paint cures.

How do I fix the texture of the orange peel texture?

The process will depend on what’s causing it, but in general, you should start by eliminating any environmental influences that may be a factor. For example, if there is too much moisture in the air or if it’s very cold or hot outside, this may affect how your finish coat dries and contributes to the orange peel texture. You may have better results painting when conditions are more favorable for finishing work.

Final thoughts on how to repair orange peel texture

In conclusion, orange peel texture is very ugly and bad for resale. You should try your best to properly maintain and repair your roof to avoid this.

If you have any other questions or concerns about orange peel texture or any other roofing issues, be sure to contact a professional right away. They will be able to help you get the problem taken care of quickly and efficiently.

The post How to Repair Orange Peel Texture appeared first on Kitchen Infinity.

Did you miss our previous article…
https://chefbuano.com/?p=1102