How To Fix A Broken Zipper 

How To Fix A Broken Zipper 

Zippers are a common problem in the modern world. They are used on so many things that it’s easy to have one break on you at some point. Besides damaging your garment or bag, a broken or stuck zipper can be very annoying and embarrassing.

The good news is that zippers can be fixed, but it takes know-how and patience to do so. You may not want to spend hours trying to fix something that isn’t worth the time or effort, which makes finding out how to fix a broken zipper an important skill for everyone. 

This guide will teach you several ways of fixing your broken zipper without having to buy a new piece of clothing or bag with working zippers again. Let’s get started.

What You’ll Need

Bar soapWD-40 LubricantStrong threadPencilScissorsRuler, tape measure andMirrorNeedle nose pliers and wire cutters

Instructions on How to Fix a Broken Zipper

If your entire zipper is ripped out and you have to replace it, then you’ll have to know how to operate a sewing machine. If you can do simple sewing projects like how to sew curtains, repairing your zipper will be a walk in the park. Check for demos online on repairing broken zippers and do it yourself in the comfort of your home. The following steps should guide you:

Remove the Bottom Stop from the Zipper

Use the wire cutters to snip off the bottom stop on your zipper. This is often too tight around the teeth to easily pry free with your fingers, but you will want this piece again for your zipper to work at all. You can also pry off the zipper’s bottom stop by using pliers to get a good grip. Prying off with a little band of metal or plastic at the bottom of the zipper teeth helps the zipper slide more easily.


Image caption: https://guide-images.cdn.ifixit.com/

Position the Zipper Pull

Once you’ve removed the metal or plastic, stop. Use a pull tab to drag the zipper slider apart, widening the opening of your zipper. Position whichever side of the metal or plastic bottom stop you removed closest to where the actual bottom part of the zipper is located.

Realign Zipper Teeth

Lay the broken zipper face down on a flat, sturdy surface. If there are any teeth that have come out of alignment, use the pliers to pinch them back into place. Run your fingers carefully along all of the teeth to ensure they are even with one another. This will enable all zipper teeth to mesh smoothly. If you’re unable to mesh them smoothly, then mark the spot on the zipper with a pencil or marker and use needle-nose pliers to pinch the teeth together until you’ve reached your desired alignment.

Reposition the Zipper Pull

Move your slider up to the top of the zipper to determine the extent of your zipper’s unzipping capabilities. If a portion of the zipper needs to be sewn back together, cut the slider off with sharp wire cutters. If you can still function as desired without sewing, you should remove the slider completely and evenly lift both sides of the teeth until they meet at an ideal alignment.

The left side of the zipper represents the top half, and the right side represents the bottom half. Add a thick line of glue to both sides of each tooth that meets in the middle, then clamp with needle-nose pliers until they stand upright and dry overnight.

Thread the Sewing Needle

Use a heavy thread or fine-weight monofilament fishing line to thread the needle and tie a knot on one end. Knots at the beginning and ends of seams help prevent your stitching from coming undone over time. Don’t worry if you have a heavy thread; instead, double the thread and knot the ends together.

Create New Zipper Stop

Pull the thread up through the zipper’s top stop and the zipper tape. The top stop is a metal or plastic flange on the zipper’s head that prevents the slider from going further up the track. Ensure the zipper pull or slider is above the spot where you want to add a new stop.

Create New Zipper Stop
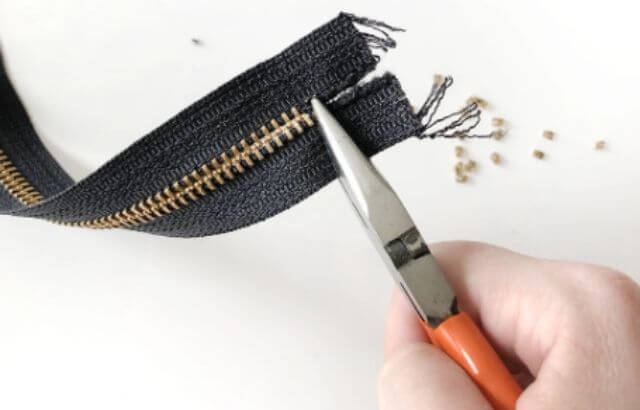
Image caption: https://homeaffluence.com/

Repair the Damaged Teeth

If the teeth of the zipper are damaged more than the zipper itself, you need a new zipper. However, if the missing or damaged teeth can be replaced with a few stitches of your thread, you should be able to fix the broken zipper and skip the step for opening up the zipper. Although it will shorten your zipper’s length, it will make it stay closed.

Secure the Thread

Secure the thread by making a couple of stitches over the slit through which you pull the zipper’s cord once you’re done sewing.

How to Fix a Stuck Zipper

If your zipper slider is stuck and not moving, the most common reason might be your thread or fabric. They might be wedged on the teeth or caught up in the slider. Here are steps to remedy such a problem:

Stop Struggling and Investigate the Cause

Stop tugging your stuck zipper up and down immediately, as you could damage the one-way nylon teeth. If your zipper happens to be jammed on a little bit of fabric, don’t keep tugging on it out of frustration. Turn your clothing or bag inside out and follow along the zipper lines with your fingers to find the source of the problem.

Retract the Fabric

Unpick any thread or fabric that’s caught in between the zipper, and use a needle to remove any stubborn fabric left behind. Apply the pulling motion to the fabric and not the zipper to gently pull it back down. Use needle-nose pliers or tweezers for better results.

Color the Zipper Teeth with Graphite Pencil

Take a pencil and rub the graphite along the teeth until you get to the bottom of the zipper. The graphite pencil will lubricate any gaps between teeth, so they grip better. Make you run the pencil lead on the entire zipper if it’s not working.

Up Your Lubrication Game

If you’ve tried so many things, but there’s still a pretty significant jam, up to your lubrication game by using household items that work as lubricants for stuck zippers. Household items lubricants for stuck zippers include talc powder, lip balm, baby powder, bar soap and vaseline. You can also use a glass cleaner or wax paper if you don’t have any household items to use.

Before choosing a lubricant, consider the fabric your clothing or bag is made of. Some lubes could leave an unpleasant, flaky residue on your favorite clothing. Make sure you apply along with the zipper teeth the same way you applied the graphite pencil. Now gently tug on your zipper to see if this will work for you, but remember that it might not be the same as before.  

FAQs on How to Fix a Broken Zipper

Why does my zipper not close?

One of the biggest problems that people face with their zippers is that they don’t zip close. Just like your button, you might be missing teeth (the little metal pieces) on the zipper. You can use tweezers or needle nose pliers to pull out each tooth until it has enough room to go back together. Do not squeeze so hard because you can break the slider.

Can you replace zipper teeth?

Yes, you can replace a zipper tooth if yours are missing or broken. All you need to do is purchase a replacement kit from the store and then replace your teeth with that small metal strip. You will not have to sew in new teeth; they snap into place.

Final Thought on How to Fix a Broken Zipper

As you can see, fixing a broken zipper can be done by yourself. All you need is to follow the steps above, and you will get the solutions on how to fix a broken zipper. So instead of throwing away your tool bag or tent, try these tried and true tips to fix your broken or stuck zipper. You can also learn other simple DIY projects such as how to sew a face mask and have fun with it as well as save money in the process.  


The post How To Fix A Broken Zipper  appeared first on Kitchen Infinity.

Did you miss our previous article…
https://chefbuano.com/?p=579

What Is Tudor Architecture?

What Is Tudor Architecture?

Tudor architecture is a style that has been used in the construction of homes and other buildings in the United States since 1890. Despite its popularity during this period, there are many who do not know what Tudor architecture is.

This guide will help you understand and learn about Tudor Architecture so that you can easily identify houses built during the period 1890-1940.

Definition of Tudor Architecture

If you’re like most people, you probably have seen a house with features such as half-timbering, steep roofs, tall narrow doors. You may also have seen long casement windows arranged vertically on buildings that resembled castles or cathedrals of Medieval Europe.


Image credit: https://www.seniorlifestyle.com/

You might even be able to identify these features as being part of an overall “Tudor” look but may not immediately recognize them as belonging to one specific architectural style known as Tudor Style Architecture. Tudor refers to a period between 1890 and 1940 when European trained architects came to America and brought their unique styles, making each building distinctly different.

Built for wealthy homeowners, Tudor houses were built of solid masonry with elaborate decorative stone and brickwork. They were also called Stockbroker Tudor because they were built for people who had made their money on Wall Street.

A notable feature that distinguishes them from other kinds of homes is their steeply pitched, front-facing gables usually decorated with intricate carvings. However, the most distinctive feature and most commonly associated with this style is the “half-timbering,” which is the decorative imitation of structural timbers.

The Fall of Tudor Homes

This transitional style continued to pop up in villages throughout England until Elizabethan architecture took over in 1558. While it became so popular during the Tudor Dynasty, it fell out of favor when Elizabeth I came to power. This style lasted until the early 16th century, also coinciding with Henry VII and Henry VIII, who hailed from the house of Tudor.

However, Tudor Revival Architecture is less common than other American architecture styles, but its unmistakable charm makes it a fan favorite. Tudor Revival homes are located in the northern U.S because their facade is ideal for colder climates. These Tudor revival homes are also called mock Tudor. 

Tudor style was also out of popularity around World War II when the resurgence of patriotism encouraged an appreciation of more American style, which is colonial revival. Tudor revival architecture was also expensive to build in the past, so it was more common among wealthy people.

Famous Tudor examples include a Tudor house in Montgomery, which is the landmark Newlands Memorial Mansion. These types of homes are commonly found in the northern United States. The residence has a variety of features, making highly stylized Tudor, including dormers, richly decorative chimney pots, uncoursed stone, half-timbering wide, decorative verge boards, and a stone porte-cochere.

Characteristics of Tudor Houses

Tudor homes are characterized by their steeply pitched gable roofs which are cross-shaped. Other features include the use of stone, brick, or half-timber, small windows with multiple panes, and masonry chimney pots.

Characteristics of Tudor Houses
Image credit: https://simplynorthshore.com/

This stockbroker often featured brick and stone walls on the first story and upper floors were stud-framed and covered with stucco walls and decorative faux timbers.

Materials

American Tudors are easily recognized by their characteristic steep, cross-shaped gable roofs and stucco walls. Decorative brackets and beams support the large overhang of the roof. The facade may be brick or stone, while the other walls are generally finished in stucco, half timber, or wood shingle siding.

Sometimes a large porch covers the front door and extends across the front of the house parallel to the street. A small cottage-style porch may also adorn a side entrance, often under a separate roof extending over a breeze-way or breezeway.

Roof

A distinguishing feature of Tudor house was the steep gabled roof. The steep pitch of the roof was intended to funnel rainwater off as quickly as possible. In several instances, the roofs have been built with a slight curve from front to back to direct more rainfall into the center of the building and then outside.

Roof
Image credit: https://i.pinimg.com/

Cotswold stone slabs replaced the traditional thatched roof. The roofs on the later buildings were of slate and occasionally of tile, but some houses still have thatched roofs today.

Windows

Tudor-styles houses had casement windows grouped in rows of three or more, each opening from a single sash. Double-hung windows were not that common. Windows were divided into six or eight rectangular panes and arranged in a diamond pattern, with the latter style often executed in leaded glass.

Windows were usually placed symmetrically on either side of the doorways. Panes were commonly diamond-shaped, with several panes grouped or separated by stone mullions. Rows of diamond-pane windows are often found on the first floor above the ground floor, sometimes in three large windows capped with ogee arches.

Entrance

The Tudor entrance was part of asymmetrical architectural elements, some for decorative and some for protection. A small entry porch is sometimes incorporated into or at least approaches the main entrance to protect from inclement weather. This is frequently achieved by a direct but unobtrusive entry which consists of two or three steps leading up to an enclosed vestibule.

Entrance
Image credit: https://www.impressiveinteriordesign.com/

Designed for pure comfort, the parlor is often located on the first floor just off the main entrance and is usually furnished with a sofa and chairs. Builders also accented the interior spaces with dark wood detailing on the floors, walls and ceilings.

How to Recognize a Tudor Revival House

Traditional Tudor houses are usually large and located in oversized lots. You can easily recognize them by features such as rectangular windows, half-timbered exterior facades together with stucco or decorative brickwork. You’ll also see chunky iron door ware for medieval architecture, earth-tone cladding colors, and multi paned windows or diamond-shaped where some are leaded glass.

Tudor Style Homes Today

Smaller Tudor homes are also being built today. Architects have taken the traditional Tudor design and modified it into a smaller, more affordable version that can be used in areas where space is limited. So, if you’re building your own house Tudor style, you’ll definitely like the modern design. 

These homes are still recognized for their half-timbered exterior facades, which are made with masonry materials.

Their roofs are steeply pitched to give the homes lots of character but may have tiles, slates, or shingles instead of the traditional thatching. The windows on Tudor homes are tall and narrow, but they can come in multiple panes. Sometimes five to six panes provide better insulation for living in colder climates that are more typically found in Europe, where the design was originally developed.

Problems Associated with Modern Tudor Styles

Even if Tudor houses have been restored to an aesthetic look, their unique look and design will present maintenance and upkeep issues because of compelling elements such as slate roofs, plaster walls, and highly inefficient leaded glass windows.

FAQs on What is Tudor Architecture

Who created Tudor architecture?

Tudor revival was started with a designer called William Morris and architect Richard Norman Shaw in England in the 16th century.

What is an example of Tudor architecture?

The Adams Building, located in Quincy, Massachusetts, is one of the best-known examples of Tudor design. The other good examples are Hampton Court and Hardwick Hall.

Final Thought on What is Tudor Architecture

That’s all about Tudor Architecture. It’s all about the historic elements creating a unique style. In England, this final evolution of medieval architecture is available in many communities in Europe, America, Canada, and Britain.


The post What Is Tudor Architecture? appeared first on Kitchen Infinity.

Did you miss our previous article…
https://chefbuano.com/?p=573

How to Iron Clothes

How to Iron Clothes

Learning how to iron clothes is a useful skill that will benefit you in many areas of your life. Ironing will not only leave you with wrinkle-free clothes but can save you some money on dry cleaning. Learning how to iron clothes is part of learning how to do laundry since the two go hand in hand.

However, ironing clothes is not as simple as it sounds, and there are several things you need to consider when doing so. Different fabrics will require different pressing techniques. You also need to sort your materials ahead of time.

In this article we’ll talk about the most important ones, so you learn how to iron clothes properly. Follow these steps for success in ironing your shirts, dresses, pants, dresses, and skirts:

Clean Your Garments Before Ironing

To have a truly clean garment that you can iron, you should wash it first. Check the label for washing instructions, and be sure to follow them closely. If a garment is not labelled dry-clean-only, you will probably want to wash it before ironing it. 

This is especially true if your clothes have been packed away in a box for a while. It is very important not to skip this step because any dirt or oils from your fingers will transfer to the hot iron, resulting in a shiny spot on your garment.

Clean Your Iron

Rust can get in whatever you’re ironing, so make sure your iron is also clean before you start. Just like how to clean a washer, you can use white vinegar or rub a lemon half on the bottom of the iron. After that, wash it as usual and never use bleach on rust stains. Make sure you clean your iron regularly to prevent steam vents from clogging and making metal plates become sticky.


Image credit: https://hips.hearstapps.com/

Get Out Your Ironing Board and Make Sure It’s Stable

Having a flimsy ironing board is going to cause problems pretty quickly. Not only can you damage your garments with a wobbly surface, but it could also burn yourself or a loved one if the table collapses while you’re in the middle of ironing. You may want to choose a sturdy model that’s heat resistant.

If you don’t have an ironing board, you can still iron your clothes well using a flat sturdy surface like a table and counter so long as you’ve prepared them properly.

Unbutton and Unzip Your Clothes

Buttoned or zipped clothes won’t sit on the ironing board smoothly, so you’ll want to unfasten all the buttons and unzip any zippers before you start pressing the cloth. Ensure you use the pointy part of the iron to get between the buttons. Never iron over the buttons and if you have time, wrap those delicate buttons in aluminum foil before ironing your fabric.

Fill Your Iron with Water for Steam

Fill up your iron reservoir with enough water to produce steam while you iron. You’ll want to use distilled or spring water if you’re particularly sensitive to the minerals in hard tap water, but this isn’t strictly necessary for most people.

Fill Your Iron with Water for Steam
Image credit: https://femina.wwmindia.com/

Steam is better than dry heat when it comes to ironing your wrinkled outfit. This is because the hot steam penetrates more deeply into the fabric fibers and relaxes them. Always start with the coolest temperature recommended on your iron’s settings and increase the temperature if necessary.

Sort Your Laundry by Material

Different materials will require different ironing techniques. Start by sorting your clothes according to the material. Polyester and other synthetic fabrics require the hottest iron temperature, as these materials tend to melt under lower temperatures. Spritz these materials with a spray bottle filled with water to get them damp.

Cotton and linen fabric should also be ironed damp. Pull them out of the dryer before they get completely dry. Use a spray bottle with clean water to spritz each section as you go along. You should use medium heat for polyester and high heat for cotton and both fabrics should be slightly damp.

Wool and silk should be ironed at a low setting. These materials are very sensitive to high temperatures, but they don’t need to be pressed with a cool iron either – you can use a slightly warm temperature for wool and silk garments, especially if their tags indicate it.

Check if Your Iron is Ready

Irons will indicate if they’re ready in many ways. A light may turn and off, or a knob will indicate it’s ready to be set. If you have an iron without any indicators, first turn it on and wait for at least three minutes to feel the effects of the heating process.

An iron must become hot enough to produce steam before pressing can take place. The lowest heat settings won’t produce steam, and pressing over a naked flame can be dangerous.

Use a Damp Cloth When Ironing Lace and Wool

Do not expose delicate items such as lace and wool to direct ironing as it can melt and damage the fibers. Place a damp cloth or an old white towel over the item and iron on top of it to avoid direct contact with the iron. Make sure your fabric is damp and not sopping wet. 

Turn Delicate Fabrics Inside Out Before Ironing

Turn the garment inside and press it from the wrong side to avoid damaging or distorting delicate fabrics. The outside finish of a piece of clothing and any print on it will be pressed down flat by an iron, which is why it’s advisable to always iron clothes inside out.

How to Iron Shirts

If you want to iron a shirt, start at the center of the underside of your shirt collar and work your way to the edge. Drape one side of your shirt’s shoulder over the edge of your ironing board. When iron sleeves, move from the cuff to the shoulder, ironing both sides of the sleeve. 

How to Iron Shirts
Image credit: https://www.dmarge.com/

If you’re ironing French cuffs, use a sleeve board to insert it in the cuff and iron directly on top of the cuff. Otherwise, you could end up with burned fingers or burns on your clothes. Be sure to press down on the folded-over part of the cuff with your iron’s flat surface.

Iron Your Pants from the Waist to the Leg

When it comes to ironing pants with pockets, turn them inside out and start ironing the pockets. But if you have pockets, proceed to the regular ironing process. Go lightly over the pockets so as not to create pocket lines. After that, lay your pants on the ironing board flat with one leg laying on top of the other. Fold back the top leg and iron the inside of the bottom leg.

For a center crease in your pants, start by ironing in the center back. Then roll up your pants so you can iron the leg part. Start ironing from the waist to the hem of your pants in small sections. The same goes when it comes to folding over cuffs and pleats. Here, you can use the steam function if you don’t have a spray bottle.

Iron Skirts and Dresses from the Collar Down

Skirts may seem simple to iron, but complications of pleats, ruffles, and gathers often arise. To iron skirts, make sure to remove the skirt from the hanger. Slide your skirt over the ironing board and begin wrinkle removal using a pressing and not pushing motion.

Start ironing from the collar down toward the bottom of the skirt in sections by moving all wrinkles away from the waistline toward the hemline. Skirts and dresses are made of very delicate fabrics, so they may scorch or be marred by steam. Check your label before setting the iron and test in inconspicuous places to ensure good results.

Keep Clothes Damp

Damp clothes are easier to iron than dry clothes. So, make sure you give your garments some nice coat using a spray bottle. This will make your clothes become wrinkle-free within a short time. 

Hang Your Garments on Hangers After Ironing

You should iron fabric lengthwise to prevent stretching, plus, do not hang your garments on wires after ironing; instead, use non-wire hangers in order to keep your clothes in good shape. For button-down shirts, button the top button to hold the collar up.

Hang Your Garments on Hangers After Ironing
Image credit: https://thumbs.dreamstime.com/

Let Your Iron Cool for At Least 10 Minutes Before Putting it Away

An iron gets extremely hot and can set fire to clothing or dry-cleaning materials like cardboard or paper. If you don’t know the brand of your iron, look for the manufacturer’s name under the soleplate of your iron. Always stand the iron upright when you stop ironing for a moment.

Never iron clothes that are stained, damp, or still slightly wet because the heat will set the stain and make it impossible to remove later on. Always take care not to leave the iron unattended when in use since this could cause a fire hazard. Check the care label before using the steam because some fabrics require a dry iron only.

FAQs on How to Iron Clothes

What can you put on iron to make it slide easier?

When you’re ironing clothes, spray starch will make the fibers stick together and let the fabric glide more easily. However, be careful not to overspray since this can put too much starch on your clothes and stiffen them beyond what’s comfortable.

What is the difference between ironing and pressing?

Although they’re used interchangeably, ironing is the back and forth motion, while pressing is more swiping. Ironing also generally refers to items that require more attention than pressing, which is usually only used on fabrics that don’t need much smoothing out.

Can you iron all the clothing?

Yes, you can iron clothing, unless specified in the laundry tag. You also need to ensure you’re using the appropriate settings for your fabric.

What do you think is the best method for ironing clothes?

The best way to press your clothes is by pulling them straight down onto the board rather than dragging them across it. This allows you to get smooth results without any creases or lines in your clothing caused by the ironing board being slanted.

Final Thought on How to Iron Clothes

As you can see, ironing clothes is simple and only requires the proper use of the best method. You can do this by choosing a flat surface on which to place your clothing and making sure you select an appropriate level of heat for your fabric.

Keeping your fabrics ironed and burn-free is simple when considering a few things in mind as stated in this article. 


The post How to Iron Clothes appeared first on Kitchen Infinity.

Did you miss our previous article…
https://chefbuano.com/?p=567