Best Types of Squash for Beginners to Grow

Best Types of Squash for Beginners to Grow

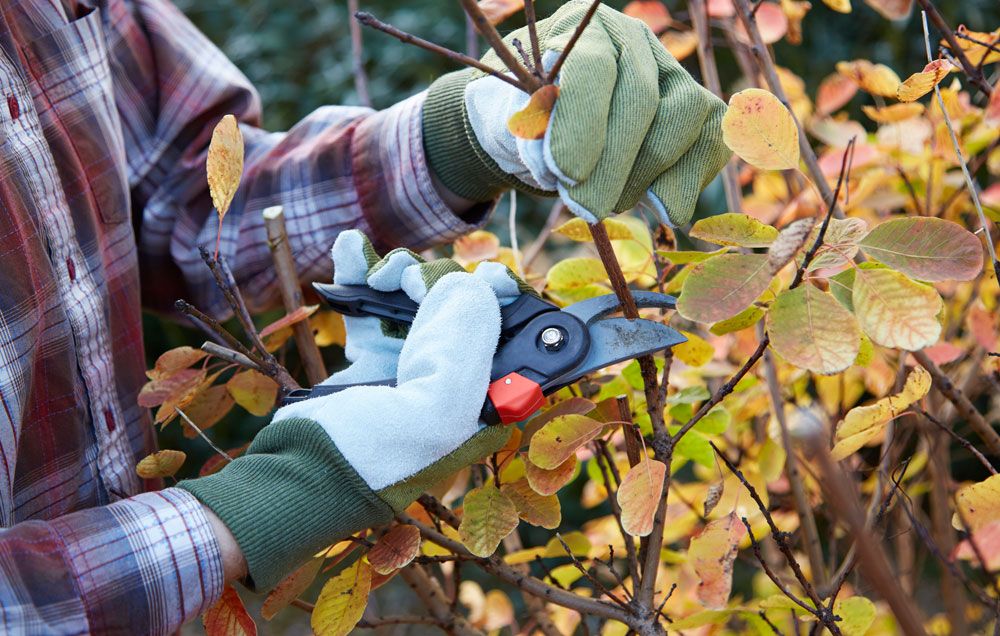
Squash is a great vegetable to grow, but it can be confusing with many different types and names. Squashes are broadly separated into two categories which are summer squash and winter squash. They’re very easy to grow as long as they’re growing in fertile soil and watered frequently. 

We’ve put together a list of the best types of squash for beginners that will help you choose what kind is right for your garden space. Let’s get started!

Patty Pan Squash

This type of summer squash is sometimes called flying saucer squash. This is a fun squash to grow because it will turn bright yellow and have a sweet taste if you let the fruit mature. Pattypan squash is small, yellow, hard squashes with a light, nutty flavor. It’s very easy to grow, and it can be challenging to cut a pattypan squash, but that should never stop you from having this squash.


Image credit: https://images.immediate.co.uk/

corn Squash

Acorn squash is very simple to grow because it has a vine that doesn’t cover too much space. It will produce a big yield if you let the fruit mature to its orange-red color. The skin is a rich dark green and bright orange with a sweet, nutty flavor.

Crookneck Squash

The crookneck squash is a very productive vine. The fruit is long cylindrical, pointed at the blossom end, and has yellow skin with stripes and greenish-white flesh. It has a distinctive pale yellow flesh with hints of green when cooked. These summer squashes have a crookneck rather than a straight neck.

The vines may trail up to 10 feet or be quite erect, 3 to 4 feet tall. The most popular crookneck is yellow crookneck squash. It’s a bush-type plant that is easy to grow. It produces fruit up to 12 inches long with golden yellow skin and golden yellow flesh rich, sweet, nutty, and firm.

Butternut Squash

Butternut squash is a great all-around plant that produces small fruits with a firm, tasty orange smell. The taste and texture of the cooked butternut squash are similar to sweet potato. It’s also a good choice to add soups and recipes, especially when you drizzle it with olive oil and then slowly roast it.

Butternut Squash
Image credit: https://solidstarts.com/wp-content

Butternut squash is widely known for the rich, nutty flavor of its yellow flesh. The neck of the fruit is tan and narrow, while the bulbous bottom is bright orange. It can grow up to 2 feet long. This plant grows best in temperate climates, making it great for cooler regions.

Delicata Squash

Delicata squash is a semi-bush plant, which produces yellow flowers and small, tender fruits. If the summers are hot, it will produce abundant crops of fruit. These fruits can be harvested at any stage of growth from very young to mature if still green. They have a perfect shape for stuffing with delicious cheeses and meats.

It is a good choice to use in soups and recipes, especially when you stuff it with any of your favorite ingredients. It also has thinner skin than many other winter squashes, which makes it easier for you to prepare. Their flesh is creamy white and sweet as well. Delicata squash is a hybrid of the Hubbard and Butternut varieties, making it close to both types.

Spaghetti Squash

Spaghetti squash is another type of squash that’s easily identified. Spaghetti squash comes in different shapes, sizes, and colors and has distinctive comma-shaped spaghetti-like strands that contain its stringy flesh. Spaghetti squash is low in calories, carbs, and sodium. It also contains rich amounts of potassium.

Spaghetti Squash
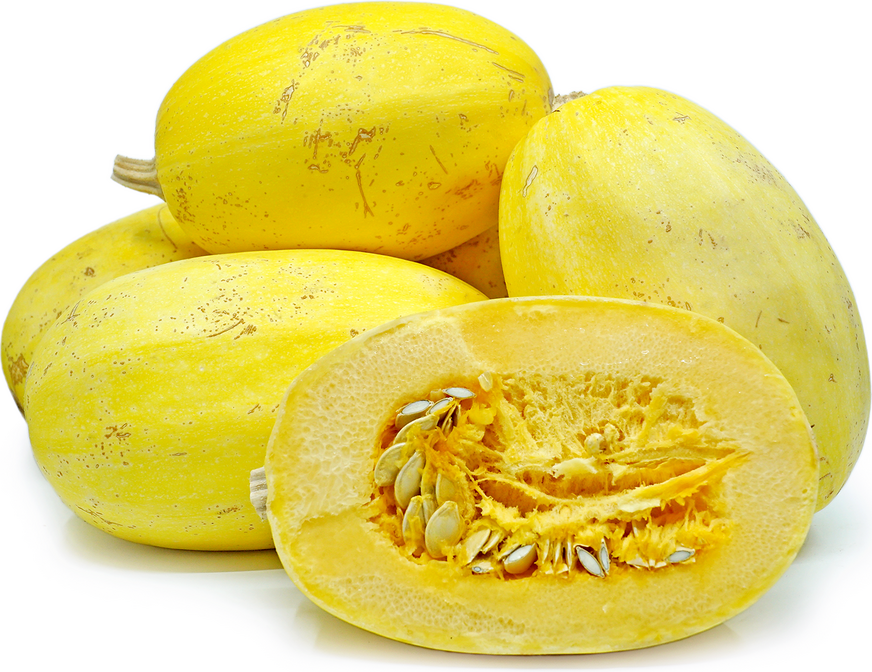
Image credit: https://specialtyproduce.com/

You can find them at your local grocery store with either a yellow or orange exterior. Spaghetti squash has gained popularity in the last five to ten years, thanks to its low-carb and healthy alternative to spaghetti.

Kabocha Squash

A very popular Asian squash, Kabocha (or Japanese pumpkin) is a thick-skinned winter squash shaped like a squat cylinder with dark green skin. It should be eaten cooked, as its raw flesh tastes very bitter and woody. Kabocha squash has an earthy flavor and goes well with savory dishes.

When you cut it, you’ll find a bright orange flesh that tastes like a pumpkin and sweet potato blend. However, it doesn’t store as long as other types of squash; therefore, you don’t have to grow many of them.

Buttercup Squash

In comparison to Kabocha, Buttercup is a very large, bright orange squash with a bulbous bottom and long neck. It has a dense texture and sweet flavor that tastes great when baked or pureed into soups. 

Buttercup squash store well into late winter and are buttery flavor and satiny when baked and mashed. After baking, add olive oil and Romano cheese and roast until browned and crispy on the outside edges.

Hubbard Squash

Hubbard is the largest American variety of winter squash, with an average weight of 50 pounds, which means you’ll need a big storage space to keep them. They’re suitable for pies and baked goods because they’re dryer than other types of winter squash.

It’s used in cooking in much the same way as a pumpkin. It’s also used as a filling for pies and puree in other dishes. Hubbard squash takes at least a hundred days from seed germination to harvest. Its fruits are ready to pick when the vines start to turn dry. Allow your fruits to cure for about two weeks before eating. Also, ensure you store your fruits in a dark, cool place for up to six months.

Zucchini

If you’re looking to grow edible fruits, then you should not let go of zucchini. Like any other squash, zucchini requires cross-pollination between male and female flowers. The most common summer squash grown in summer gardens is green zucchini. Green zucchini can grow in a range of conditions and climates. It requires cross-pollination for fruit production, so you need to plant at least two plants. 

There’s also baby round zucchini which is a popular choice if you want to grow a lot of zucchini in a small space. It’s also good for growing in containers. If you’re just learning how to grow zucchini, you need to know that it can be grown from seeds or by transplanting seedlings outside after all danger of frost has passed. You can also learn how to harvest zucchini so you don’t end up damaging your precious fruits.

Banana Squash

Banana squash is largely elongated in shape. It comes with several varieties that can grow up to 4 or 5 feet long and 1 foot wide. The fruit is very sweet, and the flesh is dark yellow. The skin of this squash is usually orange, pink, or blue in hue. When you store it properly, it can take up to six months. This squash is a great product for you to store.

Turban Squash

The shape of this squash does resemble the shape of a turban. They are very decorative squash with vivid color. They have many colors at the same time, but unlike decorative gourds, they are also good for eating. This squash is very popular with chefs because it can be cooked in many different ways, both sweet and savory. 

The flesh of this type of squash is very dense, and the flavor is described as nutty with a sweet, almost maple syrup-like aftertaste. Besides that, they are also low in calories and easy to digest. They also come in different colors, such as bright orange or golden yellow with green striped skin that add beauty to your salad.

Carnival Squash

Carnival squash is one good example of a common hybrid type. It’s a cross between acorn and sweet dumpling squash. It’s got a pale orange color, so it adds flavor to your meals. This type of squash is also great as a side dish because it can be enjoyed with sweet or savory dishes.

Red Kurri

This is another Japanese squash, but this time it’s also known as red Hubbard. It’s got a slightly nutty flavour than the carnival squash, but with an equal sweetness too. Despite its name, it is not related to pumpkins at all. They have a delicious, mildly sweet flesh which gives them a chestnut-like flavor. They are versatile because the flesh can be used in many dishes, like soups and roasted vegetables.

Pumpkin

This is probably one of the most common types of squash on the market today. If you already know how to cook pumpkins, think smaller and more flavorful. It is fun growing this type of squash because the vines wrap around trees and other structures for support. The flesh of pumpkins can be used like butternut squash in soups, stews, dishes with pasta, or risotto.

Pumpkin
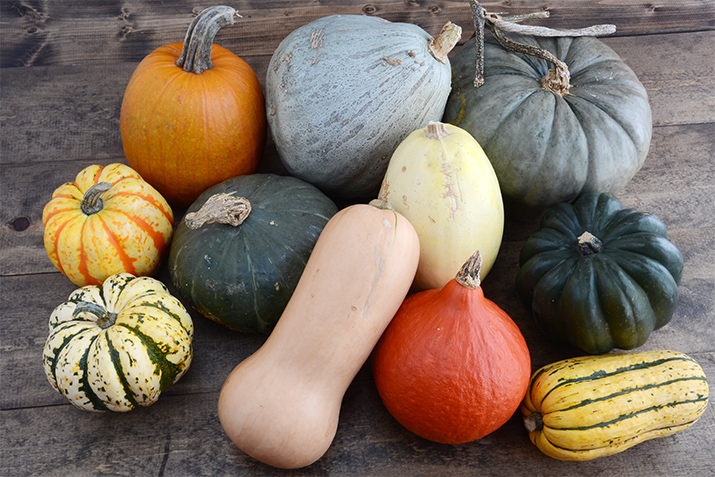
Image credit: http://ocdn.eu/

 Also, you can make pies with it if you roast it in slices before placing it in the oven. They start small and green on enormous vines, then start fattening up and transforming into the bright orange color we are accustomed to. This is another squash type for which you need a big pot.

Zephyr Squash

Zephyr squash are two-tone fruits that make them easy to distinguish in the garden. The squash has long fruits that are straight and divided into two colors. The yellow color is on the top, while the pale green color is on the bottom. The fruit of zephyr squash can be eaten or added to salads, stews, and pies. 

In order to have a successful harvest, you need to keep your plants healthy all summer long. Ensure that they get enough water and fertilize them every two weeks with a special formula for vegetables that contain more potassium. Also, take care of pest problems that can damage your crop if not controlled in time.

Straightneck Squash

Straightneck squashes are known for their long, straight shape. They are typically yellow and have mildly sweet flesh and tender skin that is easy to peel. It is often used in pies, soups, and stews. Use the same techniques as for crookneck squashes but watch out for mildew which can damage your crop if not controlled in time.

Sweet Dumplings

Sweet dumplings are small and compact with whitish-yellow skin with green stripes. You can even eat its tender skin if you want. Unlike other winter squash, it’s tender. It is fast-growing and has long vines that creep everywhere. They have a sweet flavor, plus a taste and texture that is similar to sweet potatoes. Make sure you grow them in gardens that are spacious and have full sunlight for optimal growth.

FAQs on Best Types of Squash for Beginners to Grow

What is the best yellow squash to grow?

Yellow Crookneck is considered one of the best types of squash to grow. It’s very easy and fast to grow and perfect for beginners, plus they’re also resistant to bacterial wilt.

What is the healthiest type of squash?

The healthiest type of squash is yellow squash, also known as summer squash. Yellow Crookneck Squash has the most antioxidants and the highest level of Vitamin A, making it one of the healthiest types of yellow squash.

Final Thought on Best Types of Squash for Beginners to Grow

As you can see, there are several squash varieties that you can grow with ease. Try yellow crookneck summer squash if you want to go with something easy to grow and resistant to most diseases. It is considered one of the healthiest varieties of summer squash in the world.


The post Best Types of Squash for Beginners to Grow appeared first on Kitchen Infinity.

Why Does My Kitchen Sink Smell Like Sewage

Why Does My Kitchen Sink Smell Like Sewage

Because your kitchen is the heart of your home, it’s important to keep it clean and to smell fresh. But sometimes you might still notice the foul smell despite your kitchen being sparkling clean. 

Rotten food and kitchen plumbing issues are some of the causes of an unpleasant sewer smell in your kitchen sink. Well, if you’re really not sure about what’s causing that disgusting odor from your kitchen sink then this article is for you. Below are some of the reasons why your kitchen sink smells like sewage.

Reasons Why Your Kitchen Sink Smell Like Sewage

Food Debris in the Drainpipe

When you go to the kitchen sink and flip the switch, do not be surprised to find that there’s no water coming out. Cleaning and disposing of your food waste in the disposal garbage doesn’t completely clean your drain pipes. Food waste can get stuck and cause blockage.

You should remove food debris from the drainpipe using a vacuum cleaner or similar tool to avoid such a situation. Grease buildup can also accumulate and cause a clog which prevents water from flowing properly into the drain. You need to learn how to unclog the kitchen sink before anything else. Regularly using a plunger or plumber snake will help you deal with the problem.

Greasy Drain

This is also another cause of foul sewer smell in your kitchen sink. The accumulation of grease and oil in the drains can also cause a blockage, so it must be removed to restore the flow. If left unattended, fat and oil can harden in the drainpipe and rot gradually, leading to a rotten odor in your kitchen and the entire house.

You can also remedy this by not pouring oil and grease down the drain. Other than causing an unpleasant smell, it can lead to pipe blockage. Try to run a baking soda and vinegar solution in the drain and wash it down with boiling water.

Clogged Vent

If there’s a sewer smell coming from your sink and a greasy drain or trap is not the problem, a clogged vent might be letting sewer gas into your kitchen. Clogged vents prevent the flow of sewer gas out through the drain, so they are retained in your home, giving it an unpleasant odor.

It’s always difficult to identify and remove a blockage in a plumbing vent, so it’s best to call a professional plumber to clean your vent line and check the drain pipes. This can also be remedied by cleaning the drain vent. Use a ladder to climb the top and clear any debris that is clogging your drain vent.

Dirty Garbage Disposal

There’s a certain type of smell that comes from the garbage disposal. It’s formed as a result of some types of food that are kept in it for too long, especially those containing fat, oil, and grease. This is because bacteria form on these foods and emit a noxious odor when they decay.

Inadequate running water in the garbage disposal and food particles can rot and get stuck in the bottom of the unit. This leads to an over-accumulation of food particles which rot and produce a bad smell inside it. Dumping too much food at once and worn-out garbage disposal parts can also cause dirty garbage disposal.

Sewer Smells

Another common type of smell coming from the garbage disposal is a sewer smell. This happens when the drain between the sink and the sewer becomes clogged. Your house plumbing is designed to contain harmful gas, flush away sewage and provide you with clean and potable water.

If the sewer gas is smelling in your kitchen, the smell can be leaking from the sink trap or plumbing vent. The sink trap is located underneath your sink. This can bring some irritation, plus health hazards. Pour baking soda once a week into your sink to remedy this. If you try this and still smell sewer gas, it’s time to call the help of a professional.

P-Trap Malfunction

If you hear some gurgling noises in your drain, then there is a high possibility of the P-trap malfunction. The sound of water draining into the sink should be smooth and quiet. If it sounds bubbly or smelly, these are warning signs that something might have gone wrong with the trap.

The p-trap isolates the drain line from the fixture, blocking the irritating smells. It holds water at the bottom of the curve. So, if it becomes dry, it would cause a sewer smell to come from the sink.

How to Deal with Sewer Smell in Your Kitchen Sink

Hot Water and Dish Soap

A simple remedy to this problem is filling the sink with hot water and adding a few drops of dish soap. Let it sit for a while and see if the gurgling goes away. If not, then you might have to get your trap replaced or repaired.


Image credit: https://imagesvc.meredithcorp.io/

Baking Soda and Vinegar

Pour one cup of baking soda into the drain, followed by the same amount of vinegar, and let it sit for 10 minutes. While waiting, boil a pot of water, then pour that boiling water down the drain to flush the baking soda and vinegar. This will help eliminate the sewer gas that caused the gurgling sound in your kitchen sink drain.

Baking Soda and Vinegar
Image credit: https://images.saymedia-content.com/

Citrus Peels, Ice Cubes and Salt

Remedy your kitchen sink smell by throwing some ice cubes, kosher salt, and coarse salt into it. Once you have done that, fill the kitchen sink with boiling water for 10 minutes, then run the cold water to check if the smell is gone. Add lemon juice to give your sink basin a fresh smell.

Place a couple of citrus peels in the disposal, then grind them up with the disposal running. Make sure you run water while grinding so that you don’t end up with stuck-on food debris in your garbage disposal. If your drain is clean, but the smell persists, you might be having a plumbing issue.

Bio-Enzyme Drain Cleaner

Bio-enzyme drain cleaners are environmentally friendly because they do not emit toxic fumes like some chemical drain cleaners. They’re also safer for kids and pets since they are non-toxic, biodegradable, and do not emit fumes.

Bio-enzyme drain cleaner is mixed with water to form a powerful cleaning solution that can cut through grease, grime, and any other rotting food smell.

FAQS on Why Your Kitchen Sink Smell Like Sewage

Why does my kitchen sink smell like rotten eggs?

The reason why your kitchen smells like this is that there’s too much accumulation of grease and fat in your drains. You can wash it away by running baking soda and vinegar in the boiling water.

How do you get rid of the sewer smell in the kitchen sink?

Dump a cup of baking soda into the drain, let it sit for 15 minutes, pour half a cup of vinegar, and leave it to work for a few minutes. What you need to do next is run the hot water for a few minutes.

Final Thought on Why Does Your Kitchen Sink Smell Like Sewage

As you can see, the kitchen sink is the most used area in your kitchen, which makes it emit foul odors over time. It’s usually because of the food particles or grease that are stuck in the kitchen sink drain. As you’ve seen above, getting rid of the sewage smell is not a difficult thing after all. For rotting food smells, chemical cleaning methods are the best, but for sewer gas smells, try to check and fix your systems.


The post Why Does My Kitchen Sink Smell Like Sewage appeared first on Kitchen Infinity.

Did you miss our previous article…
https://chefbuano.com/?p=523

How to Prune Roses

How to Prune Roses

Pruning roses can be a tricky thing to do. If you don’t know what you’re doing, your plants could end up looking worse than before. One of the things that make pruning roses difficult is that there are so many different types of roses and it’s hard to know which ones need to be pruned, when, and how much they should be cut back. But if you know how to plant roses then you should also know how to prune them.

Fortunately, we provide you with step-by-step instructions on how to prune roses properly. It’s easy enough for beginners but also has some good tips even if you’ve been working with rose bushes all your life. Let’s get started!

When to Prune Roses

Pruning roses is not something you should do too often. The best time to prune these plants is at the end of winter, i.e., after they have completed their blooming cycle and right before the new one begins in spring. Dead flowers can be cut back anytime in the summer. During the flowering season, deadheading spent blooms will encourage more blooms and maintain an attractive shrub. 

Pruning is also determined by the class of the rose plant and the hardiness zones in which it grows. Also, trim longer stems after a first-killing frost to keep your roses from snapping in winter storms.

Where to Prune Roses

The most obvious areas to prune on rose bushes are those with dead or diseased plants, absolutely out of control, and those that show no signs of life. These dead canes may result from disease, pests, or just a general lack of attention.

You should only remove branches from healthy plants as much as you need to allow airflow. In addition, these plants will also need a little trim back now, and then so they don’t take over the entire garden.

To keep the rose garden looking neat, you’ll also need to trim it periodically throughout spring and summer until autumn arrives. You can even use hedge trimmers to add a finished look. The ultimate goal is to maintain a V formation or an open vase shape.

Tools and Materials

Gardening glovesHeavy long sleevesBypass pruning shearsWhite glue

Pruning Steps

Remove all Remaining Leaves

Wear gloves and pull on heavy long sleeves as you’ll be removing leaves that can cause sap to splatter. For this task, you’ll need a pair of pruning shears. Start at the bottom of the plant and work your way up, making cuts where branches grow out from the main stem. Keep in mind these cuts will stop the growth of rose flowers, which is the desired result.

Prune from the Ground Up

As you take the inventory of your rose bush, note down its overall health and shape. Then go slow while pruning the dead canes at the base and opening up the interior to light and air circulation.


Image credit: https://www.gardendesign.com/

Remove any Broken, Dead, and Diseased Material

How do you know that the wood is dead or diseased? You have to cut it, and if it is brown, it’s dead, but if it’s green, it’s living. Cut away any diseased branches. Cut them flush with the bush’s base or at a 45-degree angle, exposing their white insides. If the flesh is not white, cut until you reach the living canes.

Remove any Broken, Dead, and Diseased Material
Image credit: https://hips.hearstapps.com/

Open Up the Center of the Plant

Start pruning the center of your rose bush by removing any canes crossing or rubbing against each other. Cut them at 45-degree angles, exposing the inner flesh. Also, cut off any unneeded growth shoots growing between your rose plant’s main stems and branches.

Remove Thin, Weak Growth

Remove those twiggy canes that are thinner than a pencil. If left, these thin canes can grow gangly and produce weak growth. If they are allowed to grow, the plant will become top-heavy and fall over the next season.

Remove Sucker Growth from the Base of Grafted Roses

Suckers appear at the base of a grafted rose bush. These vary from soft, thin shoots to stronger ones that resemble a small tree trunk. Left on its own, a sucker will turn into another plant entirely and take away needed nutrients from the mother plant.

Remove Sucker Growth from the Base of Grafted Roses
Image credit: https://www.thespruce.com/

When pruning bushes after flowering is finished, stop pruning at least 2 inches above a five-leaflet leaf. When your rose bush has finished flowering, cut off weak growth and remove suckers from the base.

Prune the New Growth

Prune the remaining canes by cutting them at a 45-degree angle and about a 1/4 inch above a five-leaflet leaf. Remove the strongest cane when pruning, leaving three to five of the most vigorous canes for this season’s growth. New stems should grow in the direction of the bud, and they should grow outward and not inward.

Seal Freshly Cuts with White Glue

Cut off dead or dying wood and spindly growth with hand pruners or a knife. Cut at a 45-degree angle where it meets a new stem. Seal fresh cuts with white glue to prevent rot and cane borers from entering the plant. After you have finished pruning, fertilize your bush with rose food for new roses.

Follow with Clean Up

After pruning, make sure you get rid of the debris around your rose bush. Throw it away, burn it, or compost it so that you don’t get pests and diseases in your garden roses, such as black spots and powdery mildew. These can take over quickly if left untreated.

Rose Pruning Tips

For diseased branches, major pruning should be done in early spring. Dead branches can be red, yellow, or splotchy colored. If you don’t know the type of rose bush, then watch it throughout the growing season. If it blooms on the new growth, trim it next year while the plant is breaking dormancy.

If it blooms early on last year’s canes, then it’s an old-time type rose. So, don’t prune it until after flowering is complete. For maintenance during the blooming season, the deadhead blooms to a strong node and removes fallen leaves from the ground.

It’s best to trim roses as soon as they finish blooming because flower buds for the next season form as the current flowers fade. In bloom time, these flower shoots should be removed during deadheading, or they will go to seed and not produce any more flowers this year.

Roses that Bloom Once on New Growth

Modern roses like hybrid teas, grandiflora, and floribunda bloom best on the current season’s growth. Species roses, old roses, and once-blooming shrub roses are also more primitive types that bloom first on dead wood during mid-summer. 

All these types should be pruned in late winter or very early spring before greening up and branching. Create an open vase shape by removing the center stems and any crossing branches.

 These roses bloom more than once per season and they bloom on new wood. Leave a healthy cane evenly spaced around the plant, then cut it at various lengths to encourage blooming.

Roses that Bloom Once on Old Wood

To keep roses like ramblers in check, you have to prune them to remove dead, broken branches, and dead wood after blooming. Rams continue to bloom on old wood, so cut these roses back severely once the flowers fade by about one-third.

Everbloomers

Shrub rose bushes like the knock-out varieties, and the fairy is repeat bloomers, and they flower on maturity. Leave them unpruned the first two years to increase vigor. Then, remove 1/3 of the oldest canes, plus any dead, diseased, and dying canes. Knock-outs are ready for their first pruning in their second or third season.

Climbers like climbing roses and William Baffin Rose may also repeat bloom. So, trim it early to remove dead canes. Avoid annual pruning until summer after the peak of the bloom. Note that climbing roses have two types of roses which include main and lateral.

Everbloomers
Image credit: https://www.gardeningknowhow.com/

Main canes come from the base while lateral canes produce flowers. Lateral canes also encourage blooming. However, you shouldn’t fuss about pruning to the outward-facing bud because shaping climbing roses this way isn’t necessary.

Rose hips should also be left in the warmer climates through the fall and winter just like other roses. Do not trim the last blooms of the season; instead, remove petals. However, in colder climates, you should remove the rose hips before winter.

FAQs on How to Prune Roses

What is the best time to prune roses?

Late summer and early winter is the best time to prune roses because that’s the time new growth begins.

Which type of pruner to use when pruning roses?

Always use a good quality pair of bypass pruners or secateurs when cutting canes, young or old stems, and small branches.

Final Thought on How to Prune Roses

As you can see, pruning is vital to the health of your rose bush. It helps promote new growth and encourages flowering. It’s the type of rose bush pruning that will keep your rose garden healthy for years to come. Pruning stimulates growth and leads to more blooms and a healthier plant overall.


The post How to Prune Roses appeared first on Kitchen Infinity.

20 Best Kitchen Paint Colors You Should Try

20 Best Kitchen Paint Colors You Should Try

Painting your kitchen is a great way to give it a new look. Not only will a new paint make your kitchen feel clean and fresh, but the right color will help update the look of your outdated kitchen cabinets. However, choosing the perfect paint colors for your kitchen can be a challenge.

You have to consider many elements, such as your kitchen cabinet color. You also have to consider the color of your kitchen appliances, countertops, and flooring. You need to learn how to choose paint colors that will look great on your kitchen. 

We’ve put together this handy guide on choosing the best kitchen paint colors to make your work easier. Let’s get started!

1. Sherwin Williams Cavern Clay

Kitchens with an earthy retro 70s vibe are becoming so popular. Pair your walnut cabinetry with this beautiful terracotta from Sherwin Williams. The warm reddish color is perfect for adding a bit of spice to the kitchen. This paint works well with natural wood tones, avocado green, purplish greys, and creamy white and golden yellow with a dark neutral color.


Image credit: https://i.pinimg.com/

2. Benjamin Moore Upper West Side

This kitchen paint color is warm enough to create a little drama without feeling dark or moody. This paint also looks thoroughly chic with white kitchen cabinetry. When you’re looking for a hint of color but not stray far from quiet hues, Benjamin Moore Upper West Side is the paint color for you.

3. Benjamin Moore Gray Owl

This Benjamin Moore paints color works in the kitchen because it blends well with a range of colorful cabinetry. This paint makes white cabinets stand out, and the paint shade is also light enough to avoid closing off the feel of a room.

4. Sherwin Williams White Duck

Another best kitchen paint color to consider is White Duck by Sherwin Williams. It’s a pitch-perfect blend of beloved greige, meaning that it never feels too beige or grey as the light changes throughout the day. The neutral allows white subway to sing and provides a clean backdrop for rustic wood accents.

5. De Nimes Kitchen Color from Farrow & Ball

De Nimes is a shade from the Farrow & Ball paint line, which works well in the kitchen. The color has a touch of warmth, but it’s not too saturated or dark. This down-to-earth blue-green is among the best colors to anchor a contemporary kitchen with natural hues.

De Nimes Kitchen Color from Farrow & Ball
Image credit: https://st.hzcdn.com/

Incorporate this paint on the upper half of the wall ties together with sprawling grey-streaked marble countertops and blue-black railings base cabinets and shelves. It enables you to achieve an ultra-functional space for meal prep with a moody style.

6. Pure White from Sherwin Williams

This all-white kitchen is a modern classic. The walls and cabinetry have been given a thorough coat of Dulux paint in Pure White, making this the ideal choice of color for high-gloss cabinets that better reflect light around the room.

A combination of white and grey – such as glossy floor tiles and wall-mounted stools keeps the look contemporary. A light oak worktop also helps to introduce warmth into this otherwise featureless space, while metallic silver bar stools provide a sophisticated touch.

7. Oyster Bay from Sherwin Williams

If you’re looking for the uncluttered charm of Scandinavian but still want some all-white color palette, then bath your kitchen walls in this lovely serene shade from Sherwin Williams. And when it comes to flooring, a mix of concrete and natural wood will create a cohesive yet artistic division in the room.

Oyster Bay from Sherwin Williams
Image credit: https://st.hzcdn.com/

Flat paint in a softer grey is just one way to go with white cabinetry, especially if you have dark marble counters and backsplashes that need toning down. The grey acts as a bridge between the two distinct features of your kitchen, and it also brings a cool tone to this otherwise bright space.

8. Treron from Farrow and Ball

This is a dark grey-green that lends a touch of outdoors to traditional and modern kitchens. It acts as a complementary paint color for spaces with a lot of color going on, and it can lend a sense of luxury to a farmhouse kitchen.

A unique blue that looks more grey or green depending on your interior palette. It’s a great paint color for transitional kitchens with furniture in brown shades. The blue brings an unexpected pop of color but is still harmonious with other tones in the space.

A deep grey that evokes metal and machinery, a subtle alternative to black for traditional kitchens or transitional kitchens with dark finishes. It pairs well with brown tones, but try a blue-green like Sea Salt from Behr if you want a more complementary pairing.

9. Berry Brown Paint Color from Behr

A creamy pink-beige that’s chic and modern. This paint color for kitchen cabinets is especially appealing if you like to cook with red or pink hues, as the pale shade will complement them nicely without competing.

A warm grey that combines tans, browns, and beiges. If you’re looking for kitchen paint colors with white cabinets that will blend into a variety of settings, this is an excellent choice. The lighter off-white cabinets and lustrous hardwood floors provide balance while ensuring that the darker color of the walls doesn’t overpower the space.

10. Golden Field from PPG

This is one of the most effective kitchen color ideas to cheer up your space, especially when combined with large windows. You can uplift your kitchen space by painting your subway tile with the golden field, white cabinets, and baby-blue drapes.

11. White on White from PPG

This kitchen color scheme is very classy and simple, with just the right amount of punch. The clean white paint on your cabinets and walls will allow for a little bit of shine from the appliances and tiles. Integrate white on white walls, counters, shelves, and island stools if your kitchen feels more open than its actual footprint.

White on White from PPG
Image credit: https://www.jimenezphoto.com/

12. Glidden Red Delicious

For those of you who are fans of red, this one’s for you. It’s not the most popular kitchen color scheme, but it still manages to work well with any other colors you’re planning to use in your kitchen. The deep red tone on the cabinets is balanced with warm tones on the walls and flooring.

Pair the classic red with cabinetry in its complementary color of cerulean blue for a truly luxurious look. You can also turn down the red with a rich grey or a delicious darker brown like a caramel candy apple.

13. Sherwin Williams Let it Rain

An off-white kitchen is simple, clean, and warm. The light color of the walls reflects light around the room, making it feel larger than its actual measurements. You can always add darker accents for pop like the island or accessories.

Paint your cabinets in this soft color to give them more staying power over time. This paint color combines elements of invigorating blue with calming grey undertones to create the perfect balance.

14. The Spruce Best Home First Frost

This is a milky blue with grey undertones similar to Let it Rain by Sherwin Williams, but it is more of a true blue. This lighter color on the walls allows you to have more freedom when choosing your cabinetry and appliances. There will be less contrast between cabinets and walls, so you can choose darker colors for both without it looking odd.

It boasts of both bright and warm colors. The neutral colors create a calm and serene feel in the room, and the natural light that filters through the windows enhances this effect even more without making it too much on the eyes when you’re in the kitchen all day long. It’s the perfect foundation for a modern kitchen with rose, copper, and gold tones metallic accents. It can also pair with natural wood shelving.

15. Magnolia Homes Cinnamon Sugar

A lot of people use this paint color because it is versatile. It can go perfectly with cool as well as warm colors that already exist in the room. The color palette ranges from neutral to bright and bold, perfect for those who want to create a unique look at home by mixing and matching different elements from their interiors.

Its subtle tan base with pink notes makes your kitchen tranquil and serene. It is a great option for a light, airy kitchen that keeps its decor modern and simple yet elegant. Even though it may seem a bit dull, this shade of dark grey has a lot going on in it.

From the look of the color itself, you might think it would make your kitchen appear darker, but the opposite is true. If you have issues with too much brightness in your kitchen, this color can also help tone down or balance it out for a more calming atmosphere. This is the perfect neutral shade for those who wish to incorporate orange into their kitchens without entirely turning up the heat on their decor. It’s warm enough to provide some accent but still maintains a very relaxed feeling overall.

16. Raffia Ribbon from Behr

Capture the sun-soaked ambiance of the French countryside with warm yet rustic kitchen paint colors. This paint color helps you create the undeniable country charm in your culinary corner. After applying it to the paneled walls of your kitchen, you will notice the warmer hues underneath coming through to offer a cozy atmosphere.

17. Farrow Ball Stiffkey Blue

If you’re looking for a fantastic paint color for your kitchen, this is the best option. Its elegant and timeless color brings a natural feel into your space, plus the depth of the sea and vast sky. The tone of this color works well with other light or bright colors while adding subtle sophistication to your space. It’s also a perfect complement to colors such as green, lilac, and green.

18. Benjamin Moore Regent Green

A very dark green paint color is suitable in older homes with more traditional cabinetry. So, if your home looks old, you cannot lack a perfect paint color for your kitchen. Regent Green by Benjamin Moore is a smart choice for painted cabinets. This color works well with more traditional décor while adding warmth and depth to your space. It looks great on oak cabinets.

19. Hale Navy by Benjamin Moore

Choosing a dark blue cabinet paint color is ideal for making a small kitchen appear more spacious. Hale navy is one of the most popular Benjamin Moore paint colors that work well with oak cabinets. It’s a great complement for woods and stone or marble countertops, as well as white, grey, and yellow walls.

Hale Navy by Benjamin Moore
Image credit: https://i.pinimg.com/

It looks good in matte or satin finish mixed with matte black, which pulls on cabinets for contemporary style.

20. Benjamin Moore Classic Gray HC-170

Another great color for mid-toned kitchens is grey paint colors. Quarried Oak by Benjamin Moore is a warm grey with green undertones, ideal for cabinetry if you have dark walls and cabinets. Its warmth stops the space from feeling cold or monotone. It looks great with warm, honeyed hardwood floors.

FAQs on Best Kitchen Paint Colors

What is the most popular color for the kitchen?

The most popular color for the kitchen is grey because it’s bold, clean, and remains versatile. It also allows a neutral backdrop to add your personality with colored cabinets and kitchen accessories.

Final Thought on Best Kitchen Paint Colors

Painting your kitchen is a great way to refresh the space and give it an entirely new look. The color you choose will depend on your personal preference, but there are some colors that work better in the kitchen than others.


The post 20 Best Kitchen Paint Colors You Should Try appeared first on Kitchen Infinity.

Did you miss our previous article…
https://chefbuano.com/?p=510