Building your own outdoor kitchen can be rewarding. But you must know how to plan it and build it correctly, or else you might end up with a disaster on your hands.
DIY Outdoor Kitchen Plans provides detailed instructions on how to build an outdoor kitchen. It also offers many suggestions for planning the space and choosing the right materials for construction.
If you’re looking to build an outdoor kitchen yourself, then this is the product for you. This guide will show you how to choose the right location and design elements that will make sure that everyone loves spending time in your new backyard oasis. These outdoor kitchen plans will also give you space for your grill, refrigerator, sink, and pizza oven. Here we go!
DIY Outdoor Deck Kitchen
With the right tools and budget, you can build this DIY outdoor kitchen yourself. The included design and construction plans show you how to build a kitchen with a built-in grill, refrigerator, sink, cooktop, and storage. And if you don’t have a deck to build it on, you can always attach the kitchen to your deck or patio.
Image caption: https://placeofmytaste.com/
DIY Stone Covered Grill Island
DIY grill island is the best outdoor kitchen, especially if you have a very small outdoor space to work with. You can easily build it on a weekend when you have friends around to help you out with the construction. After finishing, you can cover it with stones to give it a fancier look.
DIY Outdoor BBQ Island
This project is a lot easier than it looks because the island is built from prefabricated modules designed for maximum structural integrity and ease of assembly. The modules lock together to form a customized grill island that can be tailored to your needs. This particular project uses a stainless steel countertop and a backsplash.
Patio Grill Islands with Fireplace
If you have any space left on your patio, you should consider including an outdoor fireplace in it. Three of the most popular designs for outdoor fireplaces are fireplace inserts, lava rock fireplaces, and stainless steel designs.
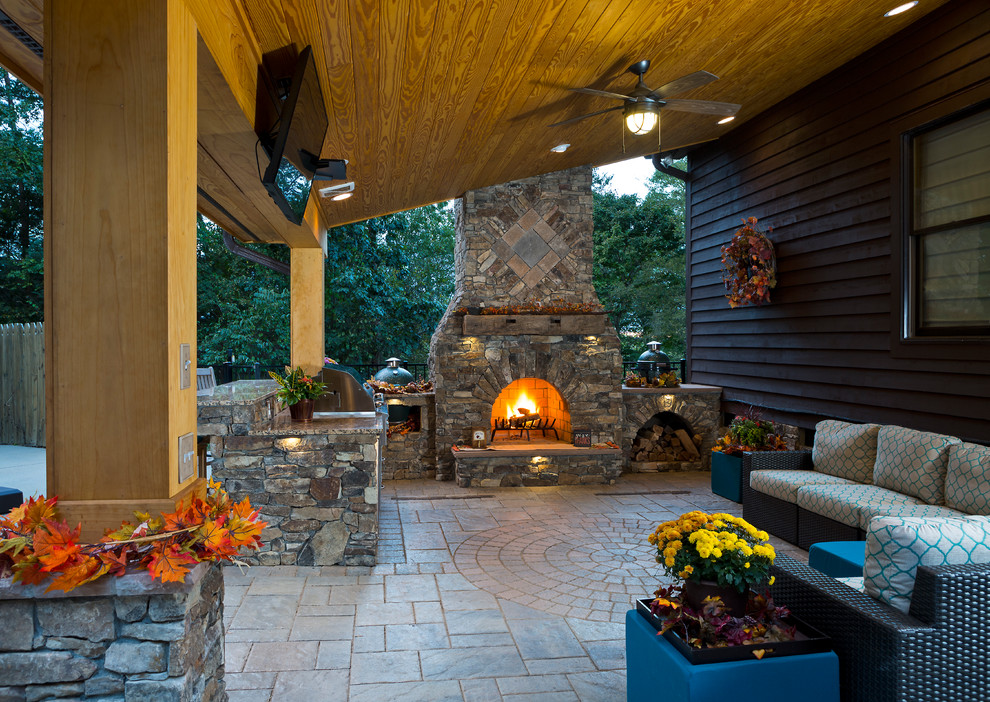
Image caption: https://st.hzcdn.com/
Outdoor Kitchen Bar with Pergola
An outdoor kitchen with a pergola overhead looks gorgeous and offers you shade during summer days. There are many different types of pergolas, but the most popular ones are the wavy style and the grapevines arbor design. However, it may take you days or even a week to complete this project. The pergola gives your kitchen a Caribbean look. You can place it at the end of your deck or build it as a freestanding kitchen.
Outdoor Kitchen with Concrete Countertops
The concrete countertops add a touch of sophistication and modernity to your outdoor kitchen. Crafting these countertops is quite easy when you know the right steps to take. All you need is self-leveling cement, wood planks for support, and a few tools that you probably already have in your home. With this outdoor kitchen plan, you don’t have to worry about elements causing your countertops to crack.
Outdoor Kitchen with Tiled Backsplash
This simple outdoor kitchen plan has a tiled backsplash that resembles the tile work of an indoor kitchen. If you’re skilled in masonry, then crafting this backsplash is easy and affordable. However, if you’re not familiar with laying tiles, hiring a professional will cost you less. And a professional will ensure you get what you want.
Outdoor Kitchen Build
Create an awesome entertaining space by turning your concrete patio into an outdoor kitchen plan. You can also bring a pergola to protect your kitchen against elements and add cabinets to store all your entertaining essentials.
Backyard Wood Fired Pizza Oven
A wood-fired pizza oven is a very popular item in outdoor kitchens. It will give your patio or backyard a unique rustic look that no one else in the neighborhood has. Pre-made kits are available for you to either buy and assemble on your own or have a contractor build them for you from scratch.
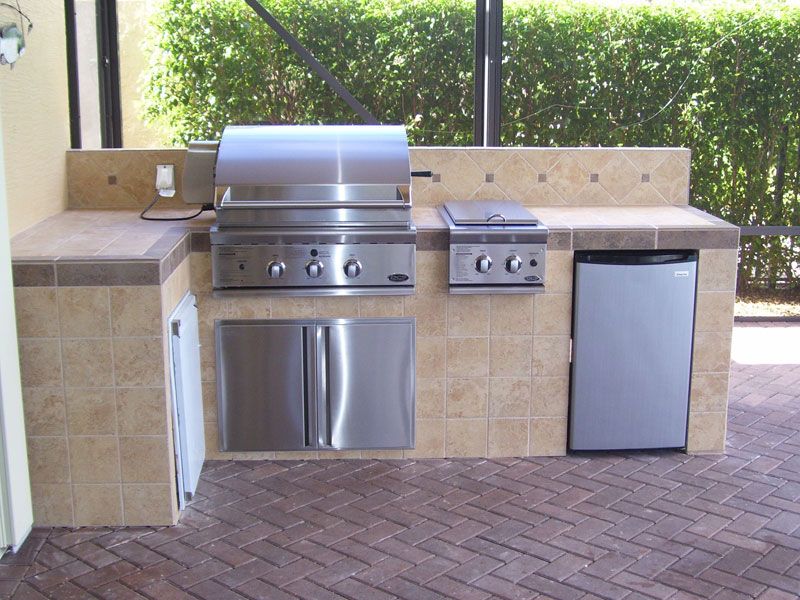
Image caption: https://i.pinimg.com/
Outdoor Serving Cart
If you’re working on a budget and not looking for a big outdoor kitchen project, then an outdoor serving cart may be the right item for you. It’s a pre-built or pre-made serving center that can either sit on your patio or be placed in a corner for more space. You can set it beside your grill to give you an extra prep space, serving area, and some much-needed storage.
Patio Storage Cabinets
If you’re serious about your outdoor grilling, then you know how important it is to have adequate storage space in your backyard. These garden cabinets fit the bill because not only do they store all of your barbecuing tools and plates, but they also add a decorative touch to your yard.
Outdoor Kitchen
DIY outdoor kitchen plan consists of custom wood cabinets, a unique counter, and a grill island. The outdoor kitchen designs take advantage of the outdoors and creates a unique place where people can gather to cook. The unique counter is designed so that it serves as both functional workspaces and integrates two table legs.
Sewing Cabinet Outdoor Bar
A bar plays a very important role in an outdoor kitchen. That said, you can turn your sewing cabinet into an outdoor bar that has a certain rustic touch. With this, there’s a big basin that you can use as a sink and fill with ice to keep your drinks cold. Other features of the outdoor sewing cabinet are a storage area for your food, extra counter space, and two drawers to store utensils.
DIY Portable Outdoor Kitchen
If you don’t have space in your backyard for an outdoor kitchen, don’t worry. DIY portable outdoor kitchens can serve as a solution for this. It’s about building a compact kitchen that has the same features as a stand-alone outdoor kitchen.
All you have to do is find a mobile workbench and add an aluminum countertop on top of it along with other needed utensils. With its portability, you can easily move it in and out of storage. And since the countertop is aluminum, it’s rust-resistant and looks good at the same time.
Rustic Farmhouse Outdoor Kitchen
You have to love the rustic farmhouse style. This outdoor kitchen is the perfect example of this kind of design. It’s quite roomy, and it has many countertops for storage purposes. The sink looks neat with its drainpipe installation, while the refrigerator is placed below it. You shouldn’t miss this in your home, especially if your home is done in farmhouse style.
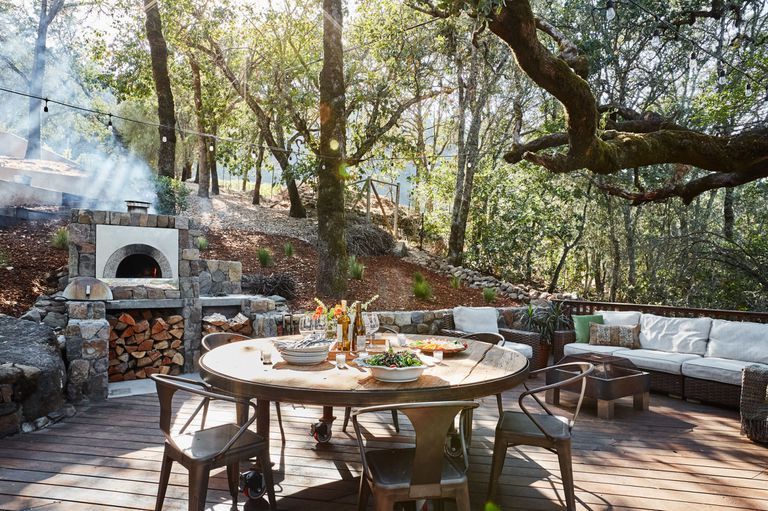
Image caption: https://hips.hearstapps.com/
Repurposed Cabinet Outdoor Kitchen
So many people love this outdoor kitchen design. And we can see why – it’s rustic and beautiful at the same time. The cabinet used as a countertop has the shape of an arch, which creates that gorgeous visual effect you can observe in the corner of this kitchen. The best thing about this project is that it doesn’t require that many resources. The whole thing is made of wood and recycled materials.
DIY Outdoor Kitchen Using Wood and Shipping Pallets
Isn’t this idea cool? It’s taking recycling to a whole new level – we love the idea of using old shipping pallets and turning them into a nice and functional outdoor kitchen. Wood pallets can also create simple counters and food prep stations. With its rustic built-ins, light wood gives your space airiness. It’s casual and fun, plus offering plenty of storage below.
Outdoor Kitchen with Built-in Grill and Sink
Stone is a classic outdoor kitchen staple, and this simple design adds modern elegance with its rounded edges and unique countertop shape. The sink is situated at one end, while the grill takes up most of the space underneath. In-between them, there’s a shelf for storage and a pot rack that also serves as home décor. This is a great way to add style to your outdoor kitchen as well as function.
Outdoor Kitchen with Grill and Island
An outdoor kitchen is incomplete without a grill, and this one is decked out with an island, bar stools, and a stainless steel sink that adds to its practicality. The island gives you extra counter space to work with, while the curved design helps it fit in seamlessly.
Food Prep Station with Crate Shelving
If you already have a grill in place but lack a prep and staging area, then this one’s for you. It provides a counter and a crate-style shelf that can be used for storage or as a serving dish. The rustic wooden top adds to its visual appeal. These crates can hold plates and dishware to get the party started.
Outdoor Kitchen with Bar, Sink, and Mini-Fridge
This combination is a full-scale dining space. It gives you enough room to spread out and enjoy your food with family and friends. The mini-fridge is a great place to store drinks, while the sink lets you clean up after dinner.
DIY Reclaimed Wood Outdoor Bar
Incorporating reclaimed wood in your kitchen countertop and base cabinets makes them look rustic. The idea works perfectly for an outdoor kitchen because it’s durable and won’t be damaged by weather elements like rain, snow, or wind.
FAQs on Outdoor Kitchen Plans
How does an outdoor kitchen add value to your home?
With their popularity, outdoor kitchens greatly improve the value of homes in the market. An outdoor kitchen is one of the most popular additions to a home when it comes to resale value.
How does an outdoor kitchen add square footage?
Typically, outdoor kitchens are custom-designed with either a grill or a stovetop and a sink. Installing this type of kitchen in your backyard adds extra square footage to the home.
What types of kitchen materials are used for outdoor kitchens?
Several different materials can be used for outdoor kitchens, including stone, brick, and metals. And some homeowners even opt for wood material to get a rustic feel.
Final Thought on Outdoor Kitchen Plans
As you can see, there are plenty of outdoor kitchen ideas. Some are simple and more budget-friendly, while others are more complex and expensive. So, get started on building your DIY outdoors so that you can have a place you can relax and enjoy together with your family.
The post Outdoor Kitchen Plans appeared first on Kitchen Infinity.
Did you miss our previous article…
https://chefbuano.com/?p=283