How To Get Rid Of Voles

Voles are small rodents that live in the wild. They can be destructive to your garden or yard if you allow them to stay there. This article will help you identify voles, why they’re attracted to your space, and how to get rid of them for good.  Let’s get started. 

How to identify voles

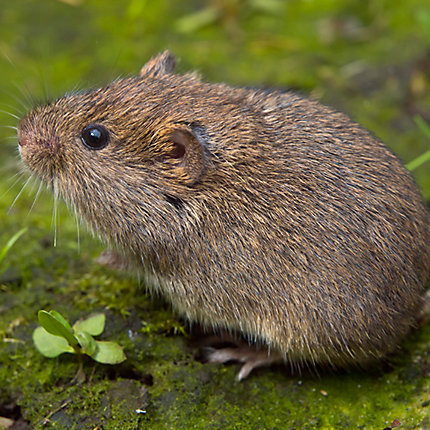
Voles are small rodents that measure about 5 – 7 inches in length.

They can be identified by their small bodies and short tails, which make them look like rats. They also have rounded ears and small eyes for such a large rodent. 


Image Credit: http://almanac.com

Their fur is typically brown or light grey with reddish-brown underbellies. They may sometimes have black or white flecks on their coats as well depending on the species and where they live and what they eat. Voles can be found everywhere from Alaska to central Mexico. They prefer moist environments so you’ll find them near rivers, creeks, ponds, marshes, bogs, and other water sources because this is where they find their food (plants) and shelter (underground burrows).

So how do you know if you have voles in your yard or garden? If you think about it, voles are typically not found in yards; they usually live in undeveloped areas near water or moist soil to get their food (plants) and shelter (underground tunnels). This means that if you find them in your yard, there is probably something attracting them to that area.

Some common “attractions” for voles

Healthy Lawn

Voles are attracted by a healthy lawn with well-watered and fertilized grass. Voles love grass so they eat it and make tunnels underneath to create homes for themselves. If your lawn is well maintained and you water and fertilize frequently, this can be a big draw for voles.

Compost piles (whether they’re decorative or functional)

Voles eat plant materials (not meat) so compost piles are ideal for them as those piles contain old plants that have begun to break down.

Plants with edible root systems such as strawberries, tomatoes, carrots, and other root vegetables like these

Some people also report having problems with voles in their gardens where they grow fruit trees and berry bushes; these plants may produce fruits or berries that voles like too.

If you think about it, all of the attractions listed above include some form of vegetation, so naturally, voles would gravitate towards these areas. There could be other things around your yard attracting them as well – it only depends on what you have.

Consequences of having voles around 

The most obvious consequence of having voles in your yard is the damage they can cause to the plants and soil. Voles like to eat succulent plant roots (and sometimes even munch on the leaves). Their burrowing under the ground can break apart irrigation systems or kill tree roots. Their tunnels may also leave divots in lawns that are unattractive and hard for grass to grow in. They often “vacuum” up all of the mulch off of flower beds (which would otherwise be healthy for plants to grow in).

Since voles are so small, they can squeeze through tiny holes and cracks. This means that if you have a fence around your yard, they could find their way under or over it easily. They don’t need much space – just enough room for them to fit through without getting stuck. This is especially concerning for people who do not want rodents on their property because once the voles get underneath something like a fence, it’s very difficult to remove them. 

In a way, the same information you use to get rid of voles can be used to keep mice out of your house – since mice also can find their way into your house through holes and cracks in the foundation, your best bet for maintaining a pest-free space is to seal up any openings you see. If you think about it, having voles in your yard means that they could potentially get into your house through small cracks or holes in foundations or walls.

So how can you stop voles from coming into your yard/garden?

The first thing you should do after reading this is to go on a “vole patrol” near the area where you noticed them; walk around and see what types of attractions they like (if any). Some people don’t notice their yards having damage until they see signs of voles. You can use this knowledge to selectively apply repellents in certain areas of the yard, so they won’t be in your garden or near plants. Then you can go on a “clearance” patrol in areas where there are signs of voles but they aren’t currently in your garden or lawn.

What really works when it comes to getting rid of voles

Aside from trapping and killing voles, prevention is really the best solution. That means keeping your yard maintained properly – do not water more than is necessary, let the grass grow long enough that it can be cut (otherwise you’re just giving them more places to hide), fertilize only when necessary (not every month.), keep compost piles away from attractions like plants, etc. If possible, remove anything that voles may like from your yard (to the extent that this is possible).

Lastly, you can try to use repellents. Although these are not as strong of a solution as the ones listed above, they can help reduce their numbers or make them move elsewhere.

A couple of examples: 

Apple cider vinegar – this has a strong smell that voles do not like. You could mix it with water and spray it on plants that have signs of vole damage – just be careful because if you leave the mixture on for too long it will burn plant leaves. 

Mothballs – yes, those things we always keep in our closets to repel moths actually work against other rodents as well. To use them as a repellent, scatter them around the yard – away from plants.

What kind of damage do voles cause?  

Voles eat away at grass or garden roots so walking through the affected areas may reveal some missing chunks of grass or other plant roots. Walking through your yard may also allow you to see any tunnels that voles have dug, which are usually big enough for a mouse to fit in.  If you notice any of these signs, chances are you’ve got voles.  

Voles can cause a lot of destruction in a short amount of time and they’re difficult to get rid of – but if the right steps are taken (like sealing up all holes in your foundation or fencing), it’s possible to make sure they stay out.

How to Get Rid of Voles | Vole Removal
Image Credit: http://havahart.com

Equipment – what do I need? 

Get yourself some protective gear while trying to get rid of voles. Voles are small and might run away from you, but they can also be pretty fast and it never hurts to protect yourself – who knows if they might decide to bite? A good idea is to wear thick gloves and an old long-sleeve shirt. Another reason why this is a good idea is that voles have musk glands that produce a strong-smelling fluid – this can get on your skin or other areas of exposed skin so you should take proper precautions before touching anything.

You probably won’t need much more than that, but if you’d like you can use things like shovels, brooms to help yourself out. 

Traps… where do I find one?

There are many traps made for catching voles, but it’s best to avoid using poison as that will leave a lot of dead bodies and the smell may attract other animals.

Some traps you can find online:

Snap trap – this is what we’re most familiar with because we see them on TV all the time. Just be careful not to catch another animal in your home/garden by mistake – some people use these as preventative measures more than for actually catching voles.Harpoon or spear-type trap – this one stabs the vole when they go over it so you don’t have to touch it. It can be quite effective if done right.Box trap – this is a simple one that only catches voles inside. There are also larger traps that can catch many voles at once, but they’re bigger and you’ll have to purchase them online.Glue traps – these are not my favorite because they tend to catch other animals (birds, lizards, etc.) but if you don’t mind them this is another option. These can also be used when it comes to getting rid of roaches in your apartment

Many people use old mouse traps and boards with peanut butter to catch voles – this is a good idea because these are much easier to find. The only thing you have to be careful about is that if you leave them out overnight, other animals may get caught as well.

Be sure to check your traps daily and dispose of the bodies. If not, they’ll start smelling pretty bad.

Final thoughts on How to get rid of voles

In conclusion, if you have a problem with voles, I hope the advice in this article was enough to help you solve it. Voles can be a real nuisance but if you use good practices and make good decisions in every aspect of vole control, you will quickly get rid of them from your yard or garden for good.

The post How To Get Rid Of Voles appeared first on Kitchen Infinity.

Did you miss our previous article…
https://chefbuano.com/?p=176

Why You Need To Install Faucet Aerators

You are a homeowner, and you want to make sure that your home is as functional as possible. With the rising cost of utilities, it can be hard to keep up with your utility bills. One way of lowering high utility bills is by making simple changes in using water around the house.

The good news is that there are some effortless ways to reduce your water usage without sacrificing comfort or convenience. Aerators are one low-cost option for reducing your water consumption at home, saving money on heating and cooling bills.

Installing faucet aerators is an effective solution for lowering your household’s overall water usage. By installing aerators on all of your bathroom faucets and kitchen sinks, you will see significant savings each month as you’re able to control the flow of water.

Here are the common benefits of using faucet aerators:

Reduces the Risk of Lead Exposure

Traditional faucet heads with separate hot and cold water control knobs allow cold water to run after the hot water has been turned off. This typically causes a small amount of lead-containing particles from the interior pipes and faucet fixtures to be mixed with cold water at the tap, affecting your health if not filtered properly before consumption.

Therefore, it’s important to clean your aerators every six months because lead can flake off lead pipes and plumbing and get into your drinking water.

erators Help to Remove Debris After Construction

If you use an aerator screen, it can catch dust and debris after construction. Aerator helps to filter debris to reduce additional charges for homeowners with meters. Soaking your clogged aerator in vinegar can help remove dirt and clogs.

Cleaning your clogged aerator can help flush out lead particles and other contaminants that accumulate after time. Anaerobic bacteria can build up in aerators and lead to smelly kitchen sinks. The good news is that cleaning the aerator only takes a few seconds of your time, saves you money on plumbing bills, and eliminates household odors.

Improves Water Flow

Another important benefit is that your faucet aerator will receive a new neoprene gasket. Gaskets can crack and fray over time, so installing a new gasket can help you turn the water on and off more easily.

Maybe your faucet is suffering from low water pressure because of dirt and debris in the aerator. Not only does this make washing dishes difficult, but it could damage your appliances if they work harder to pull water through a restrictive feed line. Removing and cleaning your aerator more often will help you reach the perceived water pressure.

Helps You Save Money

A clogged aerator may be restricting water flow, causing less water to reach the end of a faucet extension cord. This will cause you to use more water to clean the dishes and surfaces you’re working on, which can cost an extra penny or two in water bills. An aerator helps to conserve water, hence lowering your water bill.

This is a small price to pay when you consider the damage that could occur over time if your faucets reach their maximum pressure capability with a clogged aerator. Washing hands and rinsing dishes can be done more efficiently with aerators in place because it allows you to adjust the water pressure precisely. This makes it great water saving feature in your home.

Another thing people don’t think about when they replace their faucets is that new faucets are at different heights than the old ones. New faucets also help you on saving soap since bubbles activate soap faster, hence reducing the amount of soap needed when doing dishes.

Decreased Faucet Noise

Noisy faucets are not only disgusting, but they’re also disruptive. However, an aerator increases the air in the water stream as it’s released, which can help muffle faucet noise.

These water streams help in reducing water noise which is achieved through the mixing of air with water. As the water flows through the faucet, the aerator breaks the stream of water into several smaller streams, allowing air to be mixed. Therefore, the mixing of air and water creates a calming effect on water noise.

Increased Filtration

Apart from being a flow restrictor, an aerator contains small screens which increase particle filtration for a single faucet. A small screen aerator can work with your filtration system to keep your water clean and clearer. But if you often have dirt and debris problems, clean them regularly with a towel to ensure proper aeration.

Reduced Splashing

If there’s uneven flow in your faucets, you may get splashing which not only makes your kitchen wet but also damage your shower faucets and any appliance below the faucet. Low flow aerators can reduce splashing because it makes the water stream less powerful.

Aerators protect your plumbing by restricting flow through a smaller passageway, reducing strain on internal components. Less pressure not only allows you to save water but your faucet takes a long duration without wear and tear. An aerator regulates the amount of water in your faucet, making your kitchen and bathroom dry and neat all the time.

Simple and Quick Installation

While many home optimizing renovations can take you time and disrupt your daily activities, installing an aerator can take a few hours or minutes. With professional advice, you can install an aerator on your own using a few tools.

Bigger Life-Span

Aerators help you save on cost and time by protecting your internal pipelines from damage resulting from excessive pressure, saving hundreds of dollars in the process. They also protect the faucet’s exterior, giving it a longer life span. Aerators are also less likely to result in blockages, the common cause of most faucet repairs.

How to Install Faucet Aerators

Remove the Old Aerator 

It’s important to check for sediment buildup in the aerator, which can restrict it. Then, close the stopper on the sink basin to prevent spills. You can flush out sediment by running warm water through the aerator and shaking it. Make sure you stop the basin to avoid losing parts down the drain.


Image caption: https://faucetsrated.com/

Then, turn off your faucet and slightly loosen the body of the aerator to release any pressure that may have built up. Grab a towel or wear work gloves before removing all corrosion or mineral deposits on the drain. Use a wrench or pliers to remove the faucet aerator. But do not use a wrench to turn off your faucet collar.

Install the New Faucet Aerator 

Put the new aerator into your faucet and hold it in place while you tighten it down. Test it by running water in both cold and hot water directions very slowly to ensure no leaks. If it has leaks, you need to check the faucet aerator for any problems before properly installing it. You can also take your time to learn how to fix a leaky bathtub faucet

Install the New Faucet Aerator 
Image caption: https://www.thespruce.com/

After that, remove the old aerator. Once you’ve taken it off, take it apart and soak it in vinegar for some minutes, then scrub the parts with an old toothbrush.

Install the Aerator Gasket

Ensure you place the aerator gasket on top of the faucet. Insert the Hand Tight Connector into the aerator gasket and then place the whole thing onto your faucet’s threads by turning it counterclockwise until it feels snug against your faucet. This may be difficult to do, and you might want to enlist a helping hand for assistance.

After that, use your fingers to tighten the screw about another half a turn further. At this point, it should be as tight as you can get it with your hands, and you should still be able to operate the handle without any resistance.

FAQs on Benefits of Installing Faucet Aerator

How often should you change faucet aerators?

Aerators are small screens made of metal or plastic then fitted onto faucets. They can get blocked after repeated usage with minute particles of dirt, sediment, rust or lime. Regular cleaning with a towel or soaking in vinegar is important for maintaining your aerator’s functionality. You should also replace it when it is worn out or damaged due to years of use.

Can you remove a faucet aerator?

Faucet aerators can be removed without too much difficulty if they are not stuck or rusted. But, it is important to remember that you should stop the water flow before attempting any such thing on your faucet.

Final Thought on Installing Faucet Aerators

An aerator is an important part of a faucet. So, if you want to use your faucet at its full potential, make sure the aerator is replaced on time and functional before each usage. If you see your water flow restricted to a trickle, it might be clogged with dirt.

You can clean a clogged aerator by soaking it in vinegar for a few hours. You might also opt to install a new aerator, given that it’s quite inexpensive to install. 


The post Why You Need To Install Faucet Aerators appeared first on Kitchen Infinity.

How To Install Pavers

Installing a paver is a lot of hard work. It’s not as simple as laying down some bricks and calling it good. Pavers are an investment, so you’ll want to do everything you can to protect your investment and get the most out of it. 

When installing pavers, there are a few essential things you need to put in mind. If possible, use pavers with rounded edges instead of sharp ones; this will help prevent injury if someone falls on them. Also, make sure the joints between each paver aren’t too wide or narrow; they should be about 1/4″ apart from each other for optimal support and stability. 

We’ve listed our top 10 tips on how to install pavers below. We hope these tips help in your home improvement journey.

Gather Your Tools and Materials

Before you start installing pavers, you’ll need to make sure you have everything you need on hand. These include all of the tools and materials suggested in the pavers packaging. Before you go to that, you might also consider taking a break to learn how to organize tools you have at home. Well, the tools you need for your paver instalment include:

String lineGravelConcrete sandRubber malletPolymeric sandPlate compactorLevelShovelHand tamperJoint sandSealerClass ii road baseConcreteCircular sawPush broomConcrete blade

Prep Your Site

After gathering your tools and materials, you need to prep your site. Remove any weeds or grass in the area where you are going to install pavers. Then, smooth out the ground with a metal rake. Don’t use a wooden one because it will create splinters that end up hurting your feet when walking on them.


Image caption: https://diy.sndimg.com/

Before that, make sure you contact 811 or digline before digging to ensure you don’t hit any utility wires. Remove any grass or existing hardscape where you’ll be laying pavers. After removing grass, grade the area using level at a two percent slope to ensure proper drainage.

Make sure there’s a strong sub-base to make your paver installation long-lasting. Use a tamper or plate compactor to compact the sub-base to increase strength. You can also rent these machines from Home Depot or Lowes. Paving stones cannot lie on the dirt, so make sure you excavate.

You can also use geotextile fabric to ensure you don’t have any clay soil mixing with the sub-base. Sweep excess dirt off after grading and compacting, so you can put down pavers right away. Fill the excavated site using the correct amount of paver base material, then compact it using a vibrating plate compactor.

Place the Foundation

Once you’re done with prep work, lay down the foundation for laying pavers. Use string lines to make sure your stones are evenly separated. Pour your class II road base if you’re planning for a larger patio. Compact the road base with a plate compactor to make sure it’s solid and do not provide support to your pavers if installed in future.

After laying the road base, make sure it’s leveled with a straight 2×4 piece of lumber. It should be level across the width and length. Use a carpenter’s level to check this.

Pour the Bedding Sand and Screed

Use clean, sharp and deep concrete sand to fill up the spaces between your pavers. Bedding sand also acts as bedding for your pavers, so make sure it’s packed well with no voids at all. Place screed pipes across the patio every 2 feet to keep the sand level as you pour.

After that, spread a layer of your bedding sand across your screed pipe so that it’s completely filled. Use a straight 2×4 as a guide for this. This will help you avoid compaction before you place pavers. Position yourself between the pipes, then place the wood 2×4 perpendicular across the screed pipes. Make sure you sand the level more accurately by slowly pulling and sliding the wood 2×4 towards you. This process will leave you with a one-inch layer of sand.

Once you’re through with pouring bedding sand, remove the screeding pipes and fill the void with the sand. Make sure that the sand is even and flat across the area then, use a scraper to give it a smooth finish. Don’t worry about using too much pressure on the screeding pipes because you’re going to remove them anyway.

Lay Down Pavers

This is the main part of the job where you need to lay down pavers along your desired path. Make sure that the first paver is positioned adjacent to the end of the screeded edge. Place it onto a bed of sand, then use a rubber mallet to push it into place.

Lay Down Pavers
Image caption: https://premierpavers.com.au/

Before laying additional pavers, make sure that you spread another layer of sand using a metal rake. This will help you to level out your pavers and achieve a professional-looking path in the long run. There’s an endless number of paver patterns you can choose from depending on your paver materials. Make sure you lay the desired pattern out on the ground before you install the pavers onsite.

You may also trim your edge restraint or concrete border. Use a diamond masonry blade or saw to cut pavers along the top edge. If you have a circular paver, consider using a metal paver cutter for accurate cuts. Now that you’ve laid your pavers make sure to add sand in between each paver and level them out again before wetting the sand with water from a garden hose.

Cut Down the Border Stones

After establishing the paver pattern, you can now install the border stones that act as barriers between your path and lawn. The easiest way to cut down these stones is with a diamond blade-type masonry saw. You can also use a circular saw with a concrete blade.

Make sure you wear eye and ear protection as the latter is more hazardous. In cutting down these stones, use a marker or chalk to mark the area where you plan to make your cuts. Be careful when cutting border stones to avoid sharp angles and edges.

Install Edge Restraints

Stable edge restraint is necessary for laying paving stones. There are various types of edge restraints, but the most common is black plastic or steel. Once you have marked the border, snap it out like you would with a piece of chalk. It’s quite recommendable to use snap edge for better results.

If there’s no paver edging, you can install pre-manufactured steel or plastic side restraint. Another method is to use a strip of asphalt felt, cut to the width of the paver stones and place it under the stone. The edge restraint should be installed in such a way that it will be flush with the top surface of pavers once laid down.

Vibrate the Pavers

After the entire paver and borders are installed, run the plate compactor on the side of it and give it a few practice rounds. Vibrate over the entire area that is to be paved with pavers. You can rent a vibrating plate compactor from your local home center.

Drive over the entire area with a car to make good contact between pavers and gravel base layers. If you did not compact the paver beforehand, drive over it slowly after laying it down to compact it beneath your tires. It will settle little by little since there is no weight on it.

Sand the Pavers

Pour joint sand or polymeric sand over the paver, then use a leaf blower to sweep away excess joint sand so that it is even with the top of the stone. You can also use a vibrating plate compactor that you rented from the home center to sweep the sand into the joints.

After verifying that a pad can be used on your plate compactor, place the pad on the compactor and set it to medium weight. Do not use a high weight because you do not want to crack your paver. Sweep the sand into the joints with the plate compactor until they are even with the paver surface. Failing to use a pad can result in a significant amount of damage.

Maintain Your Paver Project

Once you’ve finished, maintaining your paver project should be much easier than getting it done in the first place. Keep all surfaces clean and dry with regular sweeping. Use a broom instead of a hose to keep water out of the joints.

Before you fill your new patio pavers with water or bring in outdoor furniture, waterproof it to keep the water out of your project. If you fail to do this step, you may find that all of your hard work has been for nothing. 

Also, to ensure your patio pavers withstand the test of time, apply a paver sealer to the tops of each paver. Finally, ensure any furniture you place on your patio is level so you don’t damage your patio pavers. Make sure it’s completely dry before applying a sealer.

FAQs on How to Install Pavers

How to Install Concrete Pavers?

To install concrete pavers, all that is necessary is some basic information about the size and shape of your patio. Consider the pattern you want to the layout before tackling the installation process with this information in hand.

Can you lay pavers directly on dirt?

Yes, if the dirt is free of large rocks and vegetation. However, it is important to level out any low areas in the soil for a successful installation. It’s also advisable not to directly lay pavers over dirt. For pavers to look and perform well in your permanent patio, you need to excavate, level and hard compact the ground.

What do you put under pavers?

You can lay pavers directly over that is slightly raised as a result of tree root growth or simply on dirt if you have already excavated and leveled the area. In addition to these base materials, you must install a layer of sand between the soil and paver surface to ensure proper water drainage.

Final Thought on How to Install Pavers

As you can see, installing pavers is easy. However, the material is heavy and does take considerable time to remove or install. Just make sure that you are well aware of your ground conditions before you begin pavers installation in order to prevent serious injury.


The post How To Install Pavers appeared first on Kitchen Infinity.

Did you miss our previous article…
https://chefbuano.com/?p=173

How To Identify Baby Birds

Identifying baby birds can be a challenge as they grow, change their feather length, color and mark in just a few days. It can be confusing to figure out how to identify baby birds if you are not familiar with the species. Just remember, in most cases, you can identify baby birds by learning their parents’ distinctive traits. If you love gardening, you might have come across many bird species in your garden and you know quite a number.

In this article, we give you a detailed guide and tips on how to identify baby birds. Let’s get started! 

Types of Baby Birds

Hatchling

A hatchling is a baby bird that is new to the world. Hatchlings cannot leave their nest without assistance and will rely on their parents for food and warmth through the next few weeks. Most hatchlings don’t have feathers and will remain in the nest while their parents care for them. They’re completely dependent on their parents.


Image caption: https://www.thespruce.com/

They’re generally naked with a few wispy or downy feathers on their bare skin. Their eyes are closed, and their beaks may seem large to their head. Finding them out of their nest should be a concern because they can barely do anything like human infants.

The best thing to do if you see them around is to spot a nearby nest and return them. Gently pick the baby bird and put it back into the nest with other siblings, and then walk away. If you can’t find the nest or it has been destroyed, put some dry grass and leaves in a loosely woven wicker basket and lay your hatchling there.

The basket should have a few holes over the top so they can breathe. Hang the basket in a nearby tree and quiet place away from where it got out of its nest and walk away. This will give the mother bird time to return from her hunt and recognize her baby when she returns.

Nestling

A nestling is a baby bird that has feathers but cannot fly. It’s the stage of a baby bird a few days after hatching. They’re not new to the world like hatchlings. They may have down feathers and eyes open but still cannot live without their parents, but they can take care of themselves better than hatchlings.

Nestling
Image caption: http://www.gibsonswildliferehabcentre.org/

If you find healthy nestlings on the ground, the best thing to do is to put them back in the nest with their siblings. If that option isn’t there, create a make-shift nest with nearby leaves and grass.

Fledglings

At this stage, baby birds are ready to leave their nest and strike on their own. They don’t need much parental care like hatchlings. A fledgling bird has adult feathers, although they might not be fully developed. They might not be able to fly yet, but they can hop, walk, and run.

Fledglings
Image caption: https://www.thespruce.com/

They’ll leave their nest to search for food and practice flying. Since they’re good hunters, it’s best to just let them be and not bother them. Unless it is in immediate danger from humans or predators, don’t interfere.

It might take a few days before they get used to finding food, but the parents will always be there watching over them from afar, ready to help if needed. But there’s nothing wrong with helping a lost or stuck baby songbird. However, it’s important to help the chicks in safe ways, not endangering yourself or them.

Juveniles

This is the final stage before baby birds become adults. Some are ready to leave their parents, while some choose to stay with them for pre-mating rituals. They may fly well, but they cannot live on their own without parental guidance. They have features similar to adult birds, like wing feathers, which enable them to fly independently.

Juveniles
Image caption: https://cdn.birdwatchingdaily.com/

The first step of identifying the species of your baby bird is to be sure if it’s a juvenile bird. Some juvenile birds have the same features as fledglings, but characteristics such as bill size, feather length, color, eye size and behavior will help you differentiate them.

Tips on Baby Bird Identification

Observe the Types of Baby Birds

To understand whether the young birds are hatchlings, nestlings or fledglings, you first need to observe their feathers. Young birds don’t have full-grown feathers, and their tails are stubbier than that of adults. Some feathers may be underdeveloped, exposing their bare skin.

When it comes to color, many bird species have different colors at a young age. Juvenile birds have drab and dull plumage similar to an adult female. As these young birds grow, their color becomes shinier to keep them out of danger. They camouflage, so if you want to identify them easily, look for their color.

The behavior of the young bird should also help you identify the type. Young birds tend to draw the attention of their parents by adorable behavior. They beg for food or flutter their wings whenever they’re around adult birds.

Eye Size and Bill Size

If you want to identify the type of baby bird, pay attention to its eye and beak size. If it has a smaller eye in proportion to the beak, it’s more likely a hummingbird. But if you have an example with larger eyes than its bill, then probably they are about five days old when they leave their nest.

Juvenile birds have beaks that seem too large for their head. On the other hand, fledglings and nestlings have bulging eyes that look too big for their heads. This isn’t noticeable with birds that are about to leave the nest.

Observe the Nest

Finding out the types of young birds can be a daunting task as chicks have distinctive characters than their parents. If you find the litter near the nest, then you can recognize the nest type. Several bird species make nests differently.

For example, owls make their nest in wood cavities, while sparrows make nests on the ground under bushes or small trees. You can also see what kind of material is being used to build the nest

Observe their Physical Appearance

Physical appearance shows the difference between an adult bird and a young bird. Identifying the type of baby bird at this stage is very critical. But you can look for some markings, plumage features and other bird characteristics to help you out. For example, the under-developed flight feathers are visible at this stage in young pigeons.

Consider the Geography

You can determine the baby bird species by learning their geographical location. If the bird is found in small numbers or one, chances are it might be a young bird of that species. Another easy way to identify a baby bird is to see what adult birds it stays near. Most young birds follow their parents to beg for food and even imitate their behavior. So if you see one species stay near another, you can safely assume that they are the young ones of the latter.

What to do if You Find a Juvenile Bird

Determine if the Baby Bird Needs Your Help

Young birds try to leave their nest a few days before they can fully fly. But that doesn’t mean they need your help. Their parents are always within and watchful of their every move.

If you come across a motionless bird with its eyes wide open, leave it alone even if its parents aren’t around. It might be feeling threatened by your presence. But if you see evidence of physical injury, making them unable to move, then transport the bird to a wildlife rehabilitation center or veterinary clinic.The injured bird cannot move, so help it.

Return it to the nest

If the bird is too young to have left the nest and cannot move, carefully return it to the nest. Adult birds cannot abandon a baby that humans have handled, so returning it to the nest is the best way to reunite the baby with its parents. Place it gently back into the nest, and watch from afar for about an hour. If no parent bird comes to retrieve the chick within an hour, try to contact a wildlife rehabilitator or animal clinic.

Keep Children and Pets Away

Keep children and pets from disturbing the baby bird. If cats or dogs are harassing the bird, pick it up carefully with a towel and place it in a nearby shrub. Too many observers may also scare away birds, so only allow adults to handle the bird.

Do not Hand Raise a Baby Bird

Unless you’re a licensed wildlife rehabilitator, it’s illegal to hand raise wild birds in captivity. In addition, hand-raising wild baby birds can be time-consuming as nestlings need to be fed after every 15 to 20 minutes. The birds require around-the-clock care because of their high nutritional demands, which is nearly impossible to provide by untrained people.

Call for Help

If none of these methods works, you may need to contact wildlife rehabilitators or animal clinics to ask for guidance on what to do. Wildlife rehabilitators are licensed individuals trained in the proper handling and care of sick, injured, or orphaned wild animals. These people can make sure that the bird is fed properly and be able to release it back into the wild once it’s ready.

Final Thought on How to Identify Baby Birds

Baby birds are so delicate; therefore, you need to attend to them with utmost care. Identifying these young birds through their types is more comfortable considering the above observations. However, interfering with their natural habitat is not advisable. Instead, provide them with a proper nest then inform the Wildlife Commission Authority for their relocation.


The post How To Identify Baby Birds appeared first on Kitchen Infinity.

Did you miss our previous article…
https://chefbuano.com/?p=169